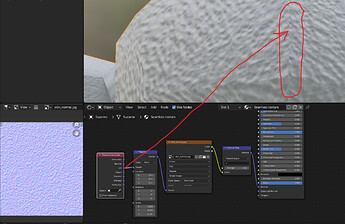
Weird question but it seems like I don’t get how it works. I want to add some micro detail for my character skin for close shots. I am using noise node to add some bump. I plug noise node to bump node and plug it to normal input of principled BSDF, From Geometry node object output to vector node of my noise node so my noise texture is spreading very nice along whole character surface without visible seams and stretching, now I’ve read procedural textures eat extra computing time so I thought I need some optimization. Instead noise node I take seamless texture plug object output from geometry node to it’s vector and then my texture is ugly stretched at some areas. If I change object to UV then stretching is gone but I get seams at places where UVs is separated (UV islands). So my question is: is it possible to apply seamless texture same way as procedural textures without seams and stretching? Or I forced to stick only with procedural textures?
You need something called Triplanar Mapping:
In Image Texture Node change “Flat” to “Box” and you’re set.
Thank you for reply. It seems like that what I need. This is the solution!
I would like to add a little warning about box mapping: it only works on non deforming objects, on a deforming object, the texture wouldn’t follow.
If you want to use this on a character, you will have to bake it to a regular UV mapped texture.
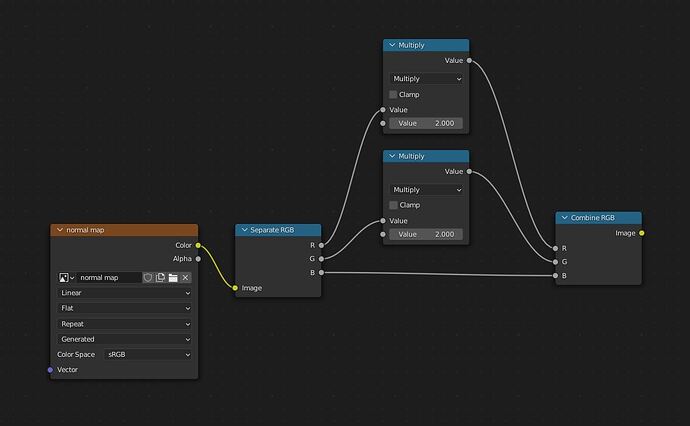
You have to split the normal map into its individual RGB channels, multiply the strength of the R and G and then recombine them together.
You would need to map procedural textures to use UV coordinates, so yes, you would still have to deal with seams and stretching.
There are ways to completely get rid of those issues.
For the stretching, a common fix is to UV unwrap your model with a checker texture applied to it, so you can see the deformation in real time and fix it before you ever start to texture the model. Maybe you need some extra seams to relax the heavily stretched parts, or maybe the minimize stretch tool would help.
For the seams, I believe lots of big productions actually just bake enormous textures, often using UDIMs to make it more manageable.
Apart from that, there is a more complicated method, where you give your model 2 different UV sets with the seams placed in different spots and then use a painted mask to cover one set’s seams with the other in the material.
But my test tells me that box maping (with generated UV) is working with armature modifier.
P.S. Damn I was wrong. When looking more closely I see that at some angles of deformations texture isn’t follow mesh deformations it’s hard to explain but definetly it doesn’t work well even with blend option set to 1. ![]()
P.S.S. And after more testing I found that procedural noise texture is working well. No seams no stretching, and it follows mesh deformation.
Probably I better leave it as it is.
It does kinda work in “generated” coordinates, I just don’t like using it because it can stretch your texture depending on the shape of your model and it can be hard to work with.
You are right. It kinda work at first glance but looking more closely you will find those ugly stretchings. I wonder how then procedural textures are working? And why some people say you have to bake procedural textures for optimizing. But if I gonna bake this noise texture I will need huge map plugged into normal map node - how this will be optimization?
When people use procedural textures, a lot of times they will do very complicated setups, with multiple textures mixed together, modified by color ramps and math nodes and using various painted masks to place the textures over different parts of the object. Those kinds of setups can get really heavy. Also, some procedural textures are heavier than others.
Procedural textures are made purely of maths. This means they have a very low memory use, but are heavy on performance and render time. Image textures are the opposite: they are all pre-processed and cached and require little render time, but they take space in memory.
if you are using a pretty simple setup with a basic noise and it’s working, I would say just go ahead with that.
Yeah I have single noise texture and couple of color nodes after it to control it’s contrast. Thank you for detailed explanation how procedural textures are working. In my case (simple noise texture scaled hundred times covering whole mesh) there is no sence to bake procedural texture so I will stick with it.


