Could someone please explain to me - as I am still a noob when it comes to rigging - why bones have roll even when it appears they are not rolled?
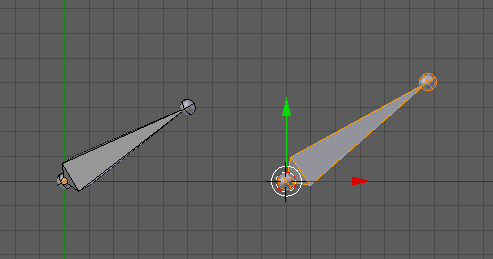
What I mean is - see the active bone on the right in this screen shot…
I recalculated the roll, expecting that would set the roll to zero.
Now it has a roll of 168.51 degrees, yet from the octahedral bone shape we can see the bone does not appear to be rolled about its longitudinal axis. Instead it appears parallel to the grid.
Also, if I move the tip the roll value changes, even though the bone remains parallel.
Clearly I don’t understand what “roll” actually is.
For those who understand the concept of roll, what was it that made you “get it”? Please share.
It is all down to how you constructed the bone in the first place!
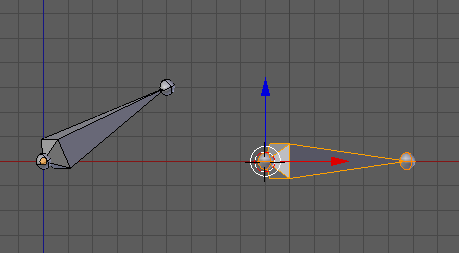
Take these two bones, viewed in Top and Front views:
The one on the left was placed in the front view, then the head was moved over to the right, then moved backwards in the top view, its bone roll is 59.04 degrees, although it appears to be in line with the grid.
The one on the right was placed the same in the front view, it’s head was moved to the right, then rotated in the top view, its bone roll is 0 degrees yet it appears the same as the left bone.
Two things to bear in mind; If you want the bone roll to be 0 in the case of a bone like this, place it and rotate it rather than move the head in two planes. Alternatively, don’t worry about the bone roll if you have moved the head in two planes. Don’t forget that you can always “normalise” bones, by keying CTRL+N and selecting an orientation mode, this will not set the left bone’s roll back to 0 however, since it cannot have its axes anything other than at 90 degrees to each other. If you normalise the left bone to Global X axis, its roll changes to -15.61, but it does not move or rotate.
I don’t have any more time for further explanation just now - I am off gliding :D, but I can look again at any reply from you when I get back. It might be worth your while reading the manual pages, slowly, where they talk about bone roll. It took me a while to get my head around it. Also think about bone roll as a means of getting the X and Z axes to align along your required hinge vector… :yes:
What made me get the bone roll was seeing the bones’ axes. That made me say: That’s how it rolls! (sorry for the pun)
Jokes aside, seeing the axes made me realize what a rotation in, say, X would mean for each bone. That, in turn, could be used to set IK limits and constraints.
Don’t forget that you can rotate a bone in Pose Mode, by keying “r xx” to rotate it about its own X axis, rather than “r x”, which would rotate the bone in the global X axis for example, same applies for “r yy” and “r zz” BTW. This however has nothing to do with the bone’s roll, which is purely its “rest” orientation along the Y axis relative to some other, like Global, Y axis.
What you are really trying to achieve with bone roll is the orientation of the bone’s X and Z axes in relation to the Global axes, to get the hinge vector of those axes aligned as you require. It is sometimes best to actually use the bone’s Y axis as a hinge, since you can precisely place each end of the bone to mesh features. See my tut here on my website:
Bones have a unique to them orientation. Their Y axis is always along the length of the bone. Since their X and Z axes are the only ones free to rotate, people speak of the bone’s “roll” to describe how the x and z axes are oriented.
The important point though, is that, when posed or animated, a bone will rotate around one of those axes, like a hinge. I think it defaults to the z axis, but check the documentation. So if you have, say, fingers, and you animate the hand closing, if the bone roll is off, the fingers will not curl in toward the palm of the hand, but will curl in off to one side or the other. Correcting the bone roll can correct this flaw.
However, bones in Blender are not actual bones, they are mathematical constructs. And bones are used to animate much more than physical bones in organic models. So Blender developers provided the flexibility to change aspects of the bone’s axes, so other types of animation, such as machinery of various types, can also be done. This gives rise to the complications clockmender alludes to in his replies.
I think the best way to actually ‘get it’ is to turn on bone axis display, and watch what happens as you arrange and manipulate and then pose an armature. In addition to clock’s tutorial, I recommend Humane Rigging by Norman Vegdhal.
First of all, I was reading this in the Blender Manual and am unclear on something:
Each time you add a new bone, its default roll is so that its Z axis is as perpendicular to the current 3D view as possible.
If this is so, why is it that a ctrl left-click extrusion and an E-key extrusion produce different roll results?
Yes, Humane Rigging is awesome! I found the chapter on rotation types to be a bit overwhelming, so I am taking a temporary hiatus from that DVD to see if learning from some other sources/methods will help me get rigging to “click” in my mind. But yes, it has been very helpful so far, and I will return to it.
What you are really trying to achieve with bone roll is the orientation of the bone’s X and Z axes in relation to the Global axes, to get the hinge vector of those axes aligned as you require.
Why the Global axes? If the armature rotates relative to the World space it shouldn’t change the way it moves in relation to its root bone.
Although I think what you are saying is that X and Z are the most important axes.
Is it correct to state: bones should generally pivot on their X and swing in the direction of their Z?
Clock, your airplane rig is impressive!
I will follow your tutorial. Not sure yet if it’s over my head or just about right. I suppose I’ll find out.
Bones have a unique to them orientation. Their Y axis is always along the length of the bone. Since their X and Z axes are the only ones free to rotate, people speak of the bone’s “roll” to describe how the x and z axes are oriented.
This was very helpful.
I think the best way to actually ‘get it’ is to turn on bone axis display, and watch what happens as you arrange and manipulate and then pose an armature.
I did find this helpful as well!
It is sometimes best to actually use the bone’s Y axis as a hinge, since you can precisely place each end of the bone to mesh features.
If you are able to briefly explain why this is, I’d be curious to know.
Can you not precisely place each end otherwise? (Pardon me if I’m asking something obvious)
A - You have to orient things to something, the Global axis is the best example, since all objects have an orientation to the Global axes. All axes have equal importance.
Q - Is it correct to state: bones should generally pivot on their X and swing in the direction of their Z?
A - No this is not true. A bone can pivot. swing, hinge or whatever about any of its axes.
Q - If you are able to briefly explain why this is, I’d be curious to know.
Can you not precisely place each end otherwise? (Pardon me if I’m asking something obvious)
A - It is easier to place the head and tail of a bone on a slanted or double slanted vector (two points), than it is to try to roll a bone so its X or Z axis lines up perfectly with a slanted or double slanted vector. In this scenario, it does not matter what the bone’s roll is, you just rotate it in Pose Mode about its Y axis for your animation, one way or the other to move the mesh, as in the Aileron rigging on my plane tutorial. That is why I rigged the ailerons, elevators and rudders using the bones’ Y axes as my control axes.
Thanks again, Clock!
Each little bit of info is helping me understand the concepts of rigging. Starting to get it.
I tried following your airplane tutorial, but without the model I didn’t get very far.
I think if I had a .blend of the model and some idea of how the parts of such a plane are supposed to move I could do it.
Here’s a simple idea that helped me, and I’ll post it here in case it helps anyone else: the left arm analogy.
(You’ll recall I mentioned this in a previous post, but when I revisited the idea I realized how good an analogy it is.)
Each bone’s position and roll can be represented by a left arm. Each axis is represented by a digit.
In this .blend you can rotate the bone on the right and the left arm will copy the rotation. left_hand_analogy.blend (545 KB)
It’s cheesy, but super simple to understand.