I’ve just started using Blender and right from the start I haven’t been able to figure everything out.
I was doing the Gus the gingerbread man tutorial and I got it ok till it told me to select both his head and body, I can’t figure out how. After I make a second object I can’t select the first one.
I’ve tried shift click, alt click, ctr click, box select, and everything else I can think of.
Now after a while I tried starting over and now when I get to the part where you are told to mirror the first block that you deleted half of, and it won’t mirror.
I restarted the program I’ve reinstalled it and no matter what I do it won’t mirror.
Are you sure you’re in object mode when you’re selecting both the head and body? Box select and Shift+RMB should do the trick.
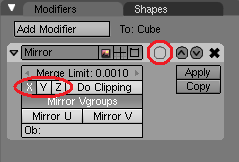
As for the mirror modifier, are you mirroring it on the right axis? You can use the X, Y, and Z buttons to mirror on a different axis. It might also help to click the little check box to make both sides editable.
Note that stuff is mirrored from the Center. It’s that ugly grey circle in the middle of your objects that you can’t get rid of. By default, that Center is in the middle, so if you Mirror, it will create a flipped version of your original object but on exactly the same space.
If that is the problem here, you can move the Center - easiest to do by selecting some outer vertices, pressing Shift+S, selecting Cursor -> Selection and in the Buttons Window, go to Editing (F9) -> Mesh and clicking on Center Cursor.
Alternatively, and probably more useful here, delete one half of your object. If it’s a cube, select everything, press K and select Knife (Midpoints) and cut a line. Then just delete the half you want mirrored.
Edit: or just move your object in Edit Mode. I was thinking too hard here .
Slip: I tried it in object and edit mode. In object mode I can do it, but not edit. And the picture in the tutorial shows both selected in edit mode, with the yellow boxes around them.
As for the mirroring, I’m sure it was the righ axis and I tried the same thing on two computers, worked on the second but not mine. I’m going to try the other ideas and I’ll let you know.
You can’t actually select multiple objects in Edit Mode; if you have two objects selected in Object Mode and go to Edit Mode, you’ll still have two selected objects, though only one of them is editable.
I do believe the head and body are part of one object in the tutorial, though. If you add a cube in Edit Mode, it’ll be part of the same object, if you add it in Object Mode, it’ll be a new object. You can join multiple objects by selecting them and pressing Ctrl+J.
As for the mirroring, I have no idea what could be wrong, so could you perhaps attach the .blend file? It’s always easier to have a look .
ok i’m including the file. I’m hoping I’m just making a stupid mistake and its not somehow my computer.
as for the selecting two objects, if its that the objects were supposed to me merged into one then who ever wrote the tutorial failed to mention that part.
If anyone knows that that is definatly the case please let me know cause that will solve one of my problems.
the mirroring issue is really holding me back though cause I started over and cant get past the very beginning till its solved.
For the mirroring issue, it appears that the orientation is the issue. If you go to the Top view (Numpad-7), you’ll see that the half-mesh is aligned such that you would have to view the model from the Side view to see what would be the front of the character.
Solution:
in the top view (numpad7), and in Object mode, select the mesh and rotate it 90 degrees. You can do this by pressing the R-key, and typing 90 on the numpad keys. Then press enter.
Now press Ctrl-A and select “Scale and Rotation…” from the popup. This resets the mesh’s rotation values for all the axis’ to zero. This resets the internal data, not the mesh’s actual orientation.
Also, make sure you are in Object mode when adding new objects to the scene, if those new objects need to be separate from an object you may be currently editing. Use the Tab-key to toggle between the Object and Edit modes.
 .
. .
.