Setting Infinite scrolling (Parallax scrolling) image with 2D Pixel art image layers

How are you doing, Blender artists?
It’s almost at the end of cold season here where I live. (I guess)
Hope you all are having good days.

I made a short music video that made of Pixel artworks, and below is the work:

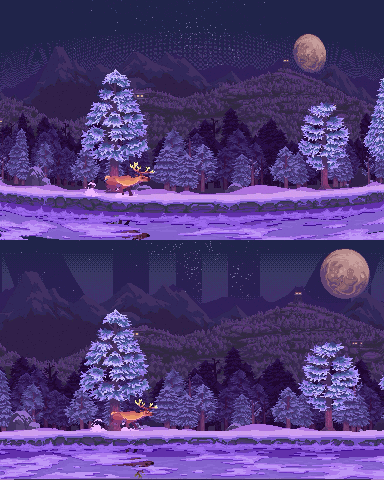
As you can see,(Thank you for watching, first) the environment layers in the animation including ground, forest, mountain, etc. are moving in indivisual(Parallax scrolling, as an other word), so they’re adding more depth to the scene.

At first I had tried to manage the scrolling just with 2D graphic tools I was using(Aseprite and Krita, if you know), but it wasn’t very proper to making infinite scrollier.

And this was where Blender came in, and this is the brief video of the result:

I recalled an classic mechanism of animation - Wheel of image sequence? - and applied it into the image layers. I set indivisual rotation angle to each of the layers.
Altough, some distortion occured to the final render image because of the gaps between the layers, but I was quite satisfied with the result.

Plus, this is the short video about how I converted character’s state sprite image with keyframe setting in mix node:

This artwork is not made with Blender, so I hesitated to upload this post on community, but I thought someone interesting in 2D animation (Side scroller, especially) might can use the blender in this way.
So I searched proper category to upload this post and I got here.
Please let me know if it’s in wrong place! (Or if there’s a better way to making infinite scroller, too!)

Thank you and stay healthy always.

5 Likes

Nice. This is nice! Mood and music match so cool! Technical part is simple and genius. I wish you nice next projects!

1 Like

Thanks much for watching my artwork.
I might bring full Blender-made artwork next time!

1 Like

This is one of the smartest parallax scrolling solution I ever saw :slight_smile: Great work!

1 Like

Thanks for the great reply too!

Sweet stuff! Did you put the final render camera in Orthographic mode or keep it in Perspective? I guess that might render more or less different results and the former seems more logic, I guess, if one doesn’t want the cylindrical swell effect of the background (which is pretty nice, though).

1 Like

Hello and I’m glad you pointed it!

In fact, I had set the camera as Orthographic mode at first, I changed it to Perspective mode later.

Like you said, perspective camera view makes images look like they’re projected on cylinder.
But after some test playing, I felt that the slight distortion on the props gives the scene more of sense of depth than the plane images(like that in Orthographic view) do, that sense feels like something’s getting closer or far away from the one’s eyes (Or, well, maybe it just looks funnier to me only. :joy:)

So I put the render camera on Perspective mode, but yes, I guess the Orthographic camera is more logical and more standard, as you said.

Here’s the short example Image I just made, for who want to see the difference:

Above: Perspective (Is exaggerated than the view I used, for showing difference clearly)
Below: Orthographic
(White meshes on sky or flickering colors are just noise, ignore them!)
Perspective_Versus_Orthographic

You can see some distortion appears especially on the floor, and big trees passing away. When the tree is on the side of screen, it looks narrow because of the perspective view of camera, and becomes wider as they get closer to middle of the screen.

1 Like

Thanks for showing differences between the two camera projections! I’m curious, what frame rate did you render the final output in? One thing that I often personally prefer to use is 60fps, in order to reduce flickering. For example, it’s quite noticeable in the trees that there’s some visual stuttering going on. 60fps gets massively more smooth, especially on side-scrolling things. Just a thought. I must say I’m super impressed by this video, though. Awesome work.

1 Like

Frame rate of the video is about 19fps (Nearly. 19.23… for precisely), and there are a few reason why I have choose the frame rate:

  • First, because of music beat speed.

The project was started from making a music. I just wanted to make up a short song that with fast and strong drum beat, so I set the beat for the music as 165 per minute - 165 BPM (and four-four common time)

Almost at the end of making music, I thought, it could be more interesting if I matched it on some animation. So I calculated the proper frame rate that matched to the beat frame, for synchronizing movement of character to the music:

The base movement that I tried to match with the music was the reindeer’s one footstep; 1 Footstep of reindeer should have matched on 1 Beat of music.

If we calculate 165 BPM into Seconds unit(/60), then it’s 2.75 BPS.
And, as you may know, the smallest frame rate that can make images sequence to an basic smooth animation is around 8 fps.

So I can use about only 3 frame per beat(8/2.75 = 2.9090… for precisely) in 8 FPS frame rate, and I guessed 3 frames are not the best amount of frame for illustrating Reindeer’s movement.
So I made an calculate function for searching proper frame rate and the options were like these:

(Decimal points are round-offed)

14 FPS - 5 frames
19 FPS - 7 frames
25 FPS - 9 frames

I thought 7 is enough frame amount to drawing Reindeer’s one movement cycle(footstep) in smooth, so I chose the 19 FPS.

  • Second, for efficient valance between quality and render speed

Continue from the issue above, that about frame rate, I could have taken more frame amount (higher FPS) than 7 to drawing Reindeer’s movement, but I didn’t, and it’s because of efficiency.
As more as frames added, the movement would get much smoother, but as you know, it takes more time to draw and adjust as well.

Even if I set aside of characters’ movement, I could have made background(Trees, mountain, etc) to move much smoother if I had chose the 60 FPS. But the total frame amount of the video was already 1120, on 19 FPS. If I had set the FPS up to 60, then the frame amount and render time would have taken more than 3x. (Size of video would have been more heavier either, not that much though)

Of course, it can be an reasonable option, if I were pro-animator or targeted more high-quality animation. But yet, I’m just an pixel art maker used to hand-drawn sprite animation (that means, familiar to low-fps animation, not in vector/keyframe animation), and I was just satisfied with the video so I finished it, as it was. (And that’s what I should thank you, that you like it despite of the low-fps. :relieved:)

But also, I guess I should follow your advice if I make another animation video. I didn’t know why the passing trees were look so blurry and flickering like a mess, and it was because of the low-fps as you mentioned. Thank you for pointing it, again.

…Gosh, did I write too much and long-winded?
Thank you for reading this, too :joy:

Hey buddy, I hope I didn’t sound too nitpicking about the framerate thing, because both the video and your artistic talent shines!! I’d love to see what you’re doing next!

Also, I definitely don’t think your character animations and fx anims should require a higher framerate. I only meant that things like static parts and background art might benefit from a bit of extra care for smoothness. In your video, this isn’t too much of a problem, as the focus is maintained on the reindeer, so no big deal there. But I ran into this issue for example when making this music video for a band (not my choice of music!!) back in 2013. In my case, there was barely any character animations at all, just static painted images (first ever animated video) put together in a collage, so the framerate had a bad effect on the result, I think. From that point, I decided that my final renders should preferably be at least 60fps if ever possible. :slight_smile:

1 Like

Wow, I totally forgot with this post since I had got into another work back in March. Sorry for a late comment.

It might be seen I over-reacted a bit with the frame issue, but actually, in opposite, I guess I was quite excited and glad with that someone asked about where my thought about the frame setting came out (regardless it was right or wrong). So I wrote down the (too detailed) whole process.
Thank you for your suggestion with the frame setting, and guess it can be worthy to find out the optimized way to set different frame rate to each of the sprite-animation object.
And I enjoyed the music video, too. Especially the flight of an eagle through the vast land and that moves of the land are impressive.

Thanks again and stay safe. :relieved:

1 Like