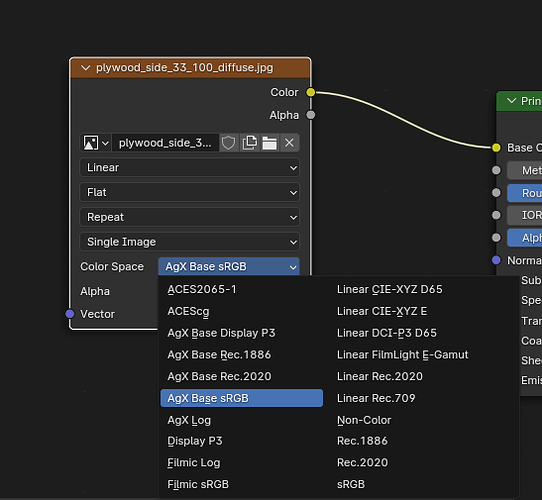
The same rules still apply. Image contains data, like normal or roughness? Non-color. Image is sRGB? sRGB. Rendered EXRs will most likely be Linear Rec.709 (what Blender used to just call “linear”) or ACEScg, and HDR environment maps will likely be Linear Rec.709.
Those transforms convert whatever data is in the file from the chosen color space to the project’s internal working space, which in Blender will always be the same unless you actively change the OCIO config itself, either by editing its contents or by swapping it out with something else entirely, like switching to ACES. So you’re correct that the program’s color settings can affect those options, but only on the broadest scale, not on the order of small stuff like swapping the display transform from Punchy to Filmic. And even if you switch to ACES or something, an sRGB image will still just need to be tagged as sRGB, and a normal map as non-color: the only difference would be that those options might have slightly different names (in ACES, most likely something like “Input-sRGB-Texture” and “Utility-Data,” respectively). So you still wouldn’t really need to worry about it: the only thing you need to keep track of is what’s in the files, and make sure they’re tagged correctly.
Now, after saying all that, the one area that the chosen view transform might affect things here is if you wanted to use a “reverse-output” cheat to pass colors through “untouched.”
The view transform—AgX, Filmic, whatever—applies a curve to the luminance values, rolling off highlights: scene-referred 1 becomes ~0.6, and scene-referred ~16 becomes 1. If you’re working with an image that already contains subjective tone mapping, like a JPG off the internet, or from a consumer camera or phone, the sRGB input transform won’t be sufficient to “unwrap” those values back into linear. The linear light values that entered the camera were subjected to some proprietary image processing, chosen by the manufacturer, which rolled off the highlights, adjusted saturation, etc, to create their idea of a nice-looking image, and were then saved into an sRGB image. We can unroll that sRGB curve, but we can’t really unroll those other transforms, since we don’t know what they were exactly. So even if the original values that entered the camera might have gone up to 5 or 20 or 3 million before they were rolled off by the curve, when we reverse the sRGB curve, we still only get values that go from 0 to 1. Then that linear data goes into the mixing bowl, everything else happens—rendering, compositing, all the processes we have to do. Then at the end, the chosen view transform is applied, and that 1.0 becomes 0.6. What was once white in the original sRGB file is now gray. This is, to some degree, unavoidable, and a consequence of trying to use display-referred tone-mapped images in a scene-referred linear workflow, as opposed to precisely quantified professional encodings like raw and log.
One thing you can do, though, even though it’s a hack, is to choose an output transform as the input transform, essentially telling Blender that the encoding this image was saved with wasn’t sRGB, or Linear, but Filmic specifically. So Blender applies the Filmic transform backwards: what was 1 becomes 16, what was 0.6 becomes 1. Now, unless the image actually was saved with Filmic, this isn’t correct: the linear values you’re working with inside the scene aren’t necessarily valid representations of the original scene light that the camera captured. But they’re plausible, and, crucially, when all’s said and done and the Filmic transform gets applied at the end, all those stretched values go right back to exactly where they were, since they’ve gone through the same transform in both directions. But this relies on the transform being the same at both ends, so this is that one area where the chosen view transform matters: if you’re using AgX, you’d have to select AgX, and vice versa for Filmic, otherwise the transformation isn’t a round trip. Also, note that since the contrast looks aren’t implemented on those lists, and you can only choose the basic Filmic or AgX, you can still get some change as it goes through AgX Base one way and Punchy on the other. Again, this is totally a hack: results may vary. Ideally you’re shooting log or whatever and carefully linearizing all your source material properly. But we all end up in a pinch sometimes, or really need to use that sunset photo we found online, so, hey, good to have an option!
