I’m a landscape photographer and recently became interested in compositing CG into still photography images. My first project deals with automotive rendering. I quickly realized that using equirectangular HDR images shot at the same time as the backplates is the way to go, and so I wrote an article detailing the shooting process and how it applies specifically to Blender. I’m posting it in here in the hope that it is useful to other people. If anything is unclear or wrong please don’t hesitate to leave a comment and I will look into it.
Nice article. If you’re just playing around and don’t need super high quality, you can use a Christmas ornament. It cuts down on the amount of stitching. I got the box of 4 at Walmart. Before Christmas they were $6. I waited until just after Christmas and they were $1.50.
That would be the HDRI Probe method. It’s interesting because with only 2 frames you’re able to capture a complete spherical panorama, however the resolution is limited as you mentioned. Your render looks quite good, so maybe I’m over thinking this! The stitching part is quite easy though in my experience, it’s the capture that requires a bit more thinking and practice (and expensive gear!).
I have played around with making my own HDRI. It’s not easy. The shooting is the hard part. My widest lens is only 18mm, so it takes me a lot of shooting to get a 360 image. But if you overshoot as I do with about 50 images per HDRI the software is pretty damn good at stitching them together. But it is kinda slow when its trying to work with 50 13MB images. I might make a cheap rig for doing this tomorrow and post it. Might take me more than one day to make. We’ll see.
As the example in my article shows I settled on using a 21mm on a full frame camera for my HDRIs, and 5 bracketed exposure shots, which give me a total of 120 frames when stitching. As you say the stiching softwares (PTGUI or Autopano) have no problems working with that many frames and the process is surprisingly quick, so I’m sure it could handle a lot more frames when using a longer focal length.
The issue with using a shorter focal length or even a fisheye lens is resolution; while the result is perfectly adequate for image based lighting and reflections, if you want to use the HDRI as a backdrop you do need to be mindful of the final resolution. Using my 21mm on a Canon 1Ds MkIII, the maximum size that I can output is about 20,000 px wide, which seems in line with the commercial HDRIs available.
I think that for experimentation purposes a simple tripod and ball head is perfectly adequate; while you will get some parallax error due to the center of rotation not being the entrance pupil of the lens, it is really not that bad and will most likely be invisible when the result is used as an IBL. And should you get more into it and require more precise results, the upgrade path is relatively easy and modular, as you can buy the nodal slides and pano clamps individually as your needs become more sophisticated.
If by “panorama extension” you mean the head I’m using the Really Right Stuff kit. I’m shooting vertically and typically 5 bracketed shots 2 stops apart. I explain my process and thinking in my article, including a calculator sheet to help determine the best setup.
Over at the Smart IBL site they’ve been using low-res (360x180 pixels) for their HDRIs. I’m not exactly sure why. They use higher-res images for reflection maps.
The stitching part is quite easy though in my experience, it’s the capture that requires a bit more thinking and practice (and expensive gear!).
I’ve used Hugin for stitching and it’s pretty monotonous. PTGui looks like it’s a lot more automated.
Based on my testing, you get significantly less noise by using a smaller HDRI for a given number of samples than using a larger version of the same file. There’s an example in my article linked above regarding the resolution of panorama. One thing that they (the SIBL people) do that I don’t agree with is to blur this small HDRI, again to further reduce the number of rendering samples needs to get a clean render. In my tests I have found that it reduces the sharpness of the shadows, so I tend not to use this technique. It’s quite dependent on the scene however, so when rendering an animation, for example, the extra time saved this way might be worth the tradeoffs. Because the HDRI is very lowres and blurred, it is therefore necessary to provide a high(er) res version for reflections, otherwise they will simply reflect the blurred version.
PTGui definitely has a learning curve, but once you’ve figured it out it’s very efficient and fast. It probably takes me longer to shoot a panorama than to stitch it, which is to say it’s quite fast.
Yeah I’ve used PTGUI and Autopano for my stitching and they both work very well. My tripod just broke so I guess I’m going to have to build one for doing this now. Those heads are very expensive and its not rocket science. You just pivot around the lens instead of the sensor. I’ve had some pretty good results by just doing it without a tripod at all. I think its easier to shoot portrait when doing it this way. just keep a mental note of where you start and how wide ur frame is. Takes some practice.
I haven’t seen anyone mention it yet, but the iphone has an app that allows you make 360 maps in real time. I don’t know how the resolution of the image, but its good enough for Freddy Wong’s youtube stuff. Here’s a link to the tutorial for how to do that with an iphone.
Indeed I forgot to mention that, I’ve used the iPhone Photosynth app which works surprisingly well. The problem with it and handholding the camera when shooting as you mention is when bracketing for HDR.
@brent, this i dont think is HDR… so it wouldnt be able to light the scene without modifiying it o go outside the 0-1 value space.
We use a piece of equipment called the gigapan pro, it rotates the camera around (we use a 5D)… and at certain intervals takes a bracketed shot, usually ±3 stops… ideally it would be larger…
Then we use Hugin for our stitching / export to equirectangular… works pretty well.
Any kind of 360 image will light a scene. I can light a scene with literally any image. Doesn’t have to be HDR. As for that over priced monstrosity above. That’s fine if you have money to burn, but it’s totally unnecessary. You don’t need thousands of dollars to make HDRI’s you can do it with a disposable camera from Walmart for 11 bucks.
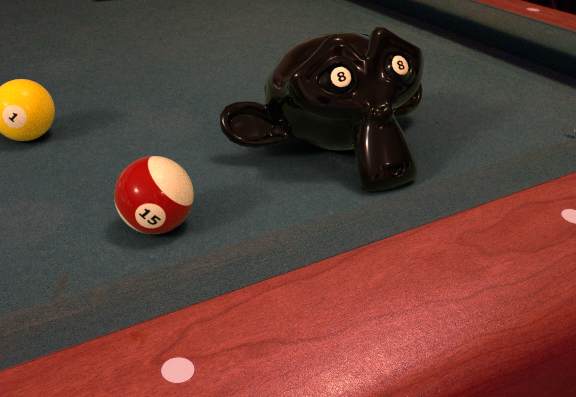
No. If you try using a JPG, it’s just going to give even lighting. Look at the pic I posted above of the pool table. Let’s see you get cast shadows like that from a JPG without using any other light sources.
That’s one of the reasons that most sIBL sets will include a direct light at the same position as the sun, or other visible light sources. Rather than trying to brute force direct illumination through a global illumination algorithm, just add a lamp to give you nice crisp direct illumination shadows while letting the IBL handle the diffuse global illumination. The other reason is that it can be very difficult to capture the full dynamic range of the sun, which could easily be +10 EV above your metered middle exposure. Quoting the HDRI Handbook:
That’s fine if the sun is the only light source, but if you’ve got multiple sources (either an interior shot or night time exterior) then I’d rather stick with pure IBL.
I can’t attest as to whether a jpg will cast even light but even if it does you can easily change that by copying the image node and feeding it through a black&white node to the intensity socket in the emit node. Uneven lighting from any image you like.