UPDATE! - Classy Dog has gained over 150 new subscribers since this video was posted! Thank you to everyone for your support! We have a lot of cool, new videos already in the works for you!
Here is a short film I completed over the past five months. I used Blender for the CG and After Effects for the compositing.
Camera Tracking- I used black and orange wooden blocks and black and orange duct tape where the car would be; also used points that were naturally in the shot. This thread by Steve S was very useful in removing the blocks and tape- http://www.blenderartist.org/forum/showthread.php?306380-Removing-Tracking-Markers-from-Video
Dupliverts- I really liked the look of some of the Trapcode Particular effects out there, but couldn’t afford the plug-in, so I tried to recreate this effect in Blender. A little research brought up this- http://www.blendernation.com/2010/03/23/particle-garden-by-david-tillman/. With this to guide me, I ended up using Dupliverted planes on a duplicate car mesh to create points of light. Using this in conjunction with the Build modifier, you can create the gradual forming of the car. The Decimate modifier is also very helpful when working with dupliverts when your parent mesh is too high-poly; just set the modifier to “Unsubdivide”.

Particles- Dynamic Paint was used to create the particles that move along the car once all the Dupliverts have formed. Originally, I wanted the particles to emit and float up into the air, but then I found out I couldn’t use the Dynamic Paint in conjunction with emission particles, so I had to use Hair particles instead, and used a UV Sphere for the duplication object. I also found out that there is a bug in Blender 2.68 which doesn’t seem to let you do this, so I used 2.67 for the particle shots. The actual transparency of the mesh is just a material in the nodes, which uses the Coordinate Mapping node and a Color Ramp node to “slide” the transparency gradient along the model. You can think of it as a gradient mask in Photoshop, but in 3D.
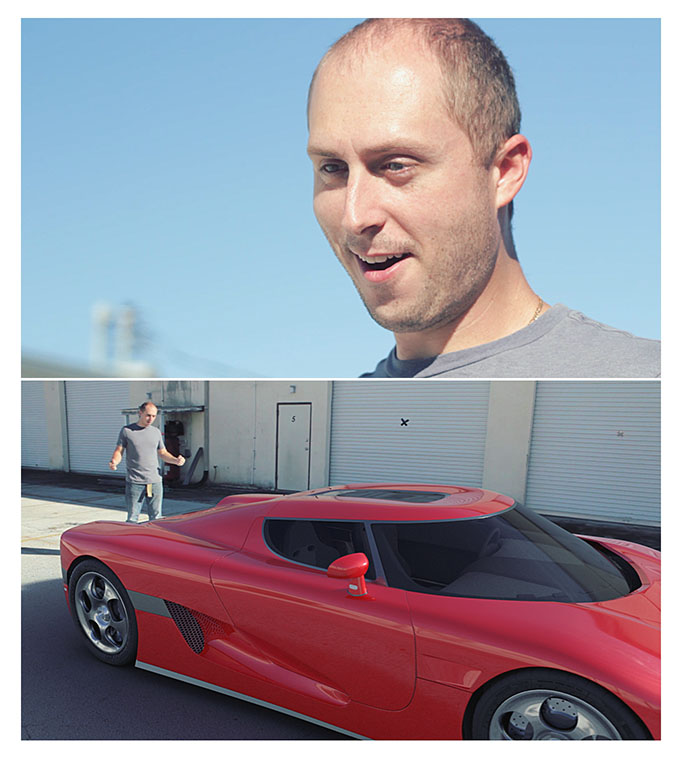
Realistic Car- I probably spent the most time on this video working on the realistic car shot. Veti’s car is very well modeled, so I had a good base to start with. Thornton Strolia helped me a lot with the car paint shader; you can find a video tutorial on paint shaders he created here- http://www.youtube.com/watch?v=-gew_1Dll7A . The car is lit only by a single chrome ball .HDR. I was quite happy to find I could create hard shadows using only HDRI lighting. Because the lighting is so direct and bright, however, it meant I had more trouble with caustics and fireflies. I had to use the Light Path node in the glass materials of the headlights and the windshield to reduce the caustic noise. If I had used an .HDR probe taken on a cloudier day, it would have been much easier. Because my widest camera lens is not that wide, I decided chrome ball HDRI would be much more efficient to shoot than panoramic HDRI. I used a 4" chrome plastic Christmas ornament I bought for the shots. However, because it only captures light from one side of your scene. Without light (and therefore reflections) from the back of the car as well, the shots looked less real. So I decided to use AGIsoft PhotoScan to recreate the side of the building behind the vehicle. I also used this software to create a textured ground plane for the reflections around the bottom of the car body and the tires. Another AGIsoft environment mesh was used for the second shot of the dupliverts, which show the front tires spawning.

It’s a shame the “real car” is limited to one shot, but I have plans for a continuation of this video into a series, so I don’t think this is the last we’ve seen of it.
I learned a lot working on this short video. It has its mistakes and flaws, and many things which I very much want to improve on in future videos, but I’m satisified with how it turned out. Many, many thanks to Harley, Minoribus, and the many other people who took the time to follow my WIP thread and offer helpful suggestions and ideas. You can check out that thread for more behind-the-scenes info on how the video was made here- http://www.blenderartists.org/forum/showthread.php?309079-Live-Action-GTA-Supercar-Spawn
As for future videos from Classy Dog, I’ve got a handful of Blender videos I’m going to be pumping out this month. I’m also ordering a new shotgun mic and camera slider in a couple weeks, so this will help to increase the production quality of our future projects. As John mentioned at the end of the video, we’ve got more GTA, more Blender, more videos based on games, and more films based on our own ideas coming out this year. So if you enjoy the work, and would like to support the channel, consider subscribing! Thank you, and I’m happy to answer any questions you may have about the video!
Also, you can try out the paint shader, the HDRI lighting setup and the gradient transparency nodes in this Blend Swap file here- http://www.blendswap.com/blends/view/72052


