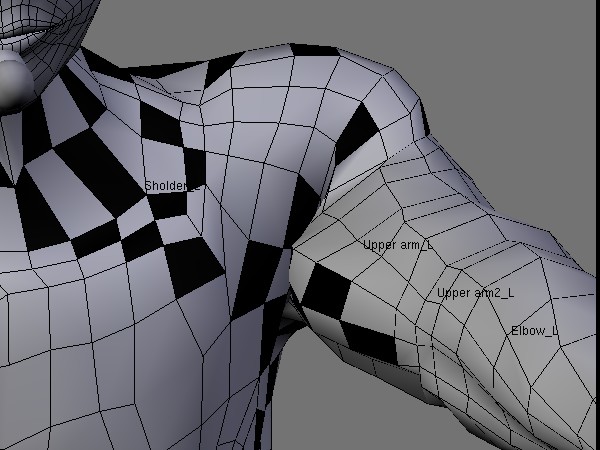
I’m pretty much stuck right now. How do you rig the shoulder to avoid the problems shown here?
Attachments

I’m pretty much stuck right now. How do you rig the shoulder to avoid the problems shown here?

Suggestions
I remember someone also used pydrivers to get better deformations. I believe the user’s name was Tolban or something similar.
Look. That deformation comes out clearly because the other vertex around are not yet being assigned to any other bone. It is not a good idea to paint one bone and test it without painting adjacent bones. That’s the key of good deformations. There is not elasticity. To eliminate that, you should paint the back to spine etc so every bone pulls their vertex creating smooth deformation. You may paint green (weight=0.5) on boundaries to make it look even better. Other quick automatic solution is bone heat. Select your mesh, go to weight painting…B (border select) and select the bones around (shoulder, biceps,spine) you may use Shift B for selection…then select from menu Paint–>Apply Bone heat to Vertex Groups…then move your bones again…I guarantee you will love your deformation. If you do not like it, U will undo the painting. Someone suggested additional bones for deformations, however looking at your mesh I would not complicate the project since your character does not have that much muscle or body fat. But additional bones are definetly used in more advanced rigging models.
PD: You must add Armature Modifier to the mesh before doing that. Parenting the mesh to the Armature will ask you for vertex groups from bone heat but taking all the bones. It is up to you.
Good luck, watch some of my recent animations at:
This is false, I did extensive weight painting. I only found three verts that were not part of a bone vertex group and none of them are visible in the screenshot.
Alright, I’ve gone into weight paint, I press the B key, and my cursor goes into cross-hair select mode. Which, in weight paint mode, does absolutely nothing that I can see. Shift-B allows me to zoom in but that’s it.
The result was quite and improvement, although I still have some issues with the “overlapping”, as shown in the picture.

it sucks hey. no one can knows the true solution. fan bones are crap for ball and socket joints. i.e: hips shoulders.
Well I insist, there is no reason for deformations. Beside I guess you need to read a bit more of the documentation. Look you said: “B does absolutely nothing that I can see”…Well you must see it…je je B after the crossHair shows ALLOWS YOU TO SELECT THE BONES FOR BONE HEAT!..And that deformation comes clearly fby incorrect vertex assignment, or envelop is activated, very simple.
Good luck
Thanks blenderguy2008 for explaining how to apply bone heat from multiple bones at once! I have been trying to see if this was possible since I learned about bone heat 3 month ago. I thought it could only be done when the mesh was parented to the armature. Thanks again.
http://kokcito.tk/tut/shoulders.html
It’s a little old, but it works. I can certainly vouch for that…
Of course, now that we have mesh deform cages, it’s the same principles, but less verticies to tweak.
http://www.cdupload.com/files/38770_q0y2k/Packed_BDCharacterUpdated.rar - 32.7mb
From a body rigging point of view, that character is quite functional. I did a lot of work on the hip and shoulders - tweaking, fiddling, starting over - so hopefully there is something to pick up if you want to have a look.