Nice one ! I’ve always found shoulders a nightmare, it looks like you’ve got good deformation going on. Did you use envelopes/weight paint or vertex groups ? Any tips ?
Well, I will make this rig public for download when it´s finished. But for now I can tell you that I rigged the basic structure with two bones, the clavicle and the upperarm. Nothing strange about that.
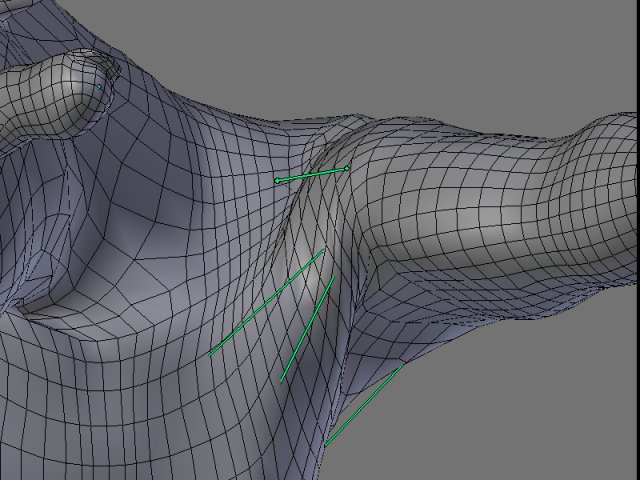
Then you have to place some extra bones for simulating muscle in order to prevent the skin form shrinking. This bones must be placed over the surface of the mesh, not inside of it as the clavicle and the upperarm.
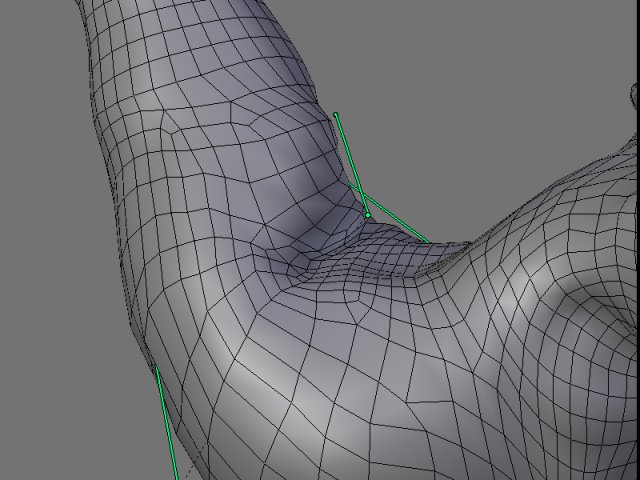
In my rig I placed two bones for the chest area and three different bones around the shoulder, one at the front, another at the back, and another at the side of it. There are some bones for the back and a bone where the actual clavicle of the character is.
The chest bones and the back bones are parent to the spine and the others to the clavicle bone. And every one of this bones has a ´´stretch to´´ constraint pointing to a bone placed where you want the tip of your bone to be. This anchoring bones are parented to the arm in order to make the chest and the shoulders stretch or shrink according to the movement of the arm. You can see how I placed the bones in one of the images.
Of course there are some copy location and some limit constraints to prevent certain deformations and to produce certain others.
I used weight painting for skinning.
very helpful. always good to see how others tackle the same problems. i keep coming back to these problems with different approaches. but i have not yet committed to the level of detail you have achieved. but i can make a suggestion, based on something i have been playing with recently. rather than a single bone with a stretch constraint, i have been using two b-bones with IK and stretch, both set to .5 influence. i make a slight offset to the joint of the two bones, and subdivide each a few times. this way there is a gentle curve to the muscle shape, unless it is pulled tight. i guess i will have to finish up the rig, and render some examples now, just to explain what i mean…
looking forward to seeing some motion tests, you have built a character with a lot of personality, and i think he could be very expressive. good job!
This looks great! I think that this rig would be of great benefit for everyone going for realistic shoulder movement without endless driven keys tweaking…
one thought: if you are considering to donate the rig to the community, I guess there will be a number of people happy to play with it even in a WIP phase (I would)
Nice suggestion Jimww.
May be I´ll try that IK thing for muscle bulging…It´s an interesting aproach.
For what I can see, if you play with the ´´stretch to´´ volume parameters you get some nice bulging to.
Oh! and one last BIG tip, You always have to make sure that the bones have the same position in POSE mode and in EDIT mode, otherwise the bone will deform the mesh even in rest position while in POSE mode. This you have to take in account specially when playing with the copy location and the stretch to constraint.
So, this is what I do:
1_ set the bone in edit mode (as usual)
2_once set, go to POSE mode and set all your constraints (generally the constraints will make the bone change it´s initial position, rotation or scale)
3_Snap the cursor to the bone´s new position
4_Go back to EDIT and snap he bone to the cursor (some times you have to adjust the bone´s root and tip separately)
This way you can match the bone´s transform parameters in both modes so that no unexpected deformation occurs while in the rig´s rest position.
note: when combining copy location and stretch to constraints check out their order in the constraints stack because it can give different results.
@ jpbouza : sounds like from your last post you aren’t setting the stretch to constraint’s targets properly when creating the set up either that or you might have odd bone rolls … I started on a project like this back in January and haven’t run into problems like you are describing unless the stretch to constrained bones had odd bone rolls …
You have to be in Edit Mode with the Transform Properties panel open (hotkey N) and check it . If it isn’t zero you will wind up the stretch to constrained bones will do odd things like over stretch their targets . If you need to reset the bone roll you also need to recalculate the rest length of the stretch to bone in the constraints panel in Pose Mode .
Even with an extensive use of the stretch to constraint the rest pose should always be the same as the edit pose .
And you don’t have to have the stretch to bones on the surface of of the mesh either . It helps if they are close to it to help in visualizing the volume but it isn’t always necessary .
@ jimww : Actually creating curves with bones isn’t necessary with the stretch to constraint . What matters is the initial shape of the mesh and its curvature . If you shape the mesh properly the stretch to constraint has the option to maintain the volume of the mesh, making the simulation of muscles pretty simple as long as the mesh is properly tapered in shape to simulate a muscle . There was a video of the stretch to constraint in action on the release logs section at Blender.org when it was first released (and a blend link too but that was dead when I tried it) that shows a “bicep” flexing that looks pretty good and it only had one bone actually causing the deformation .
Visually having the bones take on a curve really doesn’t matter (armatures don’t render in the first place) because if the mesh isn’t shaped properly relative to the path (length) of the deforming bone then having a pretty looking armature is a moot point …
Though if that Z-brush script that’s been rolling around here worked with B-Spline representations then your idea would be a very kool way to generate a visually organized mesh from just an armature …
This might be a bit off topic but how do you make a wireframe render with both edges and faces like that?
Very nice tho, I’d like to know how to make a good armature too my character look like a mess. I have a thread with a blend file here, should be on the first page… Help