Snapping - can't snap to vertices I want to snap to

I’m having a double problem, or two different issues with snapping. I’ve been reading docs, but I’m still missing something, so I need some help with this.

The first is I have two objects. Here’s a view of the parts I’m working with:


Note I have one part that’s selected and one part that has not. You can see the 3D cursor on the non-selected part, on a vertex. On the selected object, you can see a vertex on the same vertical level as the 3D cursor, just an orange dot. That’s where I’ve set the origin of the selected part, the one I’m moving. I want that vertex (where the origin of the selected object is) to snap to the location of the 3D cursor on the other object.

I made that work earlier today, but then had to remove the object from the area to work on it more, so I know it’s possible. How can I specify vertices on two different objects so I can use one vertex as the target and the other as the point on the object I’m moving so I can snap them together?

The other is related to this, but not exactly the same issue. These two parts form a hinge. Both parts of the hinge have tubes in them that the screws will go through to hold them in place, so one hinge can pivot from the screw in the tube.


This shot shows the same selected object as above, with the two parts that each have a tube for a screw to go through. The unselected part has one tube through part of it. Here’s a view of the same parts from a slightly different angle, in X-Ray mode and Edit Mode:
Screenshot 2024-02-12 at 2.58.03 AM
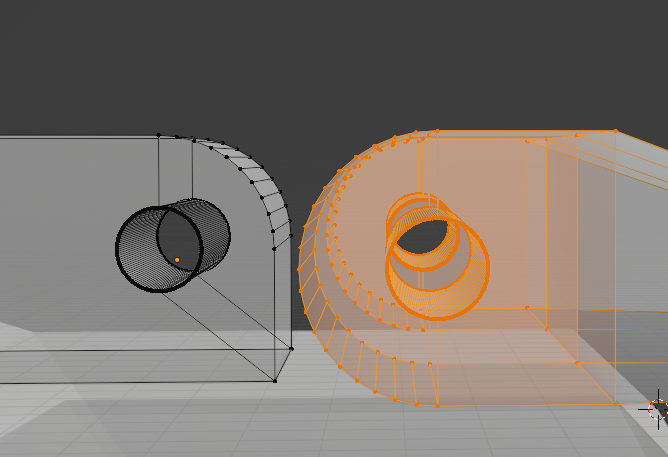
The tubes in the two separate objects are aligned on the X and Z axes, but aren’t lined up on the Y axis.

I’ve tried several methods to align these tubes. (I plan on adjusting the length of the selected part to what’s needed so the tubes line up, which is why I have it in edit mode and am moving vertices, not the whole object.) I tried, in object mode, with the origin of each object in the center of the tubes, to align the objects, but the alignment was matching the geometric center of the objects, not the location of the origin of the objects. (This also wouldn’t work, since it would move the whole object to align with the other - it wouldn’t let me just slide the tube and selected nearby parts to line up with the tube on the other object.)

How can I move the highlighted parts of the object on the right so the tube in this part lines up with the object on the left?

I’m not sure I’ve clearly undestood but you could use the latest snap options.
As the holes should be aligned (if I’ve correctly understood) you should use those vertices to align themself.

Take the vertices you’ve already selected,
select vertices as snap object in the snap settings,
then press G,
then press the axis you want to move them,
then press B,
select one of the inner vertex of the internal holes,
then move the selection to the equivalent of the other part.

It’s longer to write down than do it.
This video from Blender 4.0 new feature page https://www.blender.org/download/releases/4-0/

1 Like

Hint: Instead of moving the object to an emtpy place where you can work on it just press / on the numpad for a quick automated separation, and / again to turn it off.

Separate the “to moved object”; select one circle of it ; set cursor to selected; Objext → set origin to cursore.
Select other object and in edit mode the to be align circle…set cursor to selected.
Switch back to separated object use :Shift -S Selection to cursor (KeppeOffset).

When you want to “save” the origianl pivot point… add a vertex on it and “re-pivot”… afterwards.

1 Like

Press / and the selected object goes into local view - AKA only it is visible.
Or Shift-H to hide the other objects.
No need to move things to work on them.

Edit mode, snapping with the active vertex.

First, I was using 3.6x and I upgraded to 4.0. Love that Blender is kept up to date, but it’s really hard to keep up with all the updates. (And I haven’t used Python in the past, but I remember, in the past, it being a pain if I added modules to the Python instance Blender used, to keep Python up to date with new updates.) So now I’m at 4.02.

What does the B do? I’ve been pressing G, then the axis key I want to move it on, but not B.

I’ve been able to do a lot like in the video you provided, but I’m having issues with more complex shapes and trying to get points that aren’t on a prominent corner or protrusion to snap to vertices in a similar situation.

This is cool - never knew about this feature before! I know this is one I’ll be using a LOT!

What’s silly (about me not checking on this) was I knew H could hide an object but, knowing Blender and all the modifier key combos, had never thought to check on variations of this, so this is quite helpful!

I’m not clear about this. When you talk about “circle,” do you mean a vertex, since it’s a round point?

On the to be moved object select the two end loops (the famous circle) of the bolt holes. Snap the cursor to that location - half way between, centralized. Back in object mode set the origin of that object to the cursor location. This sets it up so the piece will have that area snapped to the other one.
On the move too object, again select the two inner loops or all 4 (circle) loops, and Snap the cursor to that new location.
Now back in object mode again you can snap the to be moved object to the cursor.

Of course it is far easier to use snap with the Active Vertex like I showed you with my video above. G, X (or relevant axis) and snap.

Hmmm. If you mean you only want to move the hole and its nearby supporting mesh and stretch the join to the rest - then, again, in edit mode use snapping with Active selected.

Since 4.0 B key allow to set the basepoint for precise source-target snapping.
Press GB, pick source point, pick destination point