Ant landscape mountains with blenderkit textures. How can I improve this? i want it to look farther away…
Have something visible in the foreground and put the camera closer to the ground, maybe the camera is on the shore of the lake? If the camera floats high in the air, it reduces the feeling of size.
Increase the detail of the waves, they are a bit too smooth and look like small ripples. Are they done using a noise texture? If yes, there is litterally a “detail” slider on the node (don’t go too high though, it has a render cost).
The camera settings matter for an impression of scale.
Add trees to the mountains. To add sky instead of Hdri, use image as plane add on. Switch to cycles…
thanks, it is actually in cycles and i’m using an image behind the mountain
Increased focal length to 150mm and lowered camera. Increase detail for water.
I think my rock texture is the problem. it looks kinda lumpy and nowhere near the right kind of texture for a real mountain. not sure what to do about it though…
I think you can make two rock shaders and combine them. ![]() Also, instead of increasing the focal length to 150mm, I think it is better to reduce it to a number between 25 and 30! I think changing the resolution to 2560/1080 may help make your scene more cinematic. And maybe you can even add cloud shadows to your scene.
Also, instead of increasing the focal length to 150mm, I think it is better to reduce it to a number between 25 and 30! I think changing the resolution to 2560/1080 may help make your scene more cinematic. And maybe you can even add cloud shadows to your scene.
I like the increased water detail. I have to agree, the focal length doesn’t work in this particular context, probably because it reduces the vast area of water and makes the mountains look closer. This camera trick really depends on the context and other objects to work. Also, you will notice in the video I posted, the camera is also moved back so the objects are the same size on screen as before, which may not be possible in a landscape.
The rock would probably work better if it had true micro-displacement. Right now, I can tell it’s a flat texture and the mountain’s shading is limited to what detail level the mesh gives you.
1- Activate Cycles’ experimental mode in the render settings.
2- Put a subdivision modifier on the landscape. Make sure it’s the last modifier in the stack, so adaptive mode becomes available.
3- Set its “render” subdivisions to 0, then click the “adaptive” checkbox to switch mode (this is necessary to avoid a problem/overlooked aspect of the modifier where both the standard and adptive levels would be active at the same time and stack together).
4- You now have adaptive subdivision on the object. It has the ability to subdivide objects more the closer they are to the camera, which is great for fine displacement. You will see a new “dicing scale” setting appear, which controls the quality. Cycles will subdivide the object until each polygon is that size on screen, in pixels (1 will subdivide until each polygon is 1 pixel wide in the render, 2 until each polygon is 2 pixels wide, so a smaller number=finer geometry).
5- Adaptive subdivision also has settings in the main render settings. There will be a new “subdivision” section that will appear in experimental mode. There, you will find an option for the viewport quality, following the same pixel size logic, as well as second “render” dicing rate acting as a multiplier for all the modifiers.
6- In your material, disconnect the bump node if you are using one. Take whatever you were using as bump, then plug it in a displacement node instead. If you were using a normal map, you will need a black and white displacement texture instead.
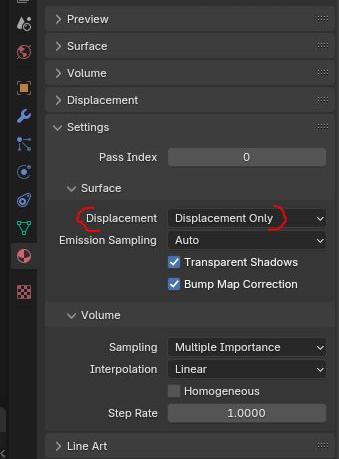
7- In the material settings, set the displacement mode to “displacement only”.

8- Your flat bump has now been replaced with true displacement. You might need to adjust the scale and midlevel settings to fit the model and texture. If you have left the viewport dicing scale to a more coarse value than the render, you are going to need to do an actual render to see the finer details.
9- You could also try setting the displacement mode to “displacement and bump”. That way, you can use a higher (coarser) dicing scale and let the traditional bump handle the finer details. This is slightly less realistic, but allows for better performance.
thanks but my Pc cannot handle this. blender crashes every time
thanks, I dunno why that tutorial said 150mm it sounds liek the opposite of what I should do…
Another version. focal length 25mm. the background mountains definitely look further away but the main one looks like a weird rock.
No idea why there is some gloop on the side of the camera…
It looks like some shadow is affecting the sky. Is the sky made with a material that can receive shadows? If yes, try replacing it with an emission node.
I think it might be better to scale the main mountain in X and Y axis. I also still suggest adding trees to the mountains other than the main mountain. It can create the feeling that the viewer is looking at a huge scene.
for texturing the mountain i recommend this video: https://www.youtube.com/watch?v=O5XedLoKWlM&t=3097s
(Not super applicble to your case, but is a good enough starting point)
Currently the border between the mountain and the water is not that visible, and it just kinda blends from one to the other. Consider adding a beach to separate the two.
Tip: HDRIs tipically arent a very good representation of real-world sunlight. Your scene feels overcast, despite some visible highlights in the clouds and such. You can use the blender native Nishita sky texture, and blend it with your HDRI using a mix shader, with the is_camera_ray output coming from the light ray node plugged into the factor. You will need to allign the sun direction manually though.
Nah, there’s many add-ons out there that do this for you precisely
Such as? Im only aware of addons that can align the sun lamp to the hdri, but none that could align the sky texture to it. In any case, for a still shot of a large landscape eyeballing it is good enough
the foreground feels empty, maybe add some ice or something like that. Also use depth of field to blur it a little if you add it
It also feels a little too clean, adding some noise would help
Adding some trees at the shore could also help make it feel farther away and maybe using a mist pass to give it more depth.
Maybe you could add some ice chunks floating around?
You can literally make the mountains smaller. That will automatically make them look “farther away.” However, distance perception in a (real-world …) situation like this one can be very deceiving.
I suggest that you have a visually simple scene which should stay simple. The snowy mountains are the main subject and my eye, at least, is drawn to studying their intricate details – not the water.


