Modeled design posed textured and rendered with Blender.
Cycles is amazing!

Very nice work. I’ve seen some shot on g+ but those finals are great. Maybe the wire could be a bit less rigid.
Can you share some info about how did you used the hook modifer?
Hey Alan, the hook modifier is very simple.
I placed an empty where the ear cups are and rotated it a little so it followed the flow of the headband design and mimicked the cup rotation axis.
In edit mode I selected mesh that flows around the cubs and then crtl left clicked at this empty.
While still in edit mode I pressed crtl H and selected “Hook to selected object (object is the empty in this case)”.
This creates the hook modifier for the mesh and makes it work with the empty and only the selected mesh part will deform when the empty is being moved.
I parented all other objects to the empty as well that are part of the cup design.
My moving the empty I moved all those elements at once while deforming the headband and all fit!
This is explain it? I can make some screenshots if you want.
The modeling is very sleek and clean, and I could fall in love with that red material. Superbly executed.
May I ask how you setup your lights for this?
Excellent work Cekuhnen!!
Wonderful design and I’m also in love with the red material.
Is it the layer weigh based thing? I would love to see the setup.
Cycles is amazing by all means.
Hi James, I only use one HDRI and rotate the image by changing the Z value in the mapping node, so it fits the background and creating nice highlights. I tested many HDRI till I found on that is good. In addition for extra highlight lights I can use a mesh/area light can you can set it to create highlights if you want only (glossy) or also emmitt light (diffuse). But in my rendering I forgot to turn it on as I noticed now. lol.
Here is a screenshot:

The materials is based on Jonathan’s Williamson headphone tut: http://cgcookie.com/blender/2012/03/21/rendering-headphones-blender-cycles/
I just modified it slightly and used a different color combination.


After all Cycles proofed to be my choice of rendering now. Fur is also possible now, anisotropic metal with linear and radial brush patterns. SSS is missing but it is slow and time consuming and a simple translucent can deliver the impression right now often already well enough.
What I also highly prefer with Blender and Cycles compared to Keyshot is that I can design and render right in Blender.
I also model the product in a way that I can 1:1 transfer the shapes into a NURBS application like Rhino or Alias Automotive and the NURBS patches perfectly fit the subdivision polygon model.
All the boolean objects in Blender like cut outs etc will be transfered as well rebuild and in the NURBS application used to do the trimming.
So I use Blender to play through the design and sculpt, while the NURBS application would only be used to make the production model!
Way to go Blender! Thanks Ton and all the developers!

Here is a screenshot of my scene showing you where my empties are:
Empty Hook Deform: deformed the mesh
Empty Hook Original + Deform: provide position and rotation values for deform empty to copy from so I dont have to hand adjust deform empty.
Empty Move Elements: parented to Empty Hook Deform and is parent of all other elements like speaker and boolean objects
Moving the deform hook moves the move element empty and thus moves all other things at once
The only downside I noticed is that the boolean modifier can over time slow down your Blender a lot.
It seems as Blender all the time refreshes the boolean modifier result even when clicking an object or entering edit mode that does not even have a boolean modifier at all.
When using subsurf and boolean things can get really slow - but well at the same time you have interactive modeling as well.
It would be awesome incase Blender could freeze the mesh result and only update the modifier when wanted or needed.
I hope the images explain everything well.
For the exploded view I used a similar approach. All boolean modifiers are baked and u can see I have axis empties those I will move
and sphere empties marking the original position of a axis empty. This way I can quickly fire and forget move my axis empties and with them move / pose certain parts of my design, and in case later I want to go back I snap the axis empty to its corresponding sphere empty and all fits again!

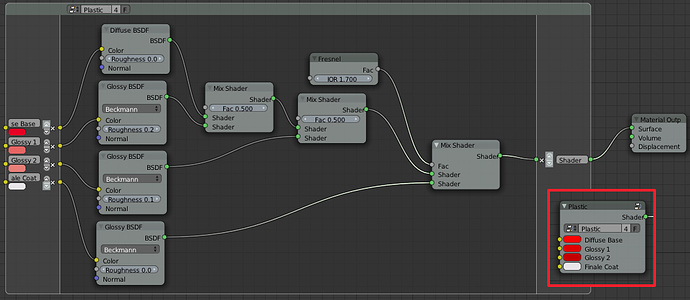
This has to be wrong. LOL
Four glossy shaders with different roughness… this must be a wrong approach. Anyway, the result is beautiful
What about a layerweight -> colorramp -> as a controller (factor) of roundness ? Just an idea. More can be added, like a normal controller. Saying…
The shader works very well specifically with hard mesh lights - they produce some stunning results and create this glow in the material you can still see when using an HDRI image instead. This is basically a car shader variation.