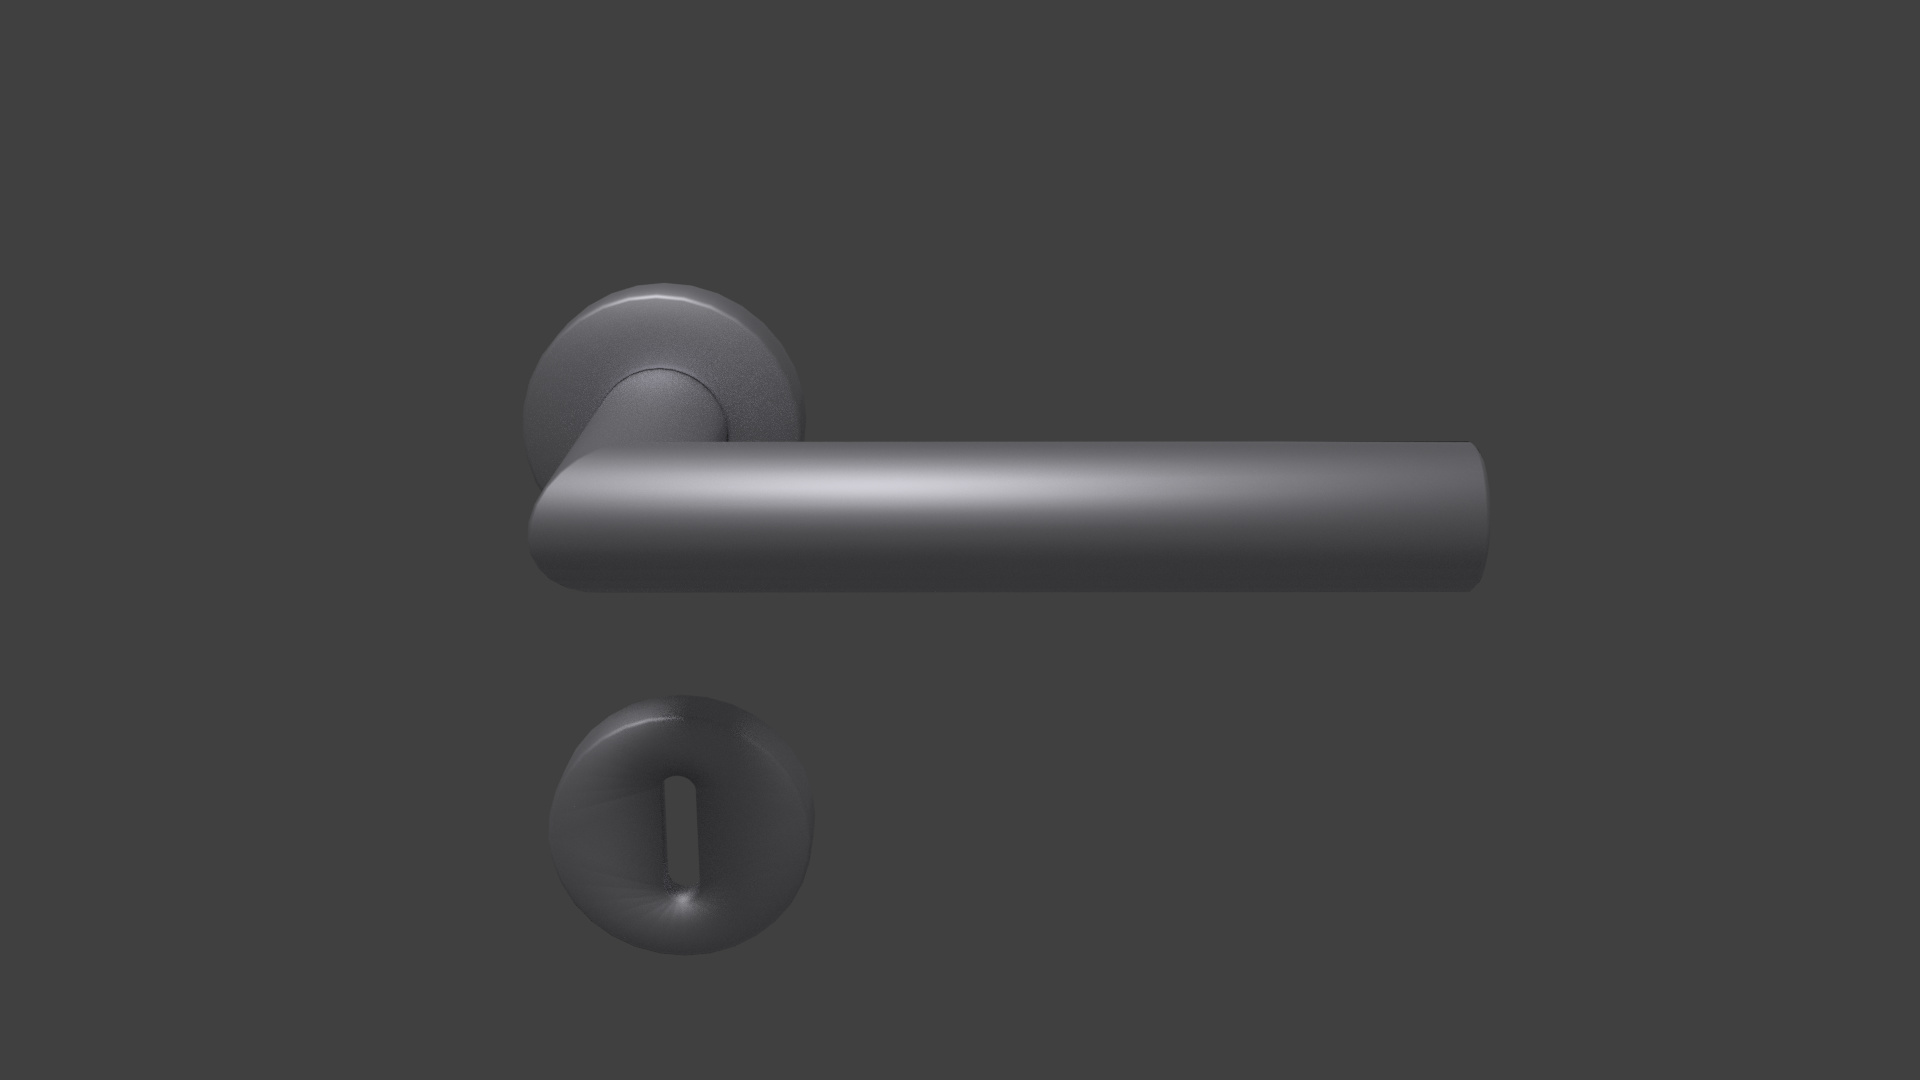
Hi guys. Im having a really weird problem with shadows in a really simple model. No modifiers. No subdivision surf. It is just a door handle. I recalculated normals, the only material it has is a standard glossy shader. Only one single sun light in the scene.
When activating smooth shading this is what happens (render view) ->
Im getting nuts with this. Sufice to say, when i disable smooth shading, it looks correct. I rechecked the geometry but its just the model doesnt have anything at all, i mean the handle is just a mesh transformed from a courve. But thats about it. Ideas???
Without a file, I can only guess that that strange end is not beveled, and it’s trying to fake a curvature (that’s what smooth shading does, essentially) between two surfaces at 90º.
There might be something wrong in the shader. If you shared the file, most people here could determine the problem in 20 seconds or less, however, you did not, so it’s hard to say.
I agree that you should share the blend or just part of it, so that the people can know how to give a proper answer. Anyway from what you say, it might be that the conversion from curves has generated a lot of edges that overlap between them so they produce artifacts in the render.
There are some ways to somehow control this, but it’s better to reduce the segments in the curve, and then convert to mesh and apply subdivision modifier.
Or perhaps another solution maybe applying the corrective smooth modifier, it may help fixing those edges.
This is not a terminator issue. It’s exactly as Ovnuniarchos predicted:
Smooth shading across hard edges in conjunction with elongated polygons…
Enable AutoSmooth for that mesh and/or add vertical segments to the cylinder.
You need to understand what smooth shading does: It tries to blend between neighbouring polygons with a smooth transition. If that happens across relatively sharp angles and if the neighbouring polygon is very long and “skinny”, the smoothing will affect its whole length, thereby creating shading artefacts.
Adding the autosmooth on the properties panel improves but it screws up the little bevels on the model, unfortunately and you still can see those weird shadow if you see the model on hard angles. Still what i want is to understand why that is happening and fix it any thoughts?
For a hard surface like this you need to add extra edge loops in the borders. You are trying to do everything in one smoothing group, and this always creates artifacts. As far as I know, cycles specially is quite sensitive to the lack of geometry. You need more geometry.
Something like this, I’m attaching the blend. For circular areas like the keyhole, to get the big area more flat you can do inset faces like twice or so. For the rest is all about CTRL-R, creating edge loops towards the borders. Then you can add subdivision modifier if it is needed.
Yeah apparently adding a few edge loops did the trick. I could have done the model in another way, but im following a tutorial and the guy didnt have that problem (why im surprised :p). I usually use subdivision surface in everything, it is the first time i model something that i know it is going to have only smooth surface but no subdivision modifier. This happens when you start to do easier tutorials and you realize that easier things are sometimes the ones that cause more problems lol.
Maybe the difference was the glossy material? The artifacts comes from the reflection not the shadows. You can try with a simple cilinder and a glossy material and you would have the same result.
Anyway as I said, at least what I can tell from my experience, I think that Cycles doesn’t handle the smooth shading quite good compared to other render engines, even if you apply a baked normal map you cannot do too much low poly, you need to add a certain amount of polygons, otherwise you get artifacts.
Artefacts like these can come from grazing angles of specular surfaces and can be considered a rendering error in most cases. Radeon ProRender had this problem, but has been since fixed in recent builds, and I saw a post in RenderMan about the same issue. It could be geometry driven as well, however. I’d like to see the tutorial that you are having so many issues with.
Nah, i never had this problem, at least, not until i migrated to 2.79 (that i found that it has far more bugs than previous versions oh my). And ive been using smooth shadow basically always in conjunction with Cycles, never had any problem. I have an nvidia card.
My grippe is that doing everything exactly like in a video you see on the screen … the guy in the video doesnt have any problems at all (yes im using the exact same shader as well) and you need to go nuts trying to figure out things like this. Probably he added edge loops but since he never shows that part again, no way to know (probably because its a different Blender version?). The tutorials im watching are simple ones, but the guy is not really good at it, and as i presume he skips a lot of things (for example this part of adding extra loops to fix shading). But the guy had hundreds of tutorials and i dont remember his youtube channel, i think he was called janamam or something like that (i already had the videos in my hd since time ago). He is terrible doing tutorials, but well, i keep doing em because you always learn something new (and other times you just want to kill the guy because he really doesnt have a clue how to teach… haha).
Oh, you did attach the file. I only saw it now. This might be a bug in recent versions, however even if it used to behave differently in previous versions this is not a glitch or video card error and has a really logical explanation that is actually quite useful to know so I’ll try to explain as well as I can.
In order to understand the issue you first need to know what normals are and how Blender treats them. Normals are basically vectors that define the direction of the surface. When using smooth shading Blender averages the normals by the angles between faces so if one face is facing one direction and the other connected to it is facing another, the edge between them will have normals facing a direction which is in between the two. If you have a look at the image bellow it might be a bit easier to understand what is happening. The thing is that this way in this particular case it so happens that the averaged normals of the surface may tell Cycles that the surface is facing away from the camera.
I am not sure - it could be that this issue was somehow addressed automatically in previous versions however it does make sense to have the normals or the geometry made the right way from the beginning. If you used more segments in the bevel, the issue would not be that visible, however the surface would still have normals that are incorrect. At the moment Blender does not have any options on how the normal averaging is done, but I believe this issue is planned to be address in the near(ish) future. There is currently a free addon that is very useful in situations like this: Yet Another Vertex Normal Editor (Y.A.V.N.E.). If you installed it you would only need to go to edit mode select all and set all the surface normals to be averaged by face area instead of by corner angles:
Hopefully this will be supported natively with next release and it will work with modifiers as well.
Very cool yeah! Thanks for the information. I’ve been testing it, I see that still the keyhole has some shading issues, but that would definitely be a good feature for better working normal maps and low poly as well.
Well the one click solution may not work all the time, but the issue is with normals here, so that’s the place to fix it. YAVNE has some more functionality. There are some nice examples and explanations how to use it in it’s Github page.