This is something I’ve been working on a for a while. I want to cut a filigree pattern out of a tube. After much labor (and help from you people) I’ve created the filigree, then made a negative of it to subtract from the tube. It worked! But I can’t figure out how to apply a subsurface modifier (or bevel) to round off the edges of the filigree without it resulting in terrible jagged edges.
I eventually want to 3D print the model I’m working on, if that makes any difference.
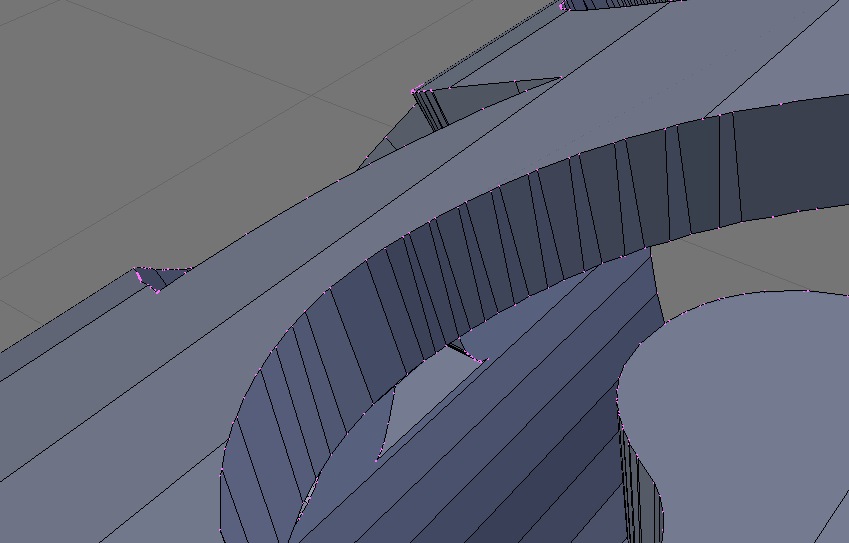
You’ll have to manually clean up the mesh, there is no one click wonder button.
For a clean subsurf have an edge loop around each edge.
X / Dissolve edges will give you a starting point to get rid of a lot of triangles. Triangles and subsurf on a non planar face = bad result, don’t do it.
Get rid of all these unnecessary vertices (X / dissolve) for example. Keep the mesh as simple as possible and faces as even as possible for best results. get rid of triangles and ngons (> 4 sides), ideally use all quads.
I looks like you just used a booleans on very long faces, this gives a mess, have additional loops around your object so the boolean effect will be cleaner. Don’t cut out shapes with too much detail or you’ll get lots of unwanted vertices that will just cause more work.
Hi Andy I remember your SVG part of the project. Took a look at your file and I really think a lot of the problems you are having stem directly from the fact that you dd not work with your SVG enough before importing it into Blender. This causes considerable problems that you are facing now - messed up geometry, lots more verts than you need that will have to be fixed etc. It would be much better - and no one ever likes to hear this - if you were to go back to your vector editor and fix the SVG. The problems really multiply when you start with a foundation like that.
Issues to fix - too many nodes, and their spacing is really uneven. When you convert it at a resolution of 12!!! as you had set this results in far more vertices than necessary or easy to work with. So if you reduce the number of nodes and distribute them better and convert at a res of 3 or 4 things will be much easier to work with. You won’t lose any time, because the time it takes to do this is far less than the time it’s going to take to fix the mesh you have.
I see. Well I’m trying to learn to do things right from the start, so I’ll definitely go back like you said. Thank you very much for taking the time to explain that. I was concerned that the curves wouldn’t be smooth enough, but now I’m seeing that things can be smoothed out later. Plus my computer was getting bogged down while applying modifiers.
Thanks again!