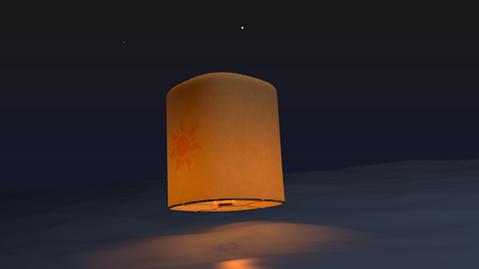
I saw Tangled the other day and though “wow” this movie is amazing. I felt really inspired by the scene with the sky lanterns and thought I would try to recreate it. So far I’ve only made one lantern but I think it is going well.
This render took an astonishing 5 hours and 33 minutes! I’m guessing that rendering the fire particles as lamps like in Andrew Price’s flamethrower tutorial doesn’t like reflections very much.
What I plan to do next is make the many shapes of lanterns just like in the movie and scatter them across the scene. After that…well…let’s hope my computer doesn’t burst into flames.:o
Thank you Jakenova over on DeviantArt for the image of the sun and critiques are very much welcome.

You could probably cheat and use plain old particles with an emit value.
Or for distance just a sphere.
That sounds like a good idea. However, I tried and the particles don’t want to emit anything. Do you know how to set that up?
How many lamps do you have, if you have perhaps hundreds of lamps in there with soft shadows then no wonder it would take so long.
You could probably get a similar effect with just a small handful of lamps, it would be a approximation of the actual light then, but it would render a lot faster.
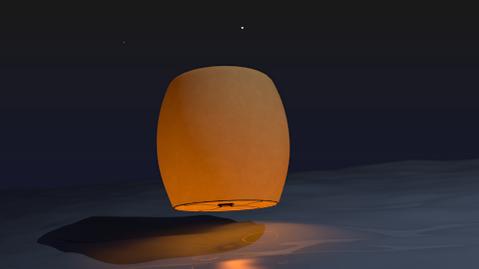
I have 1000 particles and each is a lamp. Earlier I tried lowering the particle amount to see if this would help and not change how the fire looks. It turns out I can turn the number of particles way down, awesome! I will try using just a few lamps, though.
This was rendered with only 25 particles.

edit: I stand corrected on the 25 particles part. It only worked for a few frames out of about 200. I just happened to be on a frame that had most of the 25. Back to fixing again 
Looking good - the details is amazing.
Is your water interacting with the sky?
If not make it fade to to the sky, that should give it more realism.
If you mean interacting with the sky by checking the fade to sky in the mirror settings. Then no it wasn’t ![]() I will fix that
I will fix that
Looking good - the details is amazing.
Thank you. blushes ![]()
Update: I made the sun lantern less boxy. The reference image I was using made it look boxy and another it was more round. oops! I also made a few different shapes and colors of the lanterns.

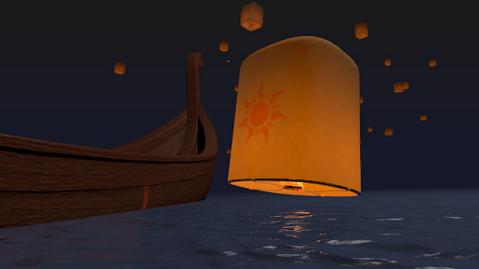
Update: I’ve modeled the boat. I had some difficulties with the swirlies…but a hop skip and a boat ride away I think they turned out fairly nice.  What do you guys think of this boat? I would like to have some feedback before I go and texture it.


2 Likes
haha never heard of that film, but it sounds real good  So do your models by the way, I love the style and you seem to have recreated it marvelously !
It is a very good movie. full of laughs and one day could be a classic 
and in case you don’t know it’s a tale about Repunzel
Looks really cool. How did you modeled boat? Using curves for top and extruding it to the bottom? Thanks.
I did not use curves at all. Everything was done by extruding, pushing and pulling.
You can find the reference image I used by googling “tangled lantern scene” and it is the third picture.
Does anyone know of any in depth uv unwrapping guides? I already know about creating seams and doing a few things in the image editor but I can’t find a guide that tells how to edit the uv’s in a way to effectively place the texture on the model. I once read a guide about the theory behind texturing but they only mentioned that they spend forever and a day pushing and pulling the uv’s and not actually showing the process they took.
Does anyone know of any in depth uv unwrapping guides?
There are usually 2 ways about it:
-
You unwrap the uv’s and then use a square “test” texture to make sure the UVs are evened out and no stretching will be visible. Then you place your texture on top. This is best for tiled textures that can support any orientation. This tutorial shows that process:
http://www.blendercookie.com/2009/05/18/creating-a-burlap-teddy-bear-part-2/ -
You build your texture first and then match the UVs to the texture. This is best for textures with a hard sense of orientation like some woods. Also is a must for textures you don’t want to loose any resolution by scaling, pinching and other manipulations. I dont know any tutorials showing this process (i’m really weak at it too) so maybe someone knows best than me.
option 2 is what I’m looking to do. I have a texture from CGtextures but I have not found a guide on how to place the uv’s in a way that looks clean on the mesh.
I decided to give texturing a go. Not too shabby I think. Now does anyone know how to create a custom bump map?

I am starting to get an itch to start a new project. trying to resist and actually get something finished for once is pretty hard. I must press on!
Ok. I stuck the boat in the water to see how it looked. I also tried adding lanterns in the background. Does anyone know how I could achieve this with a particle system? The thing is that each lantern needs a lamp to go with it so I am unsure how to do it.
Hey there- if you want moving lanterns you could make a new group with the lantern and lamp only then have a particle system with particles as the lantern locations and set the render type to group and full group. this will add the group ‘lantern’ to each particle.
Wow this is really cool for a blender project, can’t wait for the final result. One thing I might suggest I (given the rendering times you posted) strongly consider using level of detail (LOD). In other words, make different levels of mesh detail of the lamps. That way the one far away wont drag on the render times like the ones up close.
Great job on the boat, better than I could do.