Working on this project, I came to texturing phase. I unwarped meshes and saved them as images.
So far so great.
When I came to putting texture into meshes, I added material to the mesh with texture ready state. Moving to another mesh the problems are one/multiple of the filling list:
-Some objects/meshes have mimicked another’s object texture and the mesh is partially texture with a texture not belonging to it.
-The texture I load does not spear in the object.
-Some objects have the material icon covered.
-Some objects load and image texture that consist of two parts; UV unwarped map and a texture image from the already textured and good object!/mesh.
Can someone provide me instructions on how to add texture correctly without errors. Keeping in mind that I have all the textures as a colored (edited by external image editor) UV unwarping images
Answering your question as in the order they appear in:
-Yes, what I meant was as you said.
-No. When I was adding materials, I was in object mode, selected the object, selected the mesh which is the child of object selected at last I added material from material properties.
-Names of materials where not (material.001) they were (character mat OR character metal mat).
First one represent the object correctly textured. What I did to texture it was adding material, opining image, then replacing it with the right one.
Second picture represent the material having a colored icon.
Third one have the correct textured object but the image load the right texture and a uvmap for another object to the right.
Forth picture have another object textured partially by another texture image. When I try to load then replace the texture image whit the right one, nothing happens and the object remain the same.
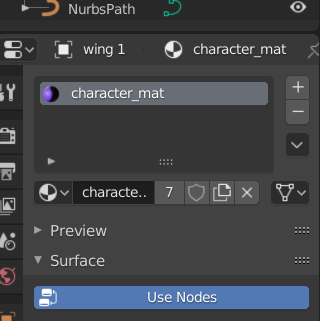
First image you have one object selected, so you get one uv map showing up, wing 1.
Second image you mean the red circle in the outliner, that indicates that you have a material on the object. eyebrowsGeo1
Third image you have the eyebrowsGeo1 selected and the wing 1 selected so you are getting the eyebrowsGeo1 UVmap.
Forth image you have the “hat” image (in the base color for the material) which is the same image that you used for the wing.
It appears, as I suspected, you are using the same material throughout. I think what you need to do is. Click the little number directly above the select button (when in object mode) and change to the image for the backpack in the base color drop down (image texture). Of course the backpack should use the unwrap from that object automatically.
-First image has nothing wrong.
-no not the circle, where (active material) is written, this the icon color I mean. It should not be purple it should be as same as the mesh.
-third image explaining make sense, but am sure I am selecting only the wing.
in your explanation for the forth image make sense too. Only that the hat image is not an image, notice that the word hat appears in any object I select. Maybe your saying is write and that am using the image of the wing as a base material. How do I correct this and use a normal (character mat material) and use a different image as a base?
-How do I do what you are suggesting me in the last paragraph of your reply?
A slight off-topic as you can see, I have this bug and it have six wings. I did the image texture of the first one and is as it look in the first image. Is it possible that i use the wing texture I did to texture the rest of the wings? Cuzz it took me long coloring the uvmap for the first wing.
When I build the bug I just made the first wing then copy paste the wing as an object and placed it to get the rest of the 6 wings. So basicly they have the exact geometry but the uvmap of each is not the same to the other.
Yeah, I was just pointing this out because this is how its supposed to work.
I can’t figure out what you mean.
The reason I say that is because the selection is indicated in the top left and it says eyebrowsGeo1, and also because the wing is a darker color orange which indicates it is the active object rather than the selected object.
This is what made me think you were using the same material.
As I said above, with the object selected (in object mode), go over to the material properties panel and click on the number, this will make a new independent material.
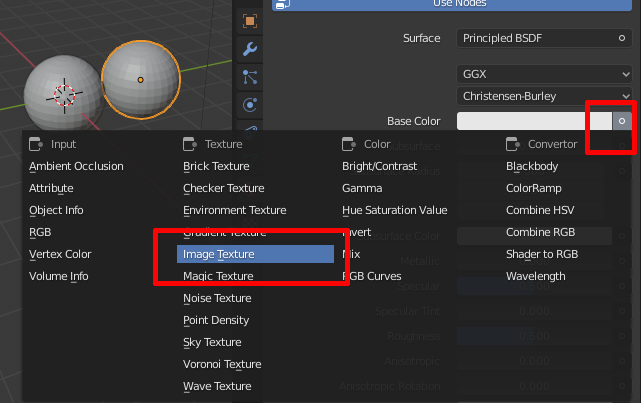
Then rename the material to something like “wing 2 mat”, then go down to the base color drop down and select image texture:
and select your image for the object.
Now, this applies to your most recent post, this material should (as far as I know) use the UVmap on the object it is on, so if you haven’t unwrapped it it won’t work.
So, I think what I would do is after you have the first wing the way you like it just duplicate it again six times. That way they should all have the same UVmap, or at least a duplicate that is the same. note: All of the wings will have the same material in that case.
Wing2,3,4,5,6 are already a publication of wing 1 that I just moved/mirrored to make the rest wings, they have the same uvmap exported but the difference is the orientation of the images. Here are 4 of six uvmaps after I exported
Yeah, thats what figured but after you get the material and the UVmap sorted out for one it will follow the wing as you transform it. So it would be simpler to just do that again.
As far as the slightly different UVmaps I don’t know why that would be.
Okey, it seams that this model have a mind of it is own and has apearntly decided not to get textured.
So this object has a material of it is own, base color as an image texture.
When I open the image from the base color section, nothing happens to the object.
When I load the same image into the image editor, also, nothing happens. Notice that I have a small riplica of the uvmap top middle of the image I loaded.
Editing image in the image editor takes no effect on object, when I reload, editing I done is removed.
The eyebrows are dark gray, I don’t know what kind of an image you would have for the eyebrows but they are dark gray. I also don’t know why you have such a complicated UVmap for the eyebrows but according to the top left that is what is selected. The replica of the UVmap I can only guess is from the UVlayout you exported still in the image. If, as you say, you are using PSD’s maybe a layer you have hidden in photoshop is showing. I would not recommend PSD’s I would use PNG’s or TIFF’s. The asterisk (*) by the image menu in the image editor indicates you have not saved the image, it is not saved automatically. So the image (as edited) would not show up yet.
Yeah, maybe you should watch some tutorials about texturing and UVmapping to find a good work flow/process and to see how someone else does it. I haven’t watched too many myself and don’t know a good one off the top of my head but youtube has plenty. I have noticed that with 3d work it can get pretty frustrating if you don’t have a good work flow. This is something I have started to work on and its much more enjoyable and makes more sense.