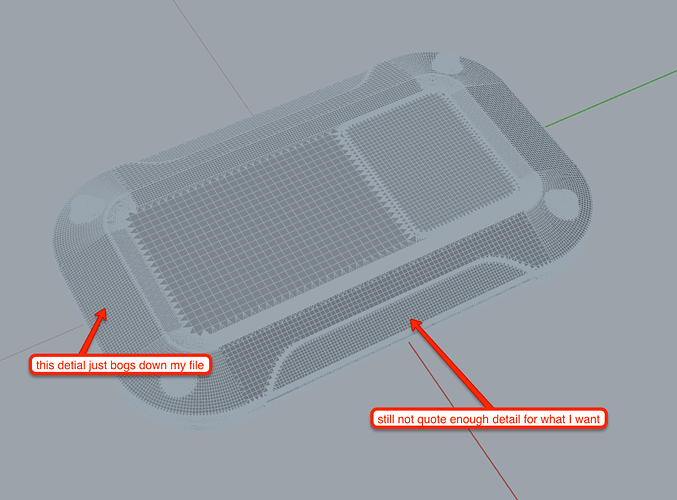
I’m a professional Industrial Designer. I’ve been trying for a few hours every night for the past week or two to figure out a workflow in Blender to texture parts for 3D printing that I’ve exported from CAD packages like Solidworks. I’ve become kind of obsessed with this problem. I found lots of people asking, and some companies that do it (but keep the secrets to themselves), but no complete answers, so I’ve joined the forum here to make a detailed post about what exactly I’m trying to do and see if the community here can help me solve it. I think the answer would be useful to a lot of people, and I’d be happy to make a tutorial about it once I nail it down.
I’m looking for 2 kinds of feedback:
-
Am I doing the right thing? Input on my BIG PICTURE WORKFLOW.
-
Am I doing the thing right? Input on using Blender efficiently. I’m new to it, and Blender is really feature-rich, so expect some really noobish ways of working. For me to use this professionally I need to cut it down to where Time Spent < The Value of Texture so this means I also need to get quick with my tools. I need help learning shortcuts.
Here’s the challenge:Displacement with a UV map is not crazy hard when you’ve created your file in Blender and have a clean mesh topology, but when it comes in as an STL from a nurbs based modeler, it’s pretty nuts to work with.
Here’s my BIG PICTURE WORKFLOW so far:
-
Import stl from CAD package at a resolution suitable for my printing application. This is a very non-uniform triangular mesh. Bad for displacement maps.
-
Remesh the areas where I want texture to be more uniform and very dense for high detail displacement mapping. I don’t want to remesh the whole thing because I’d need an absurd mesh density to maintain certain features I don’t want to alter, like very small corner roundings.
-
Unwrap the faces to texture to create a UV map
-
Displace the faces with a modifier
-
Possibly Repair mesh errors to make watertight (manifold) for 3D printing
-
Export as STL
Here’s what I’ve had the best luck with so far:
-
Import - No trouble here, but open to other ideas for getting a better mesh to start with.
-
Remesh - I’d love to be able to use the remesh modifier on a vertex group, but it doesn’t seem to be an option. Instead I’ve been going in sculpt mode, masking off everything but my target texture area and using dyntopo to make the mesh more dense. I use a brush with the strength as 0, so it’s just retopologizing, not sculpting (I don’t like how manual this is). It also can destroy edges with small fillets (rounded corners). The ideal workflow would be to select all of the faces I’m interested in, and just apply it all at once with some kind of modifier. No clue how to do that.
-
Unwrap - Once I get a dense enough mesh I’ve been selecting it all and using select boundary loop > mark seam > unwrap. Doing this I got a UV map of only the areas to texture, which I liked. What sucks the most is trying to make selections of every bit of a dense mesh like that. Even with the lasso select it misses verts, which messes up the unwrap. I’ve had to zoom way in and just slowly paint my way around, making sure I get them all. Takes way longer than I feel it should.
-
Displace - With the right mesh density and UV map, displacement is actually pretty simple. No questions here yet. Also, for random textures I could just paint them in by hand with a texture brush, but i usually want something like a honeycomb pattern or something, so I don’t think texture brush works here
-
Export as STL - this should be easy, right? Maybe repairs will be needed first?
I’ve attached my test file. It’s an improvised producty-looking shape I made in Onshape that I think exhibits a lot of the common challenges I’ll see with this kind of workflow (If I just needed to do a cube or cylinder, I wouldn’t be making this big post).
Attachments
Mesh texture Test Part (1).zip (5.99 MB)

