You are right. Roughness in Principled BSDF which has its glossy component set to Multiscatter GGX(default) will look different than roughness you would get by simulating tiny surface imperfections on a glossy shader set to 0 roughness(in your case it’s not 0, so you get some mix of Multiscatter GGX on top). I’ve done tests for diffusion shaders how tiny surface imperfections change the look of a surface. That’s for a diffuse shader though and with actual geometry, not bump maps. You know why I haven’t tried mirror surface with imperfections? Because I cannot render them. It takes too long. I have a feeling if you control surface roughness with a bump map, it’s very inefficient as well and it’s probably not the best way to atchieve good results, because actual roughness algorithms are way better for this. And you are doing this if you use bump map too small to actually be visible to change how surface reflects the light. But, sure, it looks different. It’s just not a good kind of different. You get results that are less plausible, the render time increases significantly or it gets cleaned by the denoiser anyway and at the end of the day this is not how you are supposed to do this, what you get may be less realistic and less predictable. That’s just not a very good workflow. I would not recommend this. You might end up with a physically implausible result that will look weird and it might be hard to tell why or in best case scenario that just doesn’t matter and can be done more efficiently. My advice would be to develop the look in ways that are intended to be used for this. I think same look you like can most likely be achieved controlling roughness and other shader properties. Bump maps are not for controlling how the surface as a whole reflects light, they are for simulating bumps. It’s just an advice.
That would be useful, thanks.
Is distance using the standard units?
I will have to see how that would affect things.
Thanks.
Possibly, yes.
Well, you might be correct, but I’m just not concerned about it. I may use the ray length thing to fade it out with distance. I’ll have to see how it looks.
It really does show up in close up renders. You can clearly see the canvas texture. It’s not too small to see.
I can’t say I know what the units are exactly with ray length. Usually, things default to meters in Blender and I’m pretty sure that’s what it is, if changing the units doesn’t affect it.
In my test file, lower numbers make the texture visible at a greater distance. It seems the colors are inverted when using a multiply node like in my example (white is far away, black is close) because of the way distance gets mapped to brightness.
But it’s not difficult to test different values manually in render preview. If needed, unplug the texture and replace the mix node’s 2 slots with vivid colors so the effect is easy to see.
Here is a test for the breaking effect. The inside structure isn’t accurate or detailed, I just wanted to see if the effect was possible.
Here is the file. It isn’t baked to save on file size. Start by baking the metallic structure, then bake the fabric.
The “AnimAll” extension needs to be activated for the file to work properly. This extension comes with Blender, but is disabled by default.
This turned out to be rather complicated and heavy on performance. It’s especially what I did with AnimAll that’s heavy, with the number of vertices.
The problem was that I applied the modifiers as they were in the file, but this caused the bevels to be subdivided and have a bunch of extra faces within them that made the polygon count uselessly high. If I redid the effect in the same file, I would make sure to avoid this problem.
The challenge with doing this in Blender is that the cloth cannot simulate and flap before it tears. I went around this problem by deforming the airship with some bones, then progressively allowing the simulation on more and more vertices along the tear. This is a pretty complicated setup, I don’t think I could explain how I did it in a way that someone else can follow easily (unless you are highly experienced with every tool I used).
Wow! Excellent work! Amazing! I think I could make that work with some dramatic camera work and lighting. I will download it and take a look at it. I wonder if I can add the control car and the engine cars and still have it work. I would probably get stuck trying to do that.
Thank you so much!
If you need it to break differently, or have the interior structure be more accurate, I could redo the effect with some changes. Also, this is done on the version of the file you uploaded with unfinished and broken textures, so you might want to have it redone on the final version of the model once you have it.
Again, fantastic work on this!
The way it breaks looks great! Of course there is no knowing what it actually looked like. It was rippped apart by the forces of the wind. All I have to go on is the stories written about it. Most of the crew did survive the crash. I imagine some of what’s written comes from them. What you’ve done there looks very believable to me, and I would put cameras in various positions to get different viewpoints of it.
Yes, I would like to work on the model a bit more. I think this is one of those cases where the model would be a special version just for this shot. The full model has the engine cars, the control car, and lots of cables holding them on, which I imagine would really complicate this shot. All of the internal skeleton would be a nightmare. I can’t really imagine how that would be done. It would probably have to be reduced to cards, sort of like how hair is done, or tree branches. A realistic simulation with all of that stuff would be extremely difficult. I don’t think it would be necessary to get all of that stuff correct. Only some of it would be visible in the shots. The great thing about this is, I can place cameras wherever I want them and I can direct what gets seen by the camera.
I will take a look at your file.
Thanks again!
I am sure I could simplify the internal skeleton if needed. It could be reduced to simple rectangle segments with textures for the internal details and you probably couldn’t tell from a distance.
You are right there! I have no idea what you did here. I have been looking at it. I am not familiar with those tools. You say it’s non-baked. I’m not sure how it would be baked. I’m not in the frame of mind right now. I did see that you joined the “decals” with the main body. That seems to work fine. I don’t know what the next step is. I’ll have to come back to it later.
Thanks again!
By baked, I mean the cloth sim. Go to the physics tab and you will find the cloth settings, go to the cache section and there will be a bake button there for the simulation.
If you get it to work, you can get a rough idea of what I did by watching the animation in weight paint mode. You will see I made a “pin” group that’s used to either stop or allow the cloth simulations on different parts of the mesh. You will see that group changes over time, releasing more and more parts of the mesh to allow them to flap. I don’t expect you to do it yourself though, I used Blender’s features in rather twisted ways to do things it isn’t designed to do.
I was fine with the decals because I avoided them for the test and did the split in a section where there isn’t any. I could tear through one if needed, but I would need to redo it in the material.
Yes, of course. I should have known that. It’s just been awhile since I last did anything with cloth sim. If I step away from Blender for too long I forget everything knew.
I have to find an appropriate HDRI for the storm in the early morning. I wish there were more HDRIs made in the sky.
If you can’t find one with clouds, you could instead get a cloudless HDRI and add some actual clouds to the scene. It’s even possible to find some free clouds online.
Of course, this is slower to render than just a background.
Thanks, yes, I think that would be a good idea.
I did find an HDRI that I think works. It’s very dramatic, which I like. I added my own camera in there and did this test render very quickly. I wanted to see what different angles would look like. This is by no means perfect camera positioning.
One thing I’m noticing is the stiffness of the fabric when it breaks. It kind of looks a bit like sheet metal. The actual fabric fluttered in the wind. We do have footage of the broken ship on the ground and you can see how it moves. Also, there would be the remaining gas bags and framework on the inside.
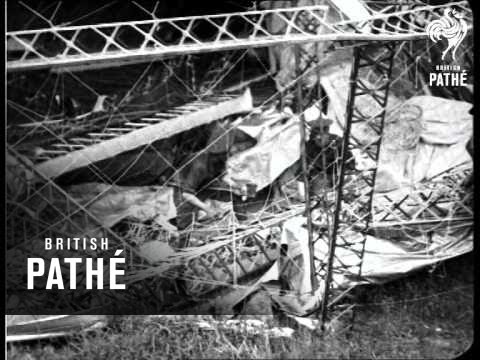
Here is a second version. I have improved the fabric flapping. I have allowed a larger portion of the fabric to be loosened, added longer tears and added a turbulence object to make the fabric flap more.
I haven’t done the inside structure yet. I will try making it and will come back with it when I have it.
Wow! I certainly appreciate your work on this! I never expected anyone would do so much work on this. Please send me a private message to let me know how you would like to be credited on this.
I will take a look at this as soon as I can.
Thanks!
This is also an opportunity for me. I had just come up with this destruction method and was looking for a chance to test it. I had tought of it for more rigid objects originally, like cars or plane crashes and still think it could probably do those too, if the cloth was more rigid. But this is the perfect use.
Here is a version with more accurate interior structure, as promised.
Here is the file. I am trying to send it with the cache. Hopefully it follows correctly.
Wow! It’s looking much better. Nice work!
Sorry, I had to step away from it for a few days.
I think now, all of the engine cars and control car need to be added back into the model and some storm effects need to be added. I had taken them out to figure out some problems I was having. The texturing on them hasn’t been finished.
Thanks again!