The Remnant game synopsis is up

Okay Here is an Image you can watch it and i explain it a bit more detailed below:
http://imageshack.com/a/img24/2964/qc99.jpg
This Character is based on a Concept by Natasa Sersen. The 2D Concept on the Top left was also drawn by her.
First i try to get it into the right shape with Boxmodeling, Subsurf Modifer and just a Few Materials for the basic colors.

Raw Model:
Only 3 Materials. Grey, Black and Bright Blue. So i can better an idea of how it actually looks like

Almost Finished:
After some Reshaping and a Re-topology. Now i used 12 Materials. Most of them just a Diffuse Color. I painted a Greyscale pattern for the Arms, Head and Fur Planes. It’s just multiplied with the Diffuse Color of the Materials.
At this point you can also apply some Normal Maps or Specular Maps to Bake them if needed.
In this example i don’t need them because it will be a handpainted character with a toon shader and already painted shadow + light details on the texture.

The UV Layout:
For this Model i decided to mirror most of it and use some repeating parts like the Belt. On the Top Left of the UV Map is the small pattern for the Fur Hairs (which are just random Mesh) (the actual texture Size i used, is 1024x1024)

AO Bake:
I added a Subsurf Modifier to the Model and adjusted it on some Parts by selecting edge loops and controling the Crease (Shift+E) so it doesn’t get too smooth overall. After that i baked the AO out of it

Texture Bake:
Now i baked the Texture on the UV out of the 12 Materials i Used. As you can see most of it is just basic colors. Only the Skin Parts have soem variation, because of the Seamless Fur Greyscale texture, which i applied on these areas before baking.

AO + Texture + Shadows:
For this character i needed also the shadows. You can setup a simple light Setup and just bake the full render, while all the other Materials are deleted (you just need 1 Material with Perfect White). So with Gimp i Combined them. Texture as Background, AO as Multiply and Shadows also as Multiply. I readjusted the values a bit so it’s not too Dark overall.

Finished Texture:
Actually Took most of the Time. i Ended up with about 60 Layers. Every single part has multiple Layers (The shoe for exampele has a own layer for shadows, kords, kords shadows, kords light, aso)
I just took my time and did one thing after another until every part was finished.

So this is my Basic Workflow. There is still a lot more which could be done like bake the Specular Color, Normal Map, aso aso.
I hope it helps a bit :-D.

this does help, but i am still struggling with the AO, here is what i came up with off of your other post, but i think i might be off a bit.


The scifi cloth pattern looks better now but the armor parts are still pretty dark.
Maybe you set the Armor Part Diffuse Color to RGB 0.025, 0.025 and 0.025 or Hex 2C2C2C. and also reduce the Specular intensity to something between 0.1 and 0.2.
The Red Color of your Armor could be also just a little brighter. maybe just about 4%.

Small suggestion, moving the legs closer together, a gap like that is unnatural. But otherwise very detailed and well proportioned.

fooling around with the the settings and redoing the texture i have gotten this far, hope i am following your direction but here is were i am so far.


Made the adjustment to the legs, thank you.


trying different things out now, still not happy with it.

okay here is the newly textured Space Marine with out scratches, i will add them later.


putting it to bead for the night so just a quick edit.


wow the last image really looks alot better. you are now able to see alot of the details.

LOL thanks Cerfribar, It took me a bit but I figured out what you were trying to tell me, yea I know I said I was going to put this one to bed for the night but I did a few more things to it, should have it loaded up tomorrow, after I rig it. thank you for your help brother.

True to human skeleton now, but perhaps he needs larger thighs; He is a marine after all. Nice colours by the way. Good job.

I have a rigging question, using the Rigifi plugin I scale my model to fit the Rig and hit ctrl+a to set the scale, my question is this if i rig this character at this new scale can i re-scale it and all the bones latter to fit my level with out getting some odd deformations? And should everything work correctly?

my rig question still stands but while waiting I added a face to the marine.


Just think of all the cool things you can do. Looking good though, sure you know of the details and bits, as for development, keep at it!

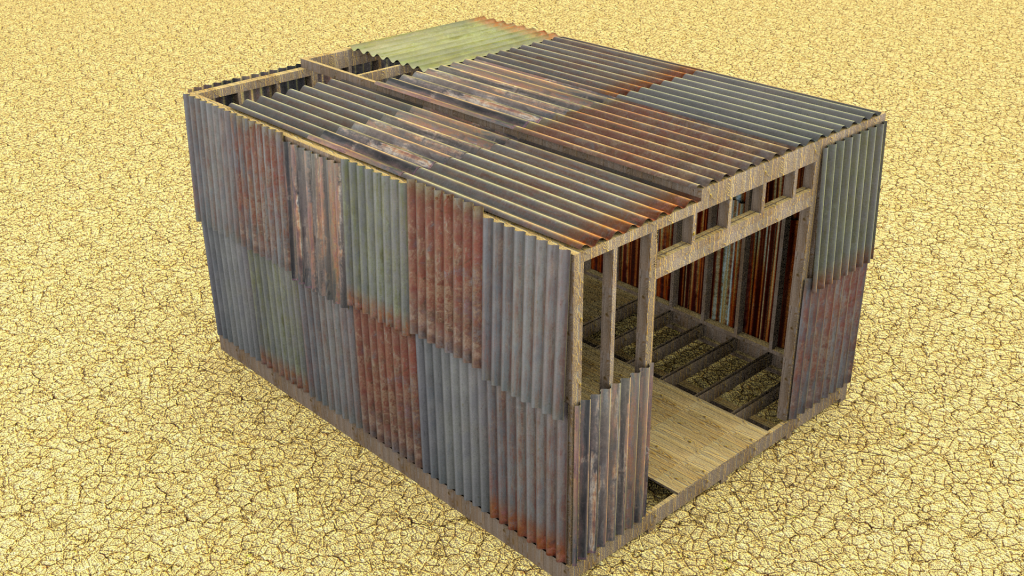
New Building created for a faction within the game. More buildings to be created soon with variations on height, materials etc…

http://i917.photobucket.com/albums/ad13/scott_rafferty2/Render_zps27738955.png

cleaning up the vertex groups on the rig now, after that have to fine tune the weight and build a test level.

can bones share 2 different vertex groups without interfering with another, like can the lower leg bone incorporate the vertex group of the foot, even if the foot is linked to the the bone?

Each Bone has it’s own Vertex group, but each vertex can be used for multiple vertex groups.
Let’s say your Leg Bone has the complete leg as a 100% weight vertex group and your foot bone is 100% of the Foot Vertices.
Now that the foot is in 2 groups for 100% it only moves by 50% when you move one of these Bones.
For example you rotate the Foot Bone by 90 Degree, but it only moves by 45 Degree.

I hope this is what you wanted to know :smiley:

New building for Scraps Faction. [IMG]http://i917.photobucket.com/albums/ad13/scott_rafferty2/Fotor0224215427_zps6c5b0817.jpg[/IMG]

Nice artistic work! This project is getting richer by the week!
Keep it up!

thank you, we are Aiming to please :slight_smile:

yea but i just pulled a n00b blender mistake I am correcting now, i went to Rig the Marine and noticed that my topology in a few places was messed up so i am remaking a low poly version with cleaner topology to fix the boneheaded mistake I made, but let that be a lesson to all the new guys here pay attention to how you layout your model lol or you will have to go back and start over.

This work is coming along very well!
Keep going!