how on earth does one do this geometry?
(the section of the image that is not “traced over”)
im trying with bridge edge loop and it works out pretty good
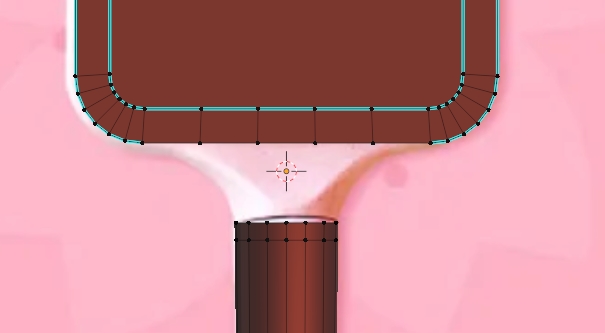
the joint from the cylinder (brush handle) to the “square” (the brush part). how is this done to be so well beveled, and not completely eff up the connection between the handle and the brush?
this shape’s blowing my mind!
any ideas on how this is easily done? or is this like, pro level stuff?
i tried a few options in the bridge edge loop window.
i still have some ideas i can test.
the part that’s odd to me (how to achieve it) is that the handle of the brush is wider that the rectangle part of the brush…
like, viewed sideways - the heights differ (the handle being wider than the “face” of the brush)and it’s that difference in height that i’ve not been able to reach.
as for the rectangly top edge loop i just added enough cuts so the vert count on both edges was equal. i thought this would give me a better result when using the bridge edge loop thing.
i’ll take more stabs at this until i get the shape, but it’s not an easy geo to make (as i thought it would!).
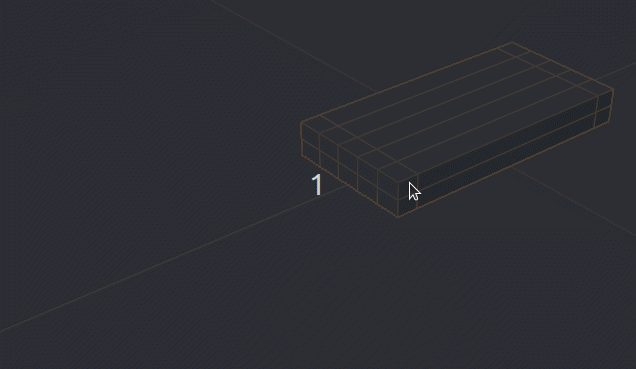
Instead of going from a cube to a cylinder go from a cube to another cube and let the subdivision surface do the rounding. Then inset the brush head in order to change edge loop direction.
I use Loop tools in the demo below. It comes free with blender. Go into the preferences > addons and find it and add a tick to activate it. Its an easy way to turn squares into circles and do other really useful sh… ummm stuff.
The handle has 14 vertices in the loops going around it. So make a cube the shape of the head with the correct number of loops to make 14 vertices.
Obviously it all needs tweaking…
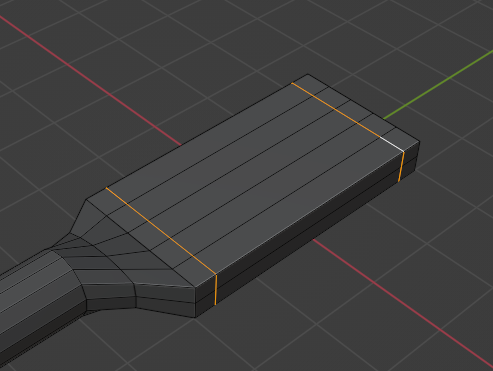
There is a level 3 Subdivision Modifier added at the end (shortcut Crtl-3). Go into the modifiers and un-tick the Optimal display checkbox. Thats all the detail you DO NOT need to add manually. Tick that box again…
These two loops are Holding Loops. They stop the ends from moving in too far once there is a Subdivision modifier active…
Keep the vertices minimal and let the Subdivision add the beautiful curves.
thanks so much everyone.
especially to @Matakani for the detailed explanation. ill have to look more into “Optimal Display” does, but thanks so much for the detailed explanation!
thanks again everyone.
also, worth mentioning, @Lumpengnom i really wanted the handle to be round, something i don’t think your final (step 5) is. thanks anyway though.
seeing you guys workflow teaches me a lot.
Oh, that is far from the final step but that doesn’t mater at this point. The only important thing at this stage is that you get the topology right. You need a decent edge flow before you go into more detail and finalize the shapes.
Only after laying the foundation by creating a good topology you start pushing and pulling the vertices as you need and make stuff rounder, bigger, smaller or whatever you need.
Then after getting the shape right you add more loops and hammer out finer detail.