Tips for doing rack focus with defocus in compositor?

Up until now, I’ve done rack focusing with the camera object directly in Blender’s 3D space. While this approach provides immediate feedback, dealing with camera depth of field in the actual render leads to longer render times for animation.

Now, I would like to render without camera DOF. I would like to add it as a post processing/compositing step.

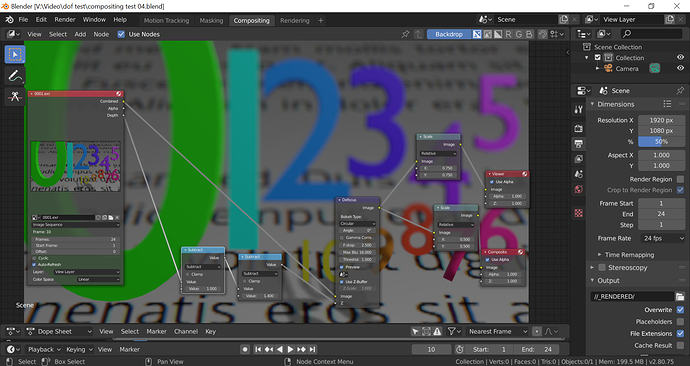
I have the basic idea of how to set this up in the compositor. I have the EXR image sequence going into a Defocus node (both the image and the Depth/Z are connected from the image sequence output to the Defocus node input). Then the Defocus output is sent to both a Viewer and a Composite node input.

Although it’s very, very easy to determine which object should have the focus when animating (by animating an empty target to where you want the focus to be), I’ve found it difficult to dial in good settings in the compositor to do the equivalent technique.

It seems like I can easily get the whole image to be out of focus…or I can get the distant object to sort of be out of focus while having the nearer object be mostly in focus. I have not been able to get the distant object to be sharply in focus but have the near object out of focus, though.

Are there any tips toward making rack focus easy in the compositor? Ideally, I would like to have some preset values ready to go and then just dial in where the focus should be. Unfortunately, my current attempts seem more…fragile than that. (And if I am not approaching this correctly with respect to the nodes I’m using, please suggest the “right” way to do this.)

Thanks!
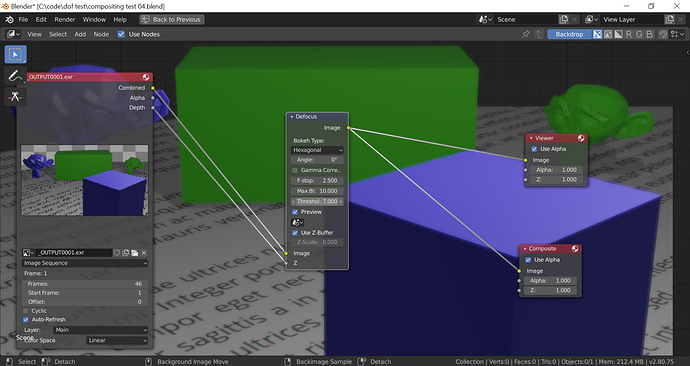
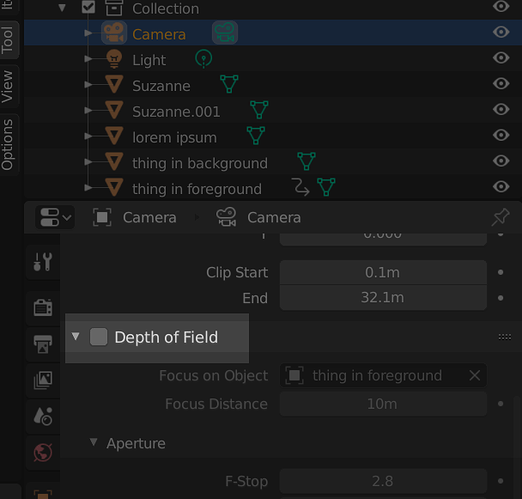
The defocus nose still requires you to use the focus target settings in the camera panel. Basically you have to set it up like you were going to render the DOF in cycles but leave it unchecked. The node then uses that focus point.

1 Like

Thanks for the tip. However, what needs to be left unchecked? The Depth of Field checkbox in the Camera tab?

Yes, Leave that unchecked otherwise cycles will try to do it. But use the Focus Distance box or Focus on Object box immediately below that. You can do it realtime after you render a scene if you’re using the focus distance. Adjust the distance to where you want it and press “i” to insert a keyframe on that spot.

1 Like

Hmmm…I’m not sure if I’m doing this correctly.

Here’s the test file I created:

dof test 08.blend (1.0 MB)

I should note that I’m using Eevee, not Cycles.

I used the camera’s “Focus on Object” feature and moved an empty around so that the focus was being racked to various objects. Then I unchecked the Depth of Field checkbox and rendered out the EXR files. When I tried bringing that file back into Blender’s compositor and set up things like in my screenshot above, I see no changes with the focus in the image sequence.

What am I missing?

I can only seem to get it to work on the scene, but not on an already rendered image.

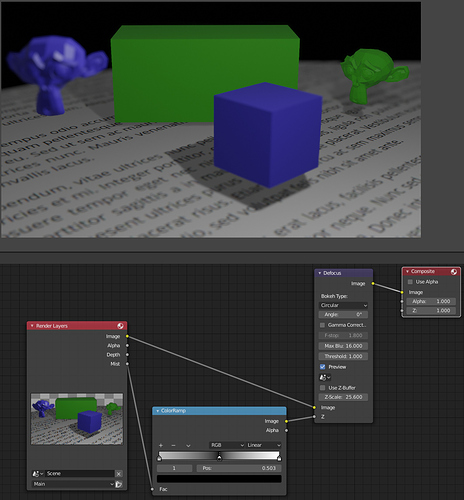
I found a kind of hacky way of making it work. I’m not sure why I can’t get it to work with the Z depth buffer. This unfortunately isn’t real accurate. Just move focus by adjusting the black marker on the color ramp. Not ideal but it works in a pinch. It would also take some time to make the falloff look more realistic.


I’m new to Blender compositing, so I could be wrong about this. However, I see you’re using a Mist pass instead of a Z (Depth) pass. My understanding is that a Mist pass is basically the same as a Z pass, except the Mist pass is anti-aliased…which means it’s actually less accurate than a Z pass, because Blender is making up fake values for depth in the pixels that are being anti-aliased. Also, the Mist pass uses a greyscale image to show depth, whereas the Z pass looks white but is using a floating point number behind the scenes.

It makes sense how you’re using the color ramp and how it’s affecting the Mist pass, but, as you said, it’s a very hacky way of making it work. My understanding is that the big animation studios do not render with DOF, but they use a Z pass and do the DOF in the compositor…something which seems like an obvious use case that Blender should be able to handle.

One thing that strikes me as odd in my screenshot in my original post is that, I rendered my EXR files with a Z pass. However, the file node has an output for “Depth”, not “Z”. But Depth apparently connects to the Z input in the Defocus node. At least, Blender allows me to connect the two. Yet, if I render the EXR file with a Mist pass, the file node will have an output for “Mist” (similar to your compositor shot). Now, this might just be an oversight as far as how Blender labels the output of a File (or in your case, Render Layer) node. But if it’s not an oversight, I wonder if “Depth” needs to go into another node before becoming an official “Z”? (I know theoretically it should be the same thing, but I’m just grasping at straws.)

I’m going to experiment more, but if you (or anyone) knows of any good tutorials on how to work with DOF in Blender’s compositor, please send them my way. I’ve searched and haven’t had much luck so far.

Thanks!

OK, I figured out a couple things:

To answer my own question from my last post, yes, the Depth output is supposed to go into the Defocus Z input. I saw some other examples online where that’s how things were set up.

One reason why I couldn’t get the Z pass to work correctly was I had the “Use Z-Buffer” checkbox checked. It appears that this needs to be unchecked instead. I can now kinda-sorta get DOF working, though it’s not particularly good. (I can put the closest object in focus and the other objects out of focus, which is progress…but I can’t figure out how to rack focus onto one of the background objects. Nor have I been able to figure out how to record the focus as a Z pass from the original render.)

after reading up about z depth maps it made sense.
Put the math node with subract between the z depth and defocus node. The bottom number should be the distance to the object in blender units.


Thanks, @oaschwab. Learning about the Math node and how it could be used here is helpful. However, it doesn’t appear that the number coincides with the distance to the object in Blender units.

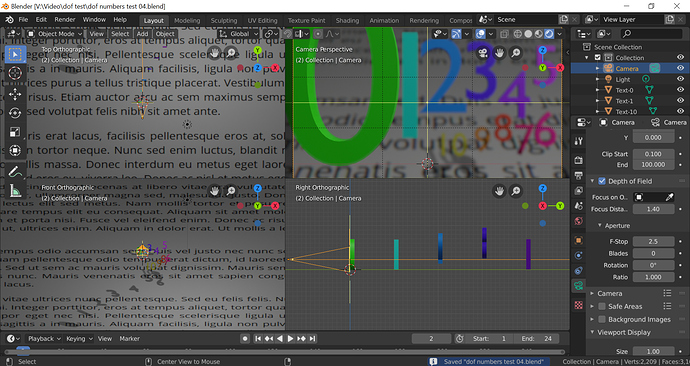
Here’s an example. I’ve made a new scene with a 50mm lens and put number objects, all one Blender unit apart from each other:

When adjusting the Depth of Field parameter on the camera, the focal distance in Blender units to the first object (the zero) is about 1.40. Each subsequent number object is one Blender unit greater (1 = 2.40, 2 = 3.40, 3 = 4.40, etc.),

When I render out OpenEXR Multilayer files and then bring them into the compositor, I am having a very, very difficult time trying to set the DOF to just one object.

Since the Math (Subtract) node doesn’t seem to match up with the Blender focal distance value, I figured that perhaps I could use an initial Math node as a sort of offset – assuming that, once I figured out the offset, I could easily use the second Math node to set the same focal distance value that I had in the original project file. Not only has it been difficult to figure out the correct values, but the Defocus node doesn’t seem to get the entire object in focus; I can maybe make the bottom or midsection of an object in focus, but I can’t get the entire object in focus like I can in Blender’s camera settings.

Anyway, I’m still kinda stuck on this and will keep experimenting. In the meantime, if you (or anyone else) have any suggestions, feel free to contribute.

Here is the project file that renders the numbers:

dof numbers test 04.blend (1.2 MB)

And here is the project file that I used for compositing:

compositing test 04.blend (520.6 KB)

So…interestingly, in the project file, I can run the render layer directly into the Defocus node and things work as expected.

Note that the Focal Distance is set to 1.40, which means the 0 would be in focus. But once I do a Math node and do a subtract of 4, then the number 4 is in focus. This is how I expect this should work with an OpenEXR Multilayer file run through the compositor…but the behavior seems totally wrong there. I’m wondering if I’ve stumbled across a bug…

Can you post your exr file?

Sure. Here’s an example EXR file with the Focus Distance set to 1.40. Theoretically, you should be able to do a subtract of 1, 2, 3, 4, etc. to set to focus on those particular numbers.

sundriftproductions.com/blenderartists/0001.exr

My initial thought is that out of focus area and size is dependent on three things
Focal length/film size
Aperture
Distance to subject

Blender compositer has not idea what the first is. So putting in an aperture has no actual correlation to real world settings. F2.8 @ 20mm has a lot in focus while f2.8 @ 200mm has very little in focus. So putting in a value of 2.8 on an exr that was originally from a scene that was done at a focal length of 20mm May result in a faked DOF that is not theoretically possible with a real world lens.

Maybe I’m barking up the wrong tree with the Defocus mode. From the documentation:

“Focus Pull”

Keep in mind that this is not real DoF, only a post-processing simulation. Some things cannot be done which would be no problem for real DoF at all. A typical example is a scene with some object very close to the camera, and the camera focusing on some point far behind it. In the real world, using shallow depth of field, it is not impossible for nearby objects to become completely invisible, in effect allowing the camera to see behind it. Hollywood cinematographers use this visual characteristic to to achieve the popular “focus pull” effect, where the focus shifts from a nearby to a distant object, such that the “other” object all but disappears. Well, this is simply not possible to do with the current post-processing method in a single pass. If you really want to achieve this effect, quite satisfactorily, here is how:

The example given is to split up foreground and background elements and treating them differently in the compositor. That can work for some shots, like an over-the-shoulder shot, but it would be less acceptable for shots where you need a gradual ramping from in focus to out of focus.

I guess at this point I’m going to give up on achieving focus pull in Blender’s compositor. I’ll see if there’s something that can do this in Natron or some other package. Ultimately, I may have to continue baking in the DOF into the render itself, even though it means extra render time. (Blender’s DOF does indeed look really nice, IMO.)

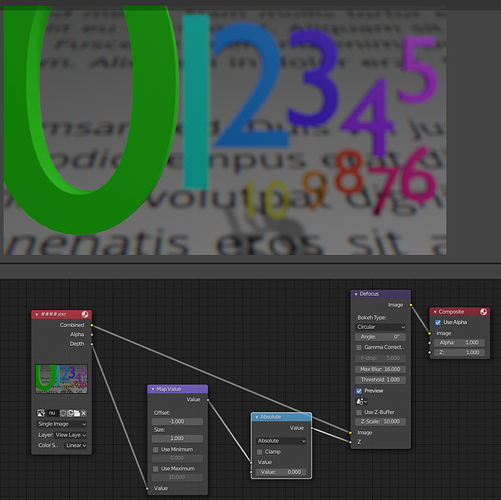
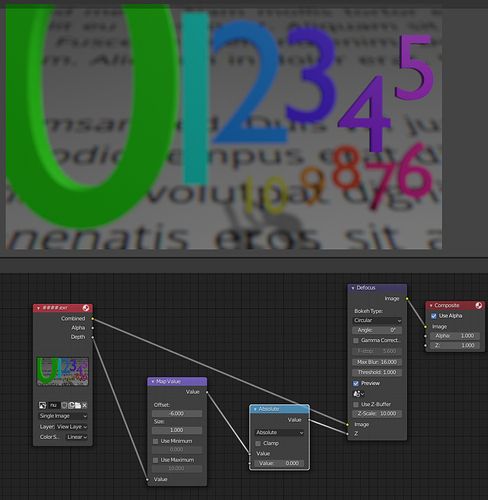
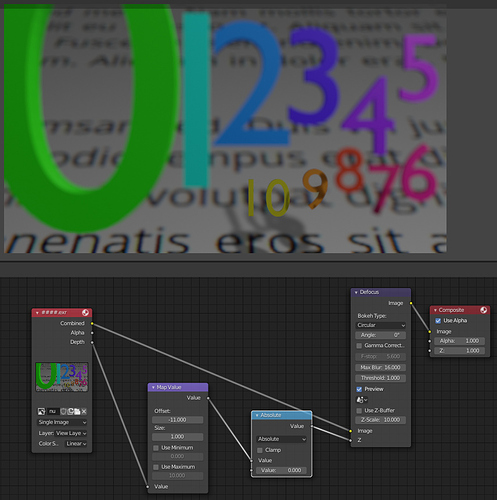
how about this? It looks like using the offset works, although it’s off by -1
For some reason it gets real screwed up when you go out past the last object and only part of the floor should be in focus. But I think that’s an error with the defocus node.


1 Like

Interesting! Thanks, @oaschwab. That’s pretty much what I’m looking for.

I can’t seem to wrap my head around how this works. So I have some questions.

  1. Why is Use Z-Buffer not checked? I assumed that I would want to use the incoming Z buffer (and maybe it does, but…I guess I just don’t understand the purpose of this checkbox).

  2. How does the “Absolute” node work? I assumed it was changing the input to be the absolute value, but that doesn’t seem to be the case. And if I remove that node, I get the behavior I had before, where I can’t get the objects close up to be blurred – just the background objects are blurred. So it’s obviously the key to selectively picking out objects that should be not blurred…but how?

  3. Does this technique rely upon the camera’s focal length at all? (I assume it doesn’t, since Use Z-Buffer is not checked, but it’s still not clear to me how this works.)

  4. I assume that you adjust Z-Scale for the depth of field adjustment, where a greater number makes the DoF more shallow and a lower number makes the DoF deeper. Is this assumption correct?

1 I don’t know.
2 absolute makes everything positive. So as you subtract numbers to move your focus point you end up with negative numbers on the objects closest to the camera. Absolute makes those positive so the node blurs them.
3 no. With any compositing node it only knows depth.
4 yes that’s correct and adjust the maximum to suit. Mine technically should have been higher to get a more accurate blur. In the last image the first numbers are blurred about the same. Should have gone higher but didn’t bother to redo it.

Great – thanks so much for the detailed explanation!