Howdy. First post here. I’m getting back into Blender after MANY years, and it’s very different now : )
I am trying to make simple 2D animations using the Import Image as Plane feature.
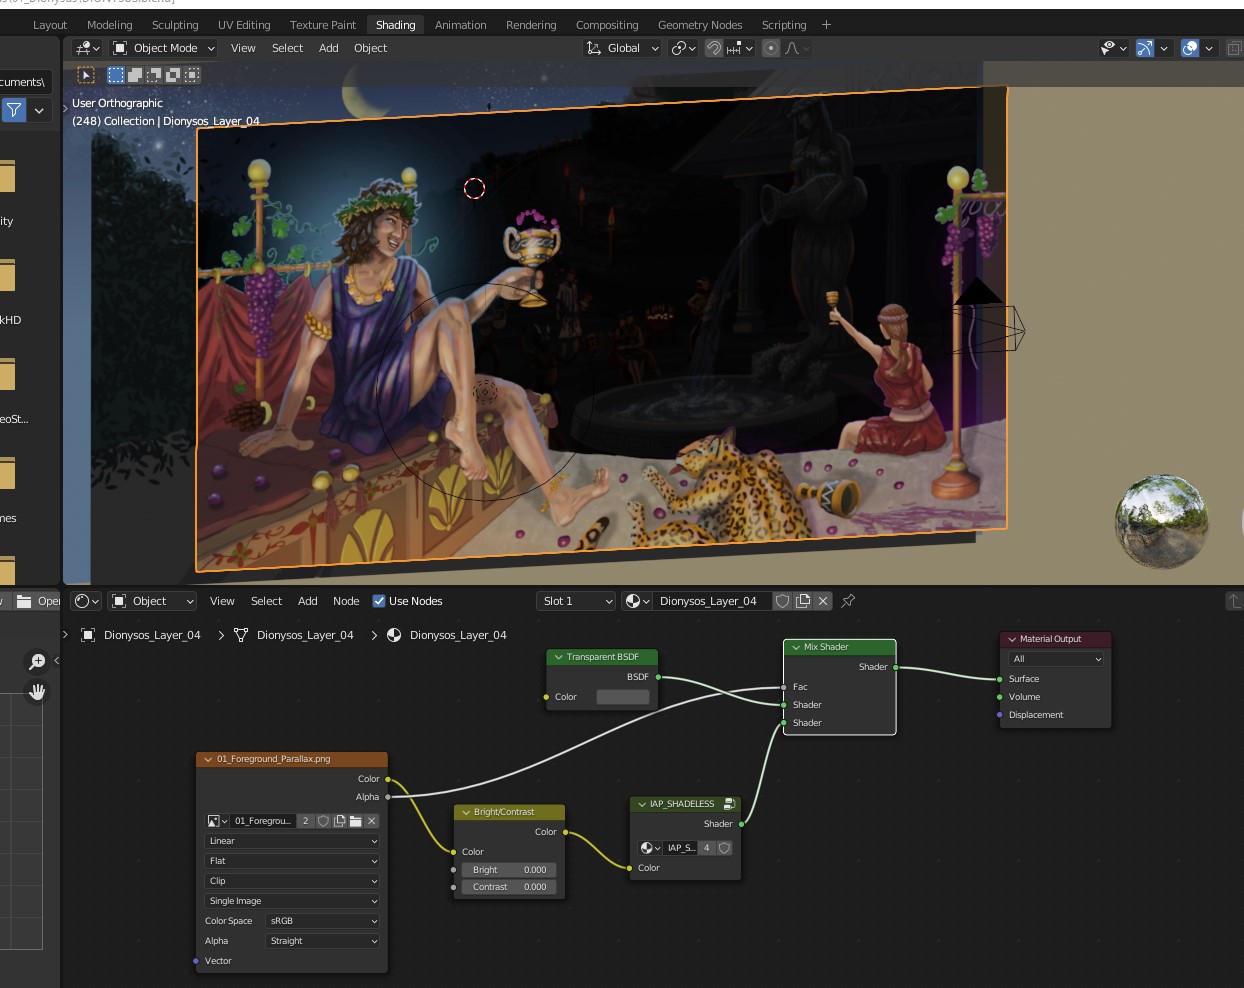
My first setup worked out pretty well, I even added some effects with particles, pretty straight forward. It’s just 3 layers of an illustration imported as transparent PNG layers onto planes.
But I have many questions. Maybe someone can help, I can’t find a lot of tips for this online.
1 - The quality of the imported image doesn’t seem perfect. It’s a little blurry and the colors seem a bit off, can this be improved?
2 - Obviously it’s kinda impossible to get lighting perfect for these layers bunched up like this. So I took the advice to import the images as “shadeless” or “emitter” shaders. And that makes the image show through without needing any lighting. HOWEVER, I actually want to use lighting effects sometimes, like to make certain areas glow… Is that possible anyhow at all?
3 - Is it possible to import a sequence of images to the plane?
4 - Is it possible to make a Image as Plane layer to be semi-transparent? Nothing I tried worked. It would effect the alpha of the PNG layer instead of maintaining the alpha and making the colors of the image transparent.
And otherwise, where can I get more tips on Image as Plane import features? For 2D animation and such. I would like to become an expert on this particular type of animation.
1-- Not sure about the blurriness although on the manual page they mention you can control the DPI. There are some settings under Properties > Material Properties > Base Color (which is the image) > Interpolation (which is linear by default). As far as the color being off I think its possible that that is due to the color management settings. Properties > Render Properties > Color Management > View Transform (which is Filmic by default, try standard) https://docs.blender.org/manual/en/latest/addons/import_export/images_as_planes.html#plane-dimensions
2- To make some areas glow, I would recommend two ideas: Cut out that part in an image program and import it separately, then add glow in the compositor (or bloom in eevee). Try painting a mask and adding glow in the compositor. I know very little about the masking features but it looks pretty powerful.
3 - Yes, check the manual page above under Import Options
4 - This I’m not too sure about, maybe try a Translucent Shader, in the Materials, you have to add the image again. Could you explain more what you mean?
Don’t know where to get more info, maybe some other people will help.
You need to open an image as a plane and study the settings on the import window…
You can import images, image sequences, videos, etc.
Treat transparency just about as you would on any image with or without an alpha channel…
In EeVee it is sometimes better to plug in from color to alpha rather than from Alpha to Alpha…
Video imported and actually set to 3 planes slightly separated…each one could be a different static image or sequence or in this case a movie file…and there is a multitude of possible combinations on how to connect transparency for alpha or color…in this case the color ( seen by the cone with reflections in the background…
Just copy this and use it to search the mass of YouTube videos on Images as planes…
Youtube Blender images as planes
then open something as a plane study the import settings, open the Node and look under the hood, kick the tires and start connecting things and see what happens…
Thank you for this thorough response! That’s all incredibly useful. I’m totally new and just getting used to things, so any input to reflect and confirm my ideas is really good right now.
I had some weird trials with the “bloom” effect. That seemed to illuminate entire objects which had the emit shader applied, and that caused problems because I was emitting from multiple locations which I did NOT want to bloom. But bloom seems to be a global, universal effect which I can’t separate into individual objects. So that’s actually exactly what led me to the problem I was in… because Bloom seems to be the only answer to “glow effect” wherever I search. However that might work out perfectly for future projects, it’s just that it didn’t fit my scenario here this time.
I was hoping that I could simply “apply a glow effect to one object”, but that sent me down the rabbit hole. It’s weird that would be so complicated. Seemed like it should be a very common, common feature. Like just making a light bulb glow? Isn’t that very basic for a 3D software?
Thanks a million for your response. I’m new (and/or the software has change from a decade ago) and I need to hear some of this. I’m jumping in rather fast and expecting easy results according to my view of things. I did experiment with the nodes and added a transparency node with a “mix shader” according to some tutorial, but it didn’t work like the tutorial and I think it’s because it’s a Image as Plane… so the side effect it caused the ALPHA AREA of the PNG image in the plane to actually add black to the Alpha area, so the PNG wasn’t transparent where it should be anymore, AND it did not go transparent where I wanted it to.
I think if you are careful with lighting and use only emission on specific parts as I mentioned this would work. Although you could use Cryptomatte on specific objects to get glow only on them in the compositor. In the following video he uses ID Masks in Cycles, I don’t know if you are using Cycles or Eevee, but I think Cryptomatte is available in both. The key is to separate the parts in another program. You can do some looking for Cryptomatte too. Cryptomatte can be used instead of ID Masks.
To respond to your observation about a lightbulb, it would be a different object with different materials.


")