So i’ve been trying to model a Nokia 3310. In my head i’m trying to follow a game asset workflow but i’m really not sure if i’m approaching this correctly. I’m using a sub-d workflow, keeping the base mesh as simple as possible and only adding geometry where absolutely possible (tell me if this is the wrong approach!). The bit i’m really struggling with is the holes and indentation for the earpiece/speaker.
Please help on how best to approach this problem. I have added more loops but that started affecting the curve and shape of the phone.
When making a high poly model for a game asset you don’t want to worry about the low poly really. 9/10 times you’ll create the low poly by just retopologizing the high poly in the end. Worrying about keeping the mesh as simple as possible and whatnot will only make it more difficult for you to create a nice high poly mesh with clean shading. The only thing in your high poly mesh you have to worry about and prioritize is good shading. For games the high poly topology really does not matter at all, since all of this info gets baked onto a different mesh anyways, that said, good topology generally creates good shading.
When doing subd poly modeling you always have to work large to small scale. You start off by creating the large general shape of your asset. You add geometry where needed for that level of scale. When you’re getting started on adding a detail you want to ask yourself if you have the geometry you need to add that detail. If the answer is no, you probably want to make a duplicate of your object, apply subdivision, add another subdiv on top and continue in there. I suggest you watch some Arrimus 3D videos. https://www.youtube.com/watch?v=_u7c6Ul6XxY This is a good one to get started. He does a lot of very insightful videos on subdiv modeling. It’s generally a good idea to watch his video so you understand what he’s doing, and then doing a quick exercise copying what he did to check if you really got the technique.
Another, possibly the biggest, issue right now with the model you’re creating is is that you’re making it a lot more difficult for yourself by making everything out of one part. In reality things are made up from a bunch of seperate pieces that get screwed, glued, or click together. It makes your life a whole lot easier when you model all these separate pieces as seperate meshes, disconnected from one another. Probably the most clear example of this is these edges I have highlighted on your model going all the way through to the bottom of the phone, which is a completely different part than the one which you added those edges for.
Thanks for that very comprehensive response to my problem and the time you’ve spent modelling a demo of what i should be doing!! That really does help me a lot and i appreciate that.
I’m both absolutely amazed and also depressed at how quickly you’ve modelled that just to help me solve my problem! i’ve spent hours on this on model so far!
I have watched loads of Arrimus’ demos on hard surface stuff, his vids really are a gold mine. I hadn’t seen any that replicated my problem although i will do a bit more digging.
I have actually separated my model up into quite a few pieces but looking at your model, perhaps i should of separated out the screen part from the rest of the main body. My real problem started when i was trying to add detail to only one area of the mesh where the surrounding topology is low poly. This is what was really troubling me.
Learning anything is about understanding and repetition.
Understand what LanderVR did, why he did it, and develop a workflow so you can also do it.
Practice making the phone a few times with different workflows until you find the one that is the fastest and gives the best results. Once you have practiced enough times, you will be able to model the phone with very little effort and you will also be able to apply the experience to other models and projects.
People think that the talented are born talented, they aren’t exactly wrong but at its core a talented individual only has an innate understanding of the subject they are talented in whether that is because of their way of thinking or the way they were raised. Talent is nothing without practice.
Don’t get discouraged! I have spent countless hours doing the same thing. As GrimZA said, practice makes perfect. Keep going at it, and when you feel like something isn’t working out, see whats causing the issue and instead of trying to make what you have work, start over with a clean slate.
If you get stuck, feel free to reach out again. And aside from that, practice practice practice!
When I have to model an object with holes, I start with the holes themselves and build the object from there. In your case, I would do the following:
Model one hole (with a circle) and duplicate it four times.
Add a circle to make the oval defining the boundary of the identation. Make sure that the circle has the correct amount of vertices, it will connect easily with the five holes already in place.
From there, extrude the circle defining the boundary of the identation and place the vertices to make the shape of the top part of the phone.
Thanks Lander,
Would you create the basic shape first and before subdividing and adding more detail, duplicate it and use that as the low poly to bake onto? or would you just go all the way with the high poly, then create the low poly from scratch using the high polys basic shape as a ‘template’ to work to.
I am getting so much conflicting info on this topic of standard workflows for game asset modelling. My basic understanding now is:
make the high poly model (making sure the shading is good )
make a low poly model
bake the detail of the high poly model onto the low poly model
Game asset pipeline workflows often depend on the specific asset, preference, the project itself, etc. Sometimes you use one workflow, sometimes another. In some cases you can use the high poly as a base for the low poly, for example when you’re mainly relying on bevels for your high poly shading, it’s easy to remove the bevel modifier, clean up the model and do whatever other things you have to do with your low poly in your pipeline (UV unwrapping, vertex painting, rigging, …). An example of where this type of workflow would work is this asset I made a while ago. You can see the general model doesn’t really have curvy surfaces, so I was able to make the high poly by just using booleans and bevels. However, when you have more organic/curvy models, like this phone, it will probably better to just retopologize it. Remind yourself regularly that the number one priority in your low poly model is getting a decent silhouette. Depending on how low poly you want to go/the purpose of the asset in the game, for this asset just using a cube with a couple loops to adjust it to the silhouette of the high poly. Such as the example attached to this reply. Didn’t really look at ref for the side so shape is probably innaccurate, but you get an idea of what the low poly could look like. You can also go more detailed, if this was an asset the player would hold in his hand and see quite close up, you could indent the screen part, add some buttons popping up in the silhouette, and more geo to round off the rounded corners.
Generally the way you do stuff doesn’t really matter, try some different workflows and see what works best for you, and what gets you the best results. The only thing that matters is what the asset looks like in the end, and that it holds up in the context that it’s supposed to be seen. For example, the phone as a first person “hero” prop would need a higher quality end result compared to if this phone would not be an interactable, laying on some random table in a third person game. For this reason it’s generally a good habit to regularly zoom out to the size your asset would be on screen in the game while creating it, to make sure you don’t get lost in unecessary details that wouldn’t show up anyways.
Unless I know I can easily generate a low poly model from the high poly, I really don’t bother worrying about it since retopologizing high poly assets to create a low poly version is often much faster in my experience compared to worrying and pottentially running into hurdles while trying to keep your high-poly low-poly compatible.
Dude, that fuel pump is insanely good! i really love how you’ve overlayed the normal, diffuse etc maps on there too. that’s very clever.
And thanks for .blend file - i totally see what you did there. the low poly really is just a box that i’m guessing would have all the detail from the high poly baked onto it.
You’re guidance has really been awesome, Lander - i posted in this thread here https://polycount.com/discussion/228807/topology-problems-help where i feel like people have just been forum warriors a bit and not really given me any clear guidance on my specific problem. more ‘go away and do some research, n00b.’
My intention for this Nokia project was to create an accurate, clean model with good topology and make it game ready. I wanted to add this to my portfolio to showcase to prospective employers that i can follow the whole process through. I’m under no illusion that i need more practice, just wanted to get a project done from start to finish.
My intention for this Nokia project was to create an accurate, clean model with good topology and make it game ready. I wanted to add this to my portfolio to showcase to prospective employers that i can follow the whole process through. I’m under no illusion that i need more practice, just wanted to get a project done from start to finish.
Great goal. I quickly read through the forum link you sent. I don’t personally get the same vibes from them as you’re experiencing, though their feedback is a bit less structured and a bit more random and potentially vague for someone who’s quite new to this stuff. That said, there are some great pointers in there:
From Wirrexx:
So here’s a couple of things to notice.
Always build the mesh as it’s built in real life.
If pieces are separate, they should be built separately.
Always begin with the main shape, Primary shape means the entire BIG shape of the phone…
This way, if the shape subdvivide is good, you can always subdivide 1-2 times, to get the share amount of density you need for…
3… Secondary Shapes. Now you have more density, you can maybe add shapes that are smaller than the primary shape.
Now you either use the existing topology or you add/cut in new edges for your shape.
So in short: seperate pieces, apply the subdiv when you don’t have the geometry you need to go to the next level of detail, so you have more geo you can manipulate. Work big to small!!
This is something I didn’t really felt like was necessary to do with the geometry I came up with, though if I’d model this phone again I would definitely apply subdiv on the screen frame part before adding those speaker holes and indent. You can see that my surrounding geometry there is very messy and doesn’t have a nice flow. Though that said: When being baked all that matters is shading.
From Pior
I would suggest to stop everything you’re doing with that phone model and instead taking the time to understand the workflow with a simple set of cubes or cylinders (high and low).
This is a great suggestion to understand how normal bakes behave and how to take that into account. For example:
Marking your seam edges as sharp edges and the consequences of that on your normal bake result.
Understanding how height details from a high poly translate to a normal map
Doing these on simple primitives or very simple meshes at least (maybe a box with one face inset and extruded for example) will definitely help you get a stronger understanding on what to keep in mind when normal baking.
subdividing the mesh made it easier to get the button holes in. still had to manually move vertices around to get the shape correct. i think in the other thread someone said this should be avoided. i couldn’t see how to get the shape correct to the reference without moving verts…?
They most likely meant that once you have your large shapes correct and you subdivide to a higher level to add details, avoid moving the vertices that make up those large shapes. Doing that will, unless you get the move very very accurate, which is unlikely, mess with your shading. For example: Once you got the main shape of this keyboard frame, and you added the buttons (for which you will have to move vertices around to create the button shapes), don’t start moving vertices on the outside frame etc. Hope that’s clear!
Ah ok i understand. so it’s ok to ‘edge slide’ verts into place for smaller details like the buttons for instance or the Nokia badge. I kind of feel like it’s coming together a bit. Also had a go at baking (which i have done a bit of in the past) with varying success.
@LanderVR - what are the 4 maps you have baked out on your fuel pump you posted? are those diffuse, AO and normal and roughness??
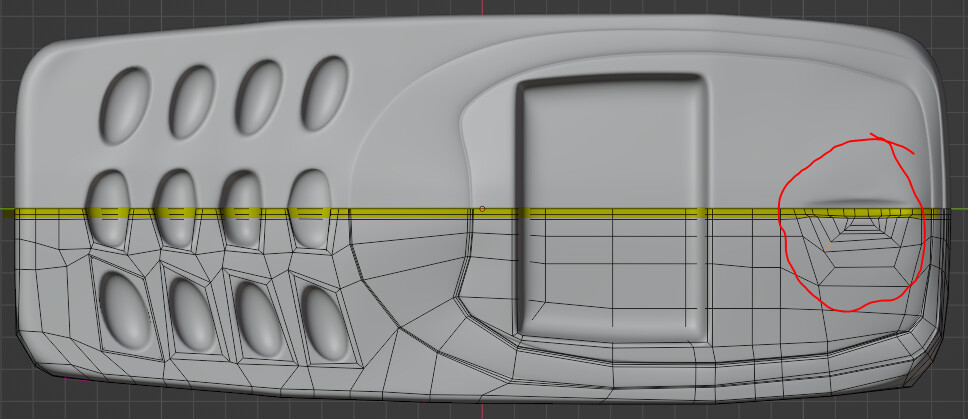
And by the way - the only verts i moved around were the ones to get the shape of the holes for the buttons correct. does this mesh look ok? or am i still making errors?
Ah ok i understand. so it’s ok to ‘edge slide’ verts into place for smaller details like the buttons for instance or the Nokia badge.
Exactly, it’s fine to move the geo necessary to add your details, knowing that it’ll impact the shading there. This isn’t just limited to edge slide, just be careful and aware of the transformations you’re doing. However, you wouldn’t want to make adjustments to vertices that are in the middle of a smooth curved surface that you’ve already committed to when applying your subdiv.
are those diffuse, AO and normal and roughness??
Albedo, metallic, roughness and normal.
And by the way - the only verts i moved around were the ones to get the shape of the holes for the buttons correct. does this mesh look ok? or am i still making errors?
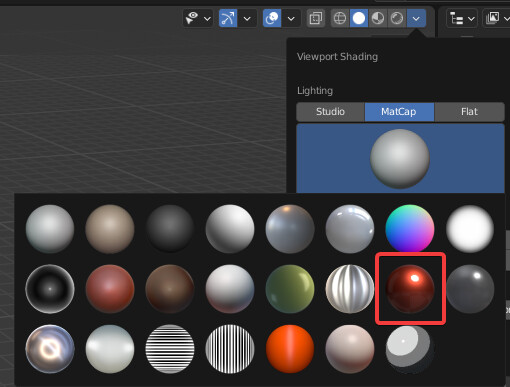
It’s looking good! It’s nice and evenly spaced geometry without any deformations that I can tell of. If you want to double check your mesh for possibly unwanted deformations, you can use the red matcap, which is extremely unforgiving when it comes to deformations. I use it often where extremely clean shading is a must and where the tiniest deformations will be visible in the end result, for example cars.
Though, for a model like this it’s not as crucial as it is for a car to get it perfect, but it’s still a good habit to check regularly while learning/practicing to see and understand how changes in geometry affect shading.
Great stuff. Yeah i have used that matcap loads of times! i think i first saw it used in a Josh Gambrell video. His models are pretty cool. Really like some of Arrimus3D’s videos too. I know he uses 3DSMax but i guess the same principles apply.