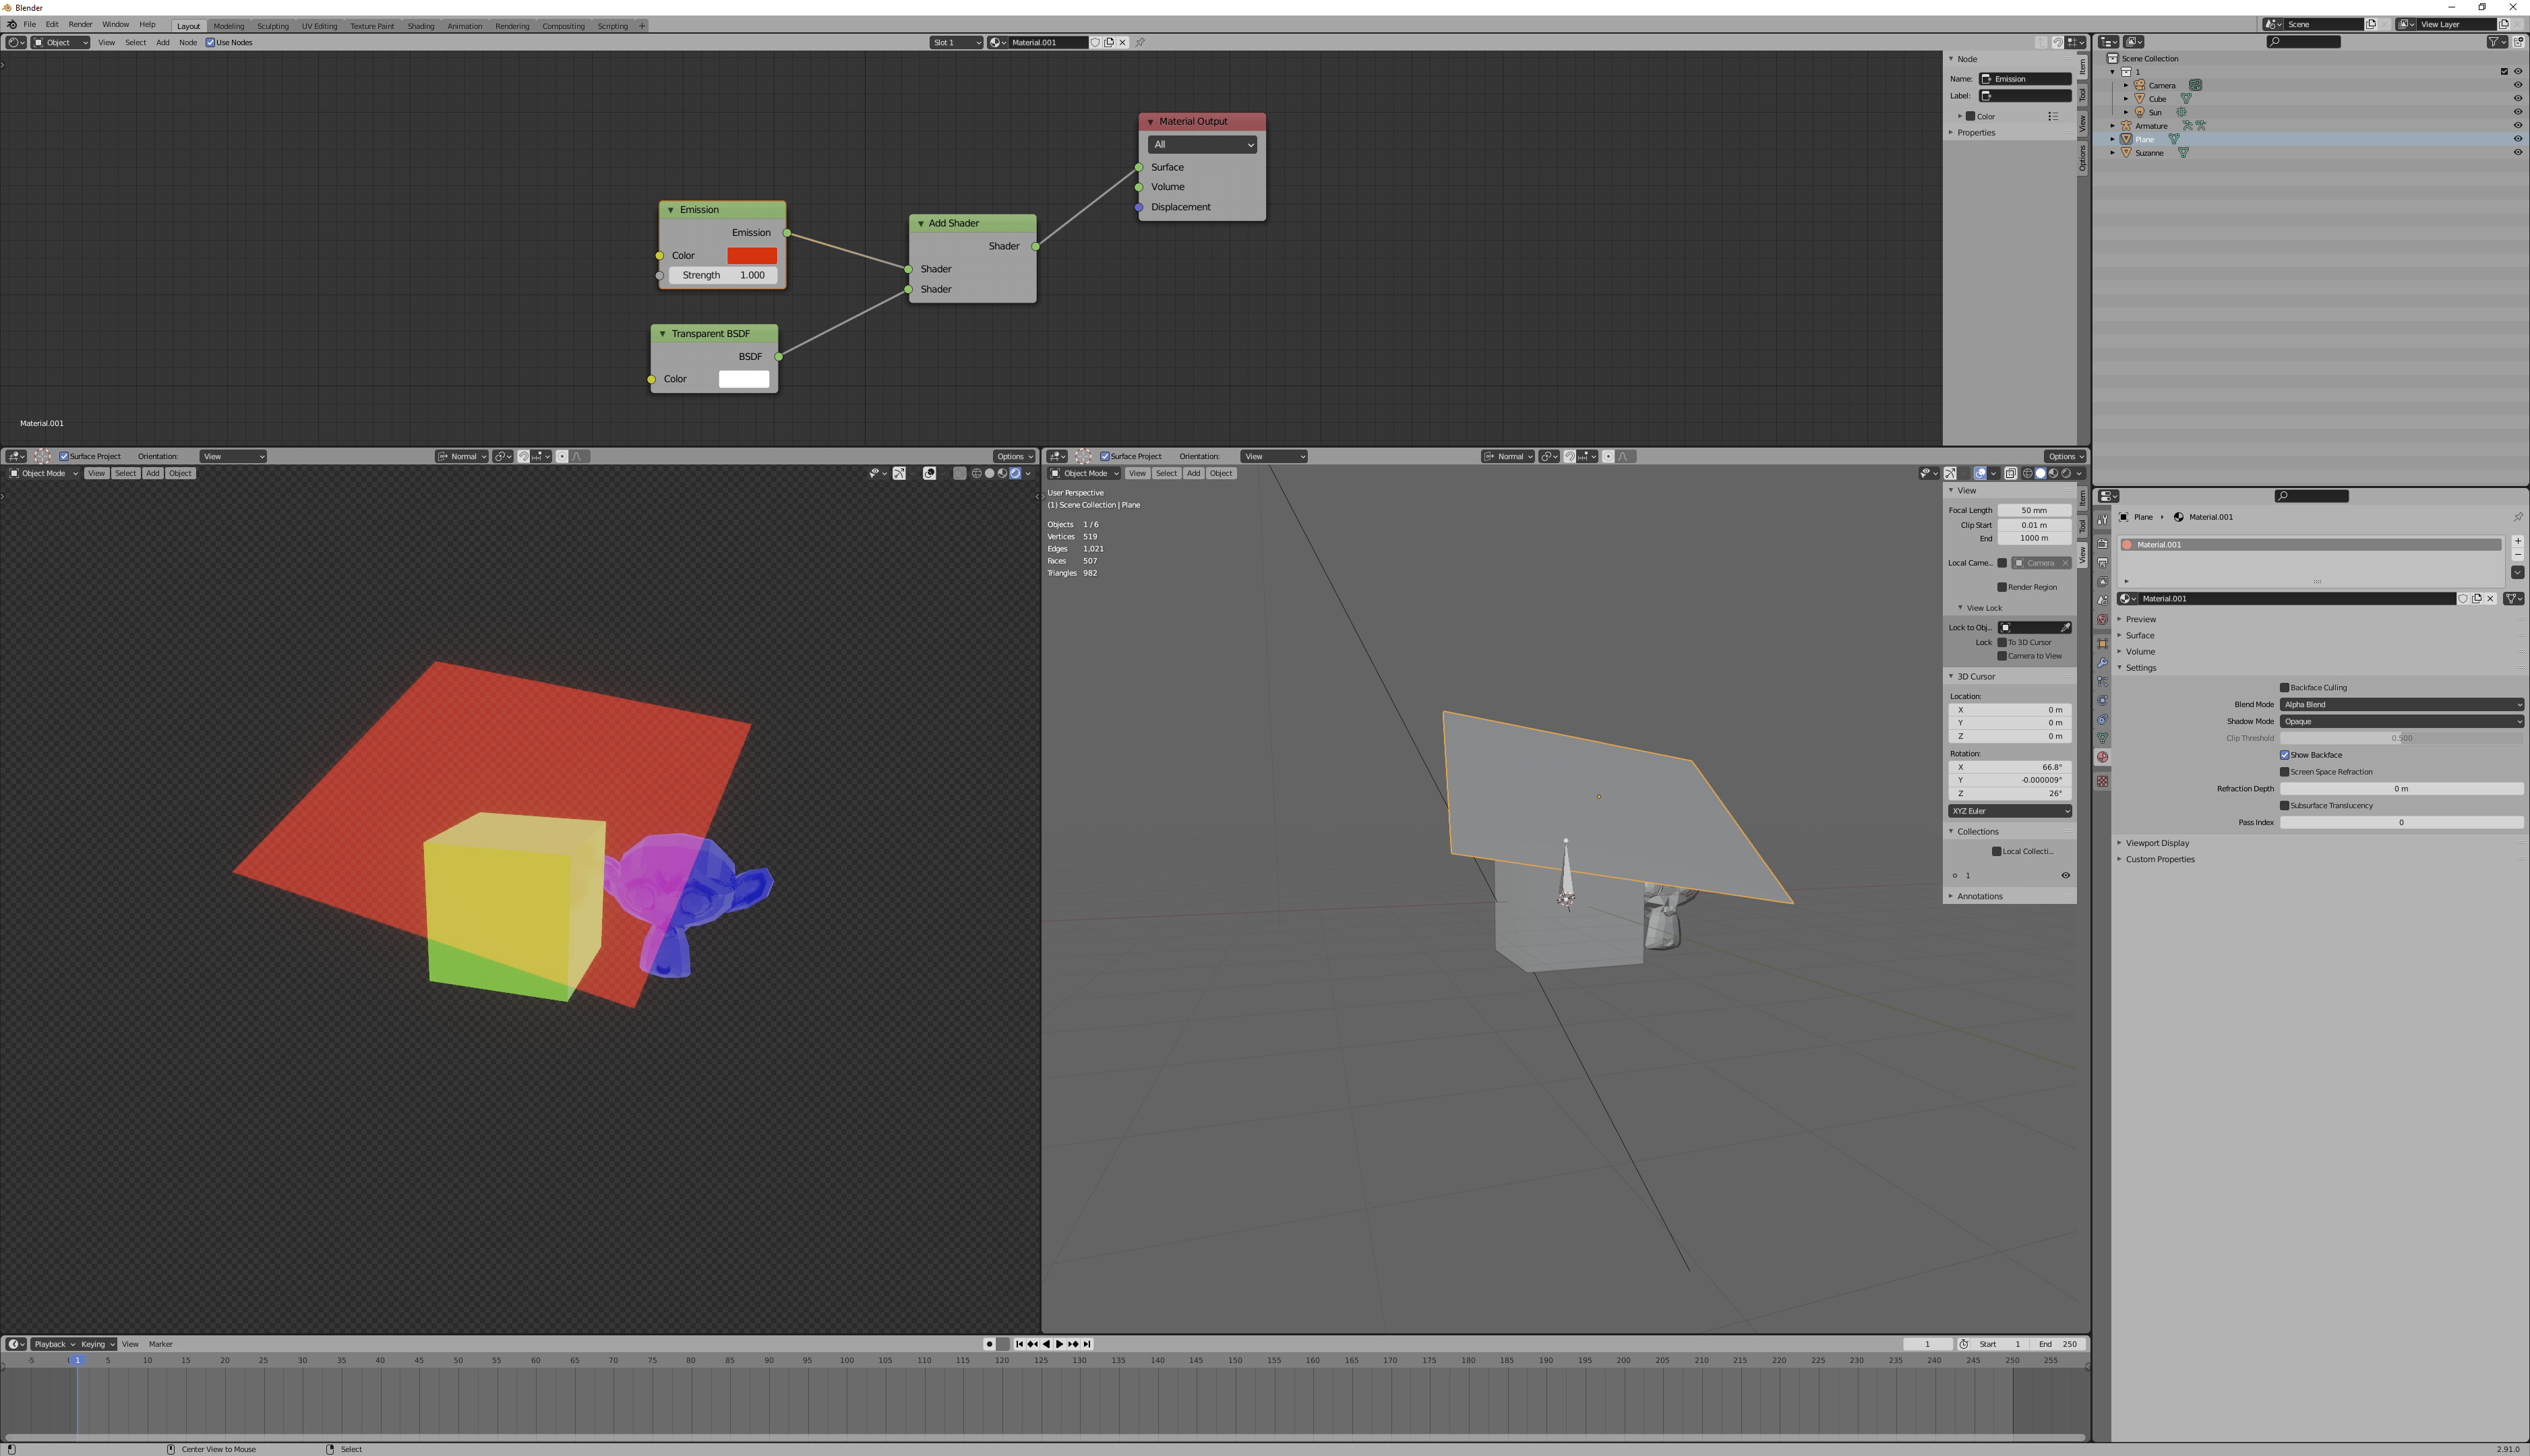
I seem to be a bit stuck here. I have this game mesh. The way the floor is lit in game is using another mesh with transparency. The problem is, as I make the alpha mesh brighter with nodes, the quality of the items underneath is reduced and there is loss of color.
(blender)
The alpha on the image was never changed only the emission so I don’t see why the stuff behind it is going away.
I know in Source Engine I would just use an additive shader to accomplish this but it doesn’t seem like blender 2.9 has anything like this. I’ve already tried all of the blending modes and other transparency values and nothing seems to work. Even if I gave the alpha channel a 99% black texture, the moment I make it brighter in blender it’s just going to wash out the colors behind it again. I would rather avoid any manual painting / image editing if at all possible. Does anyone have a solution?
If you’re rendering in Eevee and you want to do an additive shader, just add shader emission and transparency.
If you’re using 2.79, of course, you’re not using Eevee, which is kind of silly if you want to reproduce game engine output. (And if you don’t want to reproduce game engine output, why are you comparing?) Get 2.80+ already.
It’s not at all surprising to me that emitting over (or add emitting, if you choose to do that) obscures your details. After all, your monitor is clamped to 0,1 output. You can’t make it brighter without changing the colors. You can’t make it whiter without reducing the saturation.
The whole division in color and emission strength is a lie anyways. If you’re using a 100.0 strength, 0.01 emission shader, it’s exactly the same thing as using a 1.0 strength, 1.0 white emission shader. You can’t separate the color from the strength.
However, if you’re saying you’ve had better results in Source, and you’re talking about stuff that’s going to get tone-mapped, stuff outside the 0,1 range of color, you should consider looking at other forms of color management. Source probably doesn’t use Filmic color management as default.
I don’t see an ideal solution to resolve this unless I get rid of this mesh all together and replicate the lighting manually unfortunately. The entire scene is using emissive and won’t be using blender lights to add information.
Mix shader is not additive blending. It is alpha blending. Add shader is additive blending. But your nodes don’t mean anything yet, because I don’t know what textures or vcol you’re feeding them, and I don’t know what your goal is. So the most I can say is, what you’re demonstrating is not similar to what I showed-- it is the difference between add blending and alpha blending.
The add shader also will not accomplish what I want unless I can increase the emission, I tried it and it’s still washing out the textures.
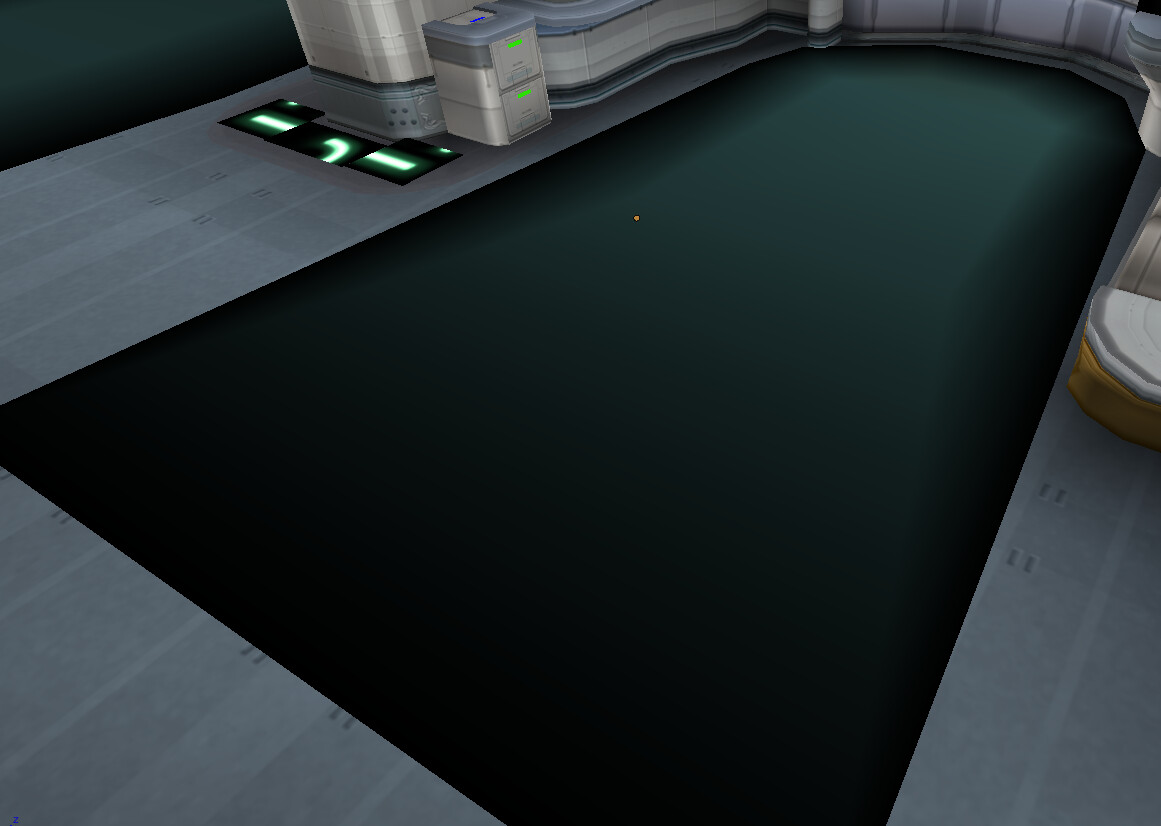
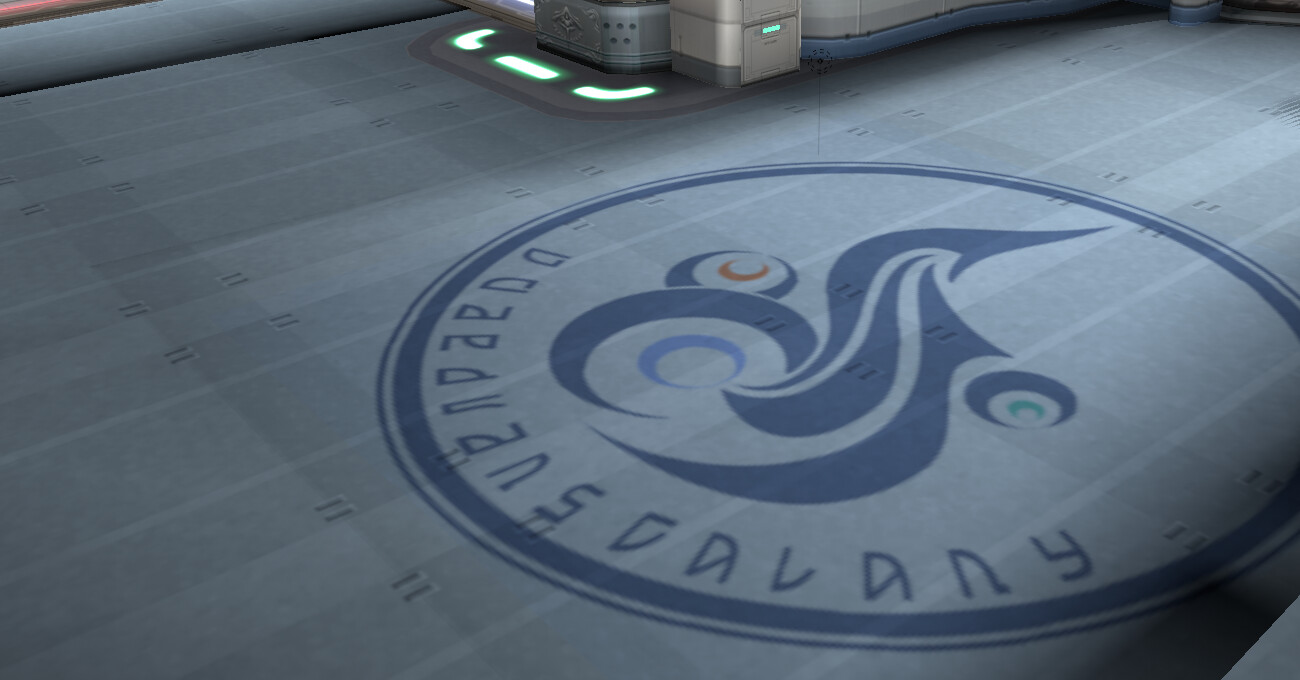
The goal is to make emission 100 look like this game screenshot shown below without any colors being washed out, but as you mentioned it doesn’t seem like that’s going to happen if I have to edit the emission. The only solution I can think of that will get to my goal would be to use a brighter emission on the entire floor, then just paint the shadows myself after deleting the light mesh. I was just hoping there would be something faster was all. Thank you anyway.
And do you have access to the meshes + shaders used to create that image? Is it using the same technique as you? If there’s an emission plane there, we can look at the shader and recreate it-- probably exactly. (Not necessarily though. There are a few things you can do in DX that you can’t do in Blender’s nodes.)
Of course, that also requires knowing the post processing shaders-- the tone mapping used.
That said, I don’t see any reason to believe it to be an emission mesh, and if I don’t see a reason, that probably means that a good game dev would be using a different technique. Probably, lightmapping. Lightmapping is less expensive than an emission mesh. (But, I’m only seeing it from one angle, so who knows what’s visible from other angles?)
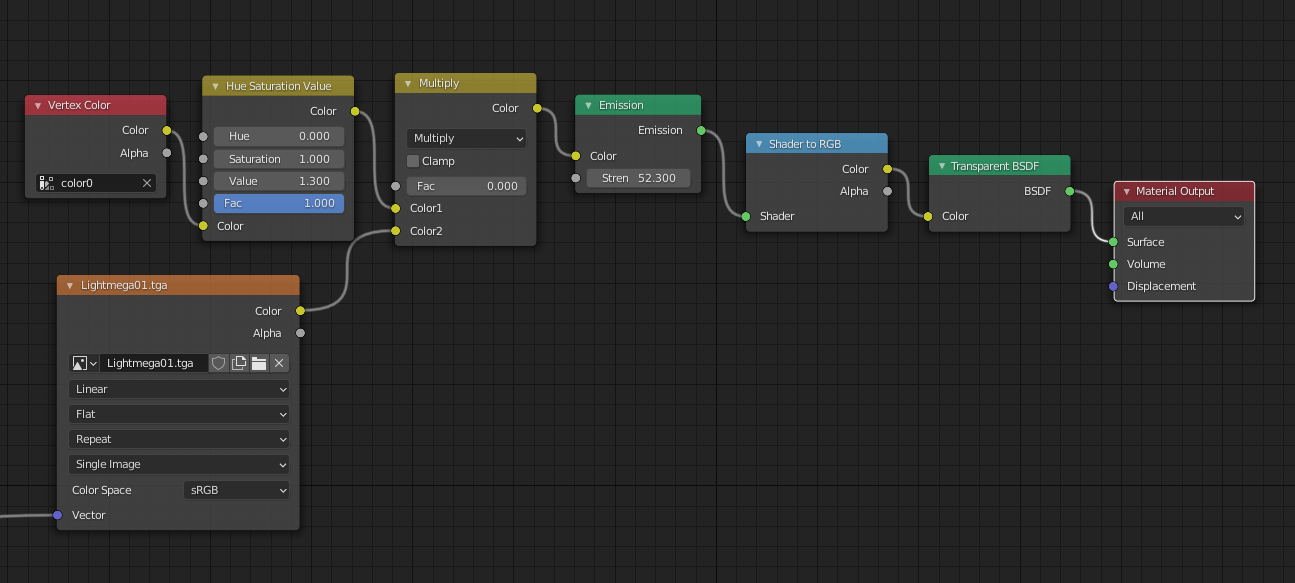
I don’t have access to the shaders from the game and have almost know knowledge on the subject of shaders. Anyway, the game actually just layers a textureless plane with vertex colors over the floor to give it lighting.
What I do is I will bake these colors to a texture, and then I will have my new light texture also be used as an alpha channel in photoshop. So texture 1, with the same texture as the alpha channel. This has been working great throughout the room as intended with minimal issues. The only problem I’ve had so far where this method hasn’t worked is the floor. If I were to just use emission 1, you won’t even see the newly overlaid texture at all, just the floor underneath. Lower values won’t be anywhere near what I need to copy that. If I raise it to 100 then I get the values I need but then the transparency is off. It may very well not be an emission mesh used by the game. However I have minimal blender knowledge and game dev knowledge and this is the closest I’ve come up with without having to resort to any manual vertex painting or texture editing in photoshop. I was hoping for a faster solution as opposed ot those since this is probably going be a recurring issue for me.
So if you’re not trying for exact reproduction, what do you have access to? Textures, of course-- UV maps? Vertex color layers? Is that green color you’re showing a texture for that surface? Of several? Or all of the texture comes from the texture you have on the emission mesh?
I’d suspect that you shouldn’t be looking at any overlaid extra meshes, but at albedo * vcol * lightmap->emission instead. (Although it seems weird to me to have both vcol and light, and I wonder if there’s some redundancy for some purpose there.) On the floor itself. Multiplying colors will end up preserving saturation (chroma, color) pretty well, compared to blending bright colors on top, and it makes more sense for a game dev to approach things from that direction anyways.
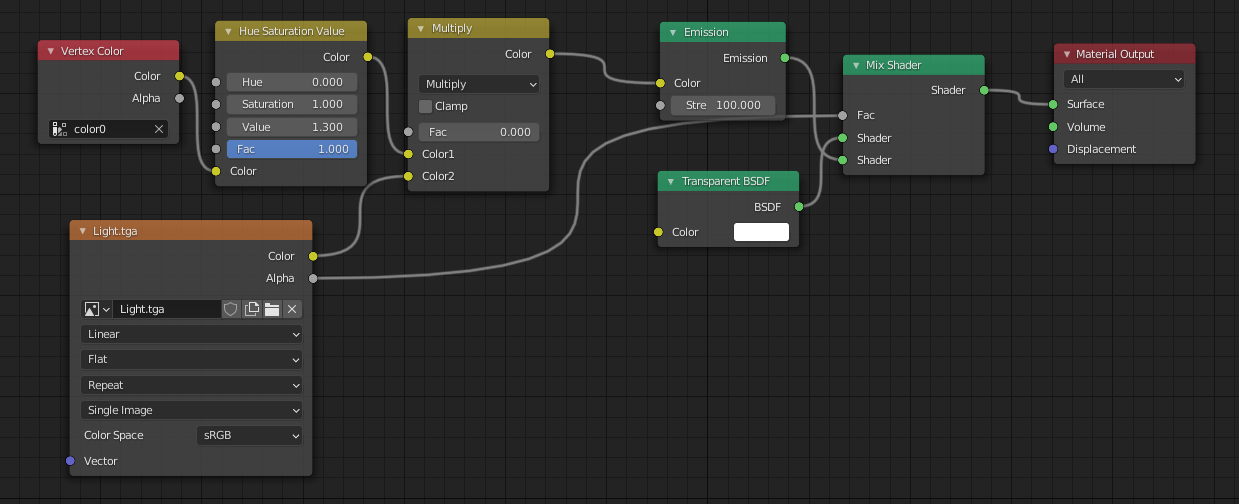
Yeah it’s redundancy to have the vertex color node there. Removing it won’t change the result though The rest of the room uses vertex colors so I’ve just been copying and pasting my nodes for convenience. Since my scene isn’t using any blender lights I’m using emission on everything as well. A few of the things in the room required I use emission at higher values in order to make it look like the game, including other lights which is why that is also present. The game also dumps the colors wrong as shown by the blue colors so I keep having to change them with the hue modifier. I would like to have an exact reproduction if possible. The green texture you see in the image is the lighting. The game puts meshes like that on every light source to fake lighting. I just did all my mentioned changes to get it like in the OP.
This mesh in particular comes with vertex colors. No textures. This light texture is nothing but vertex colors and I wasn’t sure what to do with that aside from turning it into a texture since I needed to remove the black parts from it and have it transparent so I can see the floor underneath.
I’d be surprised if the vertex color is fully redundant, just because game devs don’t do that-- they optimize the hell out of everything they make, and anything that’s left, is for a reason. I wonder if the vertex color is intended as occlusion for dynamic lights.
I also think the choice of “100” as a necessary emission strength is probably not correct, because 100 is a weird number that blows everything out and leaves you with poor precision from 8 bit-per-channel textures. And hue is probably not something that should need correction if everything else is right. Although I can’t imagine what would possibly affect it very strongly. Color management (filmic etc) can affect it, but only by a little bit.
Your general philosophy here sounds pretty wise: lightmap * diffuse → emission (leave vertex color out of it), with light sources given plain emission meshes, but there are a lot of dimensions to tuning it beyond the strength of the emission. If you have a method that works well for most bits but not this one bit, it could be that this one bit is different, or, it could be that the method you had wasn’t right. In the case of emission, the other dimensions of how emission is going to look are going to come from bloom settings and color management.
However, the fact that this mesh has no textures does suggest that it has something special going on in the shader-- something weird that’s going to require a different paradigm for it. You said that it has a vertex color layer but no textures, but in your image above, you have a light.tga for it-- does it have a lightmap?
I don’t know if it’s the case, but it’s not impossible it’s intended to use some kind of multiplicative blend (instead of add or alpha blending). Multiplicative blends tend to be more saturated than additive or alpha blends. Here’s a quick multiplicative blending demo:
In my image above, I converted the vertex colors into a texture. The floor lighting is not using any vertex colors as it originally did and the vertex color node is left over. Each room has it’s own floor faces so it’s not an overlapping issue either. I didn’t make any lightmap textures for it.
Your suggestion came pretty close but it seems to be lacking alpha with the suggested setup. Here is the floor + decal meshes if you wanted to try it. This is definitely heading in the right direction though. https://puu.sh/H65WQ/adaefe7a8c.rar
Would you recommend I revert the mesh back into it’s original vertex color export with no texture? If there is a way to accomplish the transparency effect on the black areas quickly without creating an alpha channel texture that would work better as well. If that isn’t possible I’m fine with baking the colors to textures.
The transparency depends on the brightness of the color you send into the shader to RGB. The brighter it is, and the whiter, the more transparency you’ll get.
I can’t say that I’ve paid enough attention to have a very clear idea of your workflow-- but that’s not your fault, that’s just me. If you want to bake vertex color to texture, you can, you’re not going to lose anything in the bake. Assuming reasonable texel density vs vert density. If you don’t want to, you don’t have to, you’re not going to gain anything from the bake either. (The reverse isn’t true-- if you bake image texture to vertex color, you’re going to lose detail.)
To clarify, the above image is exactly what I need, but since this is supposed to be room lighting, I need the black vertex colors around the edges of that mesh to be transparent. With the darker hues being the opacity level. It doesn’t seem to want to use my alpha channel using your method otherwise the black hues I would assume wouldn’t be there.
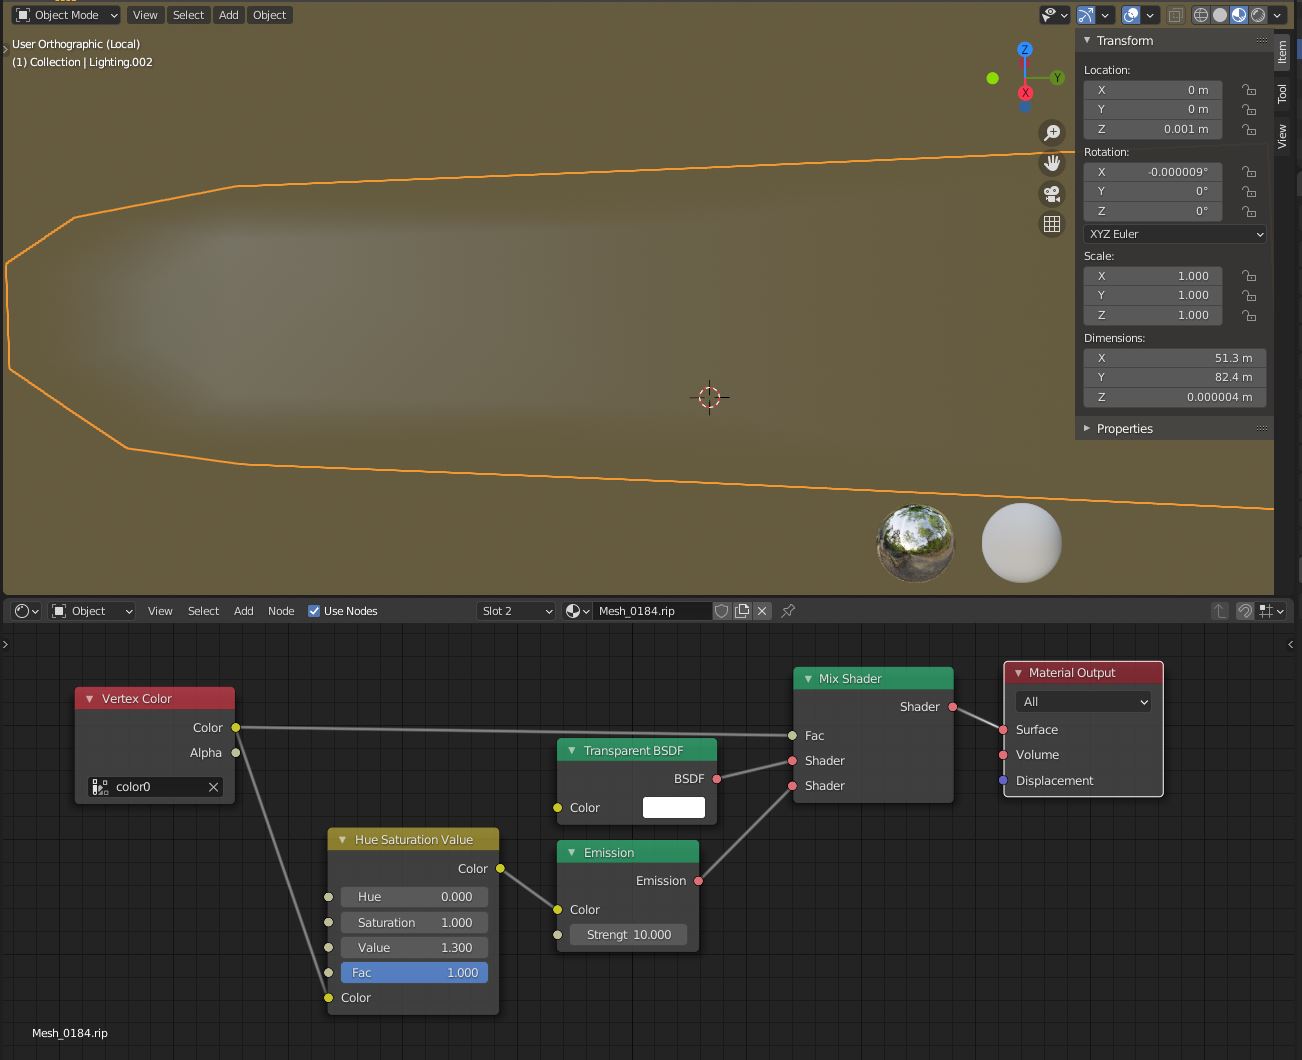
So I believe I’m supposed to be looking at “Lighting.002” mesh, right?
The first thing I notice is that its material references a UV map that it doesn’t have (“uv0”). It has a UV map (“UVMap”) but it’s not really unwrapped-- everything is at UV 0,0. So any texture lookups you’re doing using UV are just delivering what you have at that position, which is pretty close to transparent black (RGBA .02, .04, .03, .07).
The vertex color looks like occlusion or lighting (and on the other meshes too) but it’s a bit confusing, because an emission mesh shouldn’t really have occlusion or lighting. I’m not sure that you should be using the vertex color layer at all for this particular object. While I can’t be sure about it, I suspect that texture would be creating alpha wherever the vertex color even mattered, if the mesh was unwrapped properly.
And, just to make sure, your file references some .dds files but you have .tga in your rar. Probably fine, just making sure.
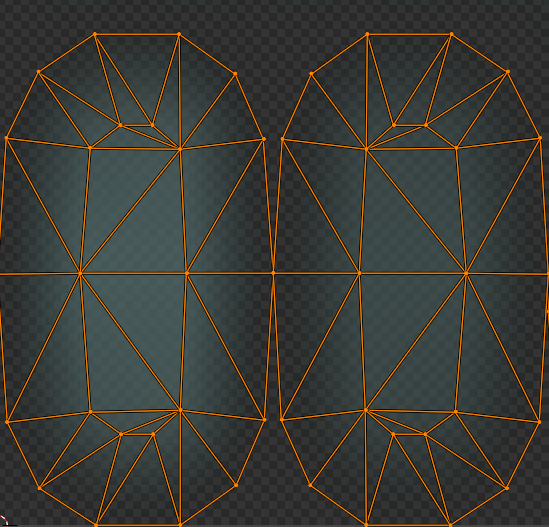
@bandages you seem to be correct! I did have it unwrapped on my end but the bake I made had squished the faces together. Below is the result of me manually moving uvs. I still have to redo the bake to fix the slight transparency issue but its absolutely what I was looking for.