Trouble importing .SVG into Blender

Okay this is sort of an odd thing, but it happens many times I try to work with .SVGs (which is more and more frequently, since I’m now learning Inkscape, too).

So, let’s say that you have a .SVG file with numerous overlapping graphics (which I think most .SVG files contain). Blender seems to usually import them as multiple Curve Objects rather than just one. This means that, of course, there is major Z-fighting going on between the multiple Objects.

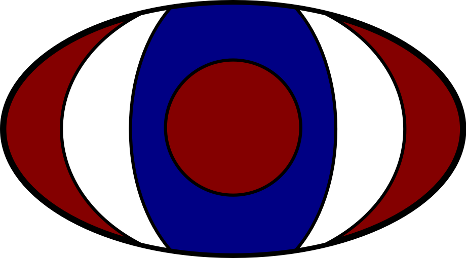
So this is the original .SVG image…


And now I’ve imported it to Blender, and this is what you get:


But thanks to the always-awesome rking, I now know how to correct this. It’s kind of a cumbersome process, but very quick once you get a handle on it. The solution lies in the fact that, if you have two different 2D Curve Objects, and you join them, Blender automatically cuts the inner Object’s shape from the outer Object’s. But since you do still want that inner Object to be there, you have to do the following:

  1. Create a duplicate of the inner Object (Shift + D).
  2. Shift-Select that duplicate and then the outer Object and join them (Ctrl + J)

Now what you’ll have is the larger, outer Object has a nice hole in it, and you still have the original copy of the inner object to plug in that hole (Blender automatically deleted the duplicate when you joined it to the larger Object).

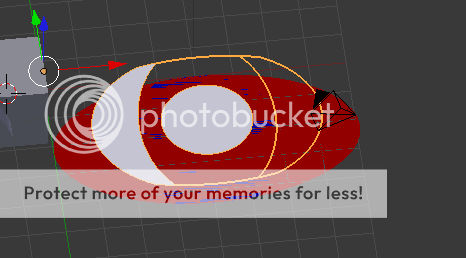
Here is a screenshot showing the decrease in Z-fighting (although there’s still much Z-Fighting because of the two other Objects, which I haven’t addressed yet):


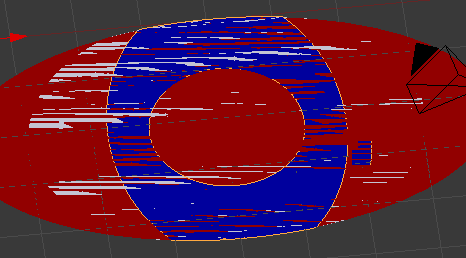
So, in theory we should just be able to keep repeating this process (create a temporary duplicate of the inner Object, join it with the outer Object, and that stencils a hole in the outer Object)…

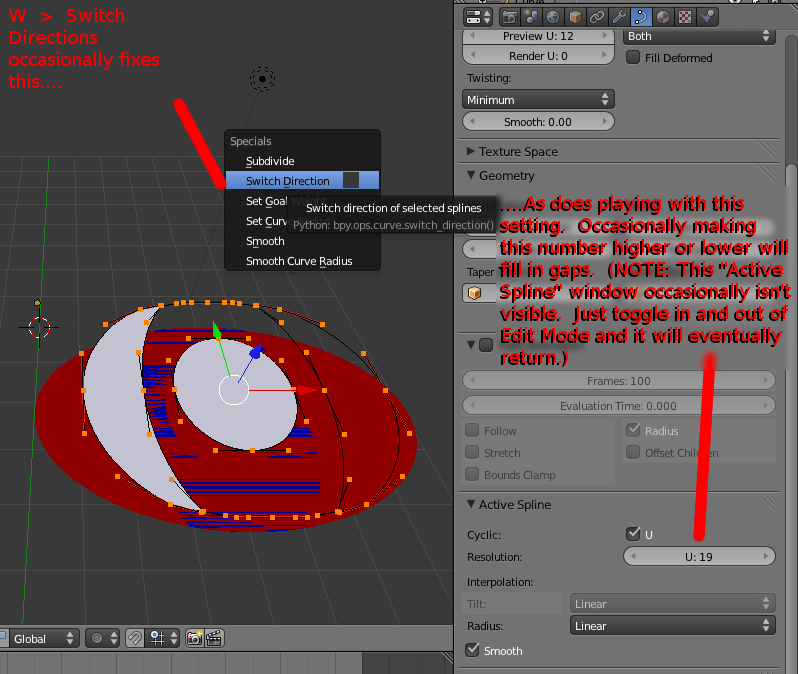
…But I frequently run into problems. Even on a very simple shape such as this one, the outer Objects frequently have segments which do not fill up:

http://i1222.photobucket.com/albums/dd499/ComicsPlus3/4.png

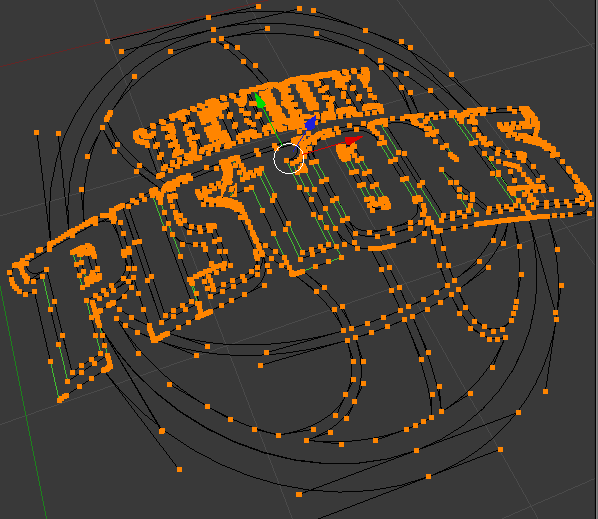
For instance, a few weeks ago, I was importing a .SVG of the Detroit Pistons basketball team logo into Blender, and it was just a nightmare trying to work it out.

So my question is: Does anybody know of any technique to either (a) prevent those Objects from not being completely filled (like the white one directly above) or else (b) an alternate, superior way to import .SVGs so that none of these challenges are there to begin with?

Here’s a .Blend with the newly-imported. SVG.

Thanks to everybody who works on Blender, as always.

I’m not used to svg files, but i tried to import this svg as you mention this logo :

And indeed i noticed that some parts weren’t completely filled too :
http://i.imgur.com/ccmgq.jpg

Possible solution, select one of those curved object that is not completely filled
http://i.imgur.com/WY0q0.jpg

Go into edit mode, press A until the whole path is selected
http://i.imgur.com/oemWq.jpg

Press W then “Switch Direction”, sometime it can work very nicely :
http://i.imgur.com/3yGC1.jpg

Unfortunately sometime it will not (like that not completely filled part under the S in the screenshot)

Maybe it has to do with the options with which the SVG have been saved in inkscape/illustrator/etc… that may not be very compatible with the current svg importer


Oh yeah - two factors: (1) Edit Mode > W > Switch direction and then (2) Properties > Object > Active Spline

…can both help out, occasionally. But I’d say they’ve only fixed these things maybe 20% of the time or so - but still always worth checking out.

Based upon my experience, you’re 100% right that the issue has to do with the native settings of the .SVG. That is, if the different layers are stenciled out within the .SVG, then you can import them into Blender no problem - no Z-fighting at all because they don’t overlap.

However, most .SVGs that I download do have stacked layers (and I would guess that, for Inkscape and Illustrator, this is usually better). So when I go to OpenClipart.org or WikiCommons or wherever else to get some stock .SVG - of a flag, company logo, whatever - they are almost always stacked, and so I cannot simply import them into Blender.

But now, when I make my own .SVGs (like I just did the one above and also the Batman logo), I make sure to have a stenciled version so that I can bring it into Blender.

If switch direction does not work (and it often does not as you have discovered) it probably means you may have a duplicate vertex somewhere. There is no short-cut to finding it either. What I do is go in a clockwise pattern around the SVG curve selecting each point and moving it with the G-KEY. If it is the culprit, you will see the design fill in the missing area. If not just press the ESC key or do an undo and move to the next point. When you find the point, just delete it. Downloaded SVG files from websites are more problematic than actual artwork that a designer hands off to you, such as professional logos from Brand kits etc…

For the stacked layers problem, i am wondering if you couldn’t just convert each of them into a mesh, then use the (new and much improved) 2.62 boolean and merge them to see if it could fix those layers z-fighting with each other.

About the piston logo, i think i found a possible source of the problem i mentionned

I downloaded Inkscape, loaded the logo svg in it and looked at the part that Blender couldn’t display correctly even if i used the Switch Direction trick

And indeed it looks ugly, lots of nodes seems to be close to each other in a single line :
http://i.imgur.com/xbvNF.jpg

So i selected them and deleted them
http://i.imgur.com/ZaRtE.jpg

Saved it as a new SVG and imported it into Blender.
And :
http://i.imgur.com/5mcTR.jpg

Looks like it fixed the problem, as previously it was (and Switch Direction couldn’t fix it) like this :
http://i.imgur.com/w4ylj.jpg

So you may need to give a look to the original SVG into Inkscape before import, as there are then possible annoyances like this one that are no problem for Inkscape/Illustrator but that the Blender importer is completely puzzled by

I’ll definitely keep this technique in mind, and I’m sure that it will be useful very often. However, you can imagine many scenarios where “needle in a haystack” comes to mind:


Sanctuary,

Yeah, me and rking both worked our butts off correcting that in Inkscape (well, rking mostly) when I was working on that one. But the Pistons logo was just one of many that I’ve tried to import into Blender and I have almost ALWAYS had this issue. (I did this little thing about the Detroit sports teams and that’s what I used six logos for: http://www.youtube.com/watch?v=TJAHpzXbPLE)

So it’s a larger trend, not only the Pistons one. But I think that cleaning up messy handles in the native .SVG is often a big help, I totally agree. But very often, that’s just way too time-intensive because there are dozens of different Curves in the .SVG.

This was an issue for me and this thread was the only relevant thing I found so I figured I’d post here because it still comes up on Google.
I managed to solve the issue. SVG is only meant for 2D so it uses draw order for depth. You can fix z-fighting issues by moving layers closer to the camera so that they render on top of layers underneath them.

I wrote a script to automate this. It assumes that lowering the y axis value movies an object closer to the camera and that my SVG image is a collection named siamese.svg with all of the layers as paths nested in the collection that are ordered in draw order.

import bpy

MIN_TRANSLATE_Y = -0.0000001
counter = 0

svg = bpy.data.collections["siamese.svg"]

for path in svg.objects:
    path.location.y += counter
    counter += MIN_TRANSLATE_Y

The value -0.0000001 was picked through trial and error. It might need to be bigger if it doesn’t fix all the z-fighting. Hope this helps someone out :slight_smile:

2 Likes

This script is not working with 3.0. I know a lot changed. Any chance to have a fix for 3.0 ? Thanks.

I fixed the script for blender 3.0 added documentation for noobs like me :smiley:

# how to use this script
# 0. copy paste this script  to text editor dialog
# 1. import svg to blender (import/svg)
# 2. copy name of svg (collection) and past it to  bpy.data.collections "" inside this script
# 3. Run script  THIS inside editor type  insde a blender 
# 4. play with settings if necesery

import bpy

# try diffrent values for offset its scale dependend
# try negative values for offsety if Z order is reversed
offset = 0.000001 
counter = 0

#copy name of your collection  in to ""
svg = bpy.data.collections["prison_vectorstock_24789584__Converted_-2.svg"]

# try changing path.location.z to path.location.y or path.location.x if it does not work properly
for path in svg.objects:
    path.location.z += counter
    counter += offset
2 Likes

Thanks @Adam_Belis

Based upon my experience, you’re 100% right that the issue has to do with the native settings of the .SVG.

That is, if the different layers are stenciled out within the .SVG, then you can import them into Blender no problem - no Z-fighting at all because they don’t overlap.

However, most .SVGs that I download do have stacked layers (and I would guess that, for Inkscape and Illustrator, this is usually better).

So when I go to OpenClipart.org or WikiCommons or wherever else to get some stock .SVG - of a flag, company logo, whatever - they are almost always stacked, and so I cannot simply import them into Blender.

But now, when I make my own .SVGs (like I just did the one above and also the Batman logo), I make sure to have a stenciled version so that I can bring it into Blender.


Ornament Central

Working fine on 3.3.1 as well.

1 Like