Your viewport screen shows hair at the tips of the ears and so it is rendered as well. Try to remove the vertices of the ears from the vertex group.
Did you use cycles or blender internal for this render? I would guess that it is blender internal. That’s important because some options for particles differ between this two render engines.
4000 particles is very much for such a small area. How many children do you use. Perhaps it is the sheer density of the paricles which produces this effect. Perhaps it comes from the settings for the root size of the strands in cycles.
BTW: You should work on your mesh. In general nice and smoth running egdes and quads are desired. Triangles are problematic. This problematic areas produce the sharp lines in your render (at the forehead for example).
Perhaps you share your blend file, so that we can have a closer look?
Hello Jackster, thanks for sharing your .blend. I downloaded and opened it. And I must say: That’s going to be a nice creature.
However, there are some problems with your mesh. I applied the mirror modifier and smoothed it a little bit (hit “w” in edit mode and select smooth). This shows, that you have loose vertices, which are not connected. And you have flipped normals (the darker faces are flipped). This flipped normals are a problem for rendering and for particles because the particles will point inwards when emitted from the faces with flipped normals.
Normally you would select all faces and type CTRL n to recalculate the normals. But because of the problems with your mesh that doesn’t work correct.
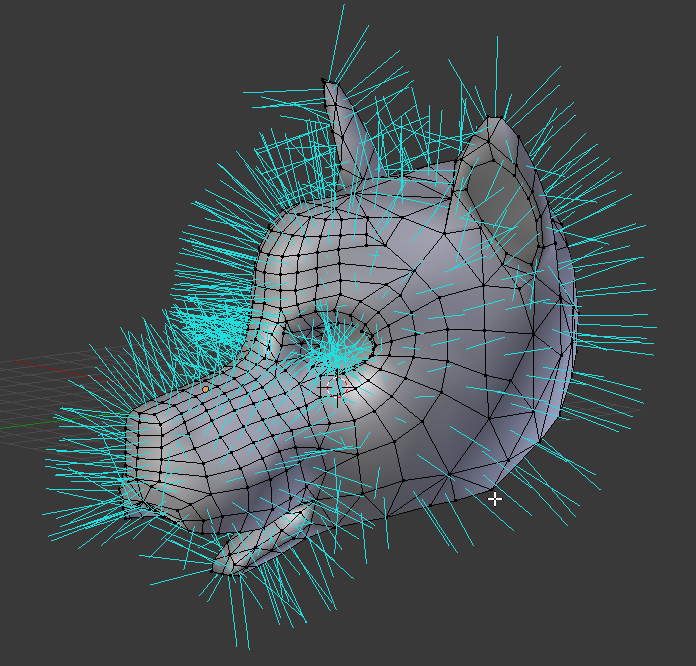
To get a little further I closed the gaps, cleaned up the topology a little bit (there are still tris and ngons left to redo) and removed the double layered structures at his rear head. I also fixed all flipped normals. The “hair” you see in the next screenshot is no particle hair but the normals made visible (you have the option in the n menu when in edit mode under “mesh display”).
Then I created a vertex group as you did, called it “beard” and assigned some vertices to this group. I assigned a particle system and use the vertex group as density group.
I gave your dog a second material. In the particle settings I use this for the particles. I tuned the particle settings a little bit.
You may consider to change your render engine from blender internal to cycles. I found it very difficult to get a good lighting for hair with blender internal renderer. If you want to use blender internal make sure that you have a lamp with buffer shadow to light the hair. I read that the Sintel crew had an extra second lighting system only for the hair, because it was so difficult to light the hairs. The lighting is much easier with cycles.
Oh - I sometimes have the feeling that there are some caching issues with this forum. When I replied half an hour ago - your post was not visible to me.
Ok, the shape of the hair looks good. The color - hmm :spin: Did you assign a material to the particle system - i guess that you have several particle systems in use? The grey parts look like the default blender internal clay stuff.
Check out my video tutorial on hair materials in Blender Internal. It’s just as important that you use the correct lamp settings as it is material settings.
Hi Jackster, yes, this is hard stuff to learn, because you always have to configure the material, the particle settings and perhaps a texture to get a good result. This is necessary, if you use blender internal renderer. It has become somewhat easier with cycles.
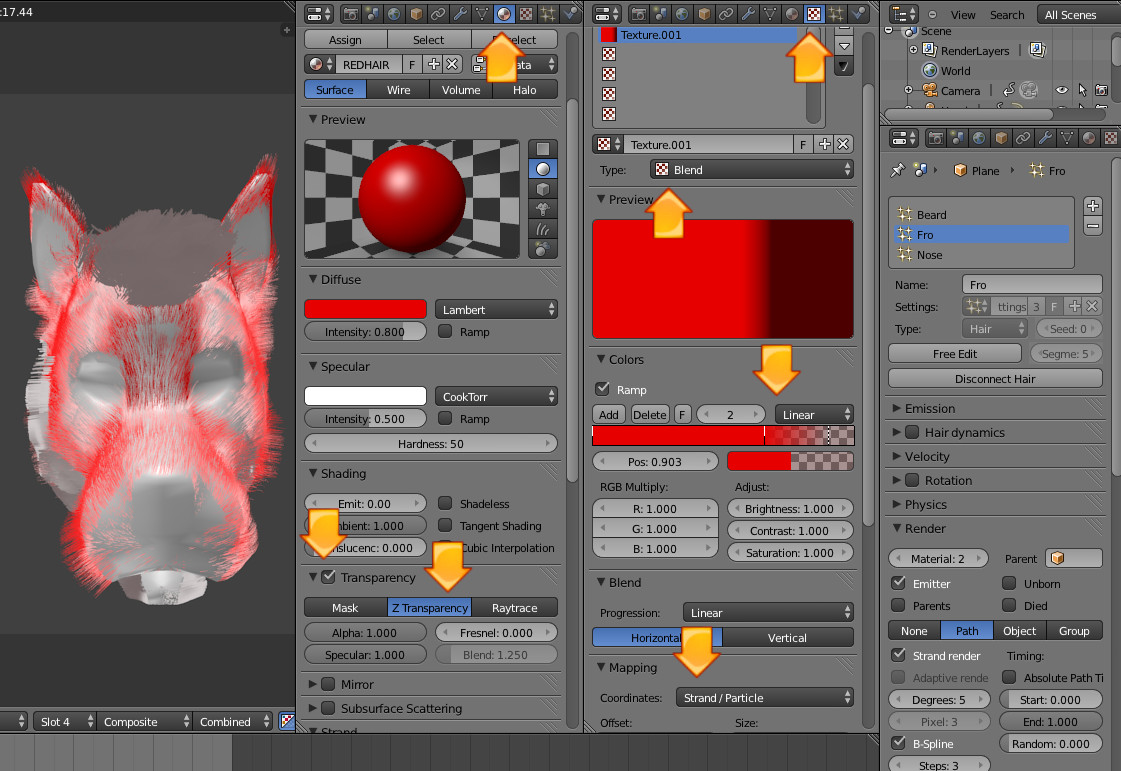
I made a little screenshot. From right to left: You assigned material 2 in the particle settings for the hair at the top. Material 2 is the dark gray material in the material settings and therefore it rendered this part in that dark gray color.
Many of the material settings are important, when you render hair with blender internal. In the material settings you can for example configure the thickness of the root and the tip of your hair. If you tweak that you get much thinner and realistic hair. I think you can see the difference.
One step further is using a texture for the particles. There is an arrow pointing at every important parameter in the next screenshot. Basically its a blend texture, which fades to transparency from left to right. Its important to set the mapping to strands. And it is also very important to enable transparency in the material settings. This has the effect of fading every single hair from full colored at the root to transparent at the tip. You could even make it darker at the root by adding another color in the blend at the left side.
And - don’t worry - this is hard stuff. I don’t know how many tutorials I watched and how many tries I had until I got the first acceptable results. You’re on a good way!
Hey Jackster, just one thing: Take your time, it would be worthwhile, because you are on a good way!
I think that you know the say: Rome wasn’t built in a day. And from what you wrote, you are young enough to spend a couple of more days to build your personal “Rome” :).
Learn from all the good examples on this site, asks the artists here, support others - and find your own style and pace.
 in Blender and go this far: