Unable to bake Normals the way I want them to (Smoothing & 90° angles)

Hi
I can’t figure out how to get perfect normals in Unity (2019.2.8f1) (or anywhere else for that matter) from a cube that’s been created in Blender(2.81) and baked in SubstancePainter(2019.2.3).
Please refer to this picture:

I’ve researched this a lot and I kind of know what the problem is.
Things I’ve done to try and fix the problem:

  • Split UVs and provide padding

  • AutoSmooth feature at various angles on both the high and low poly

  • Pretty much every smooth/flat, auto-smooth combination that there is on low and high poly

  • Pretty much every possible FBX-export combination regarding Tangent Space and Smoothing

  • Edge Split Modifier on low and/or high poly

  • Export Loose Edges fbx setting

Regarding the imagine that shows all the different outcomes:
I don’t understand what “separate smoothing groups” means. First of, from what I understand, the term “smoothing groups” comes from 3DsMax, Blender doesn’t have that, or does it? And if so I don’t know how to use that. All I know is how to shade things smooth/flat or use the Autosmooth function at an angle. And I don’t understand the differences between exporting Faces or Normals only in the FBX export settings. Furthermore I’m always unsure whether or not to tick Tangent Space. Would be good if someone could clarify that.

Lastly, I understand that having a 90° angle is why I’m having this headache and all of this would go away if I beveled the low poly cube. But that’s not the issue here, it bothers me that I can’t figure this out and finally want to know what I need to do.

To summarize:
I need specific instructions on how to shade both the low and high poly correctly to get the result I’m after, exactly what FBX export settings regarding smoothing and tangent space for SubstancePAinter+Unity and clarification on what they mean / how they affect the models further down the line.

1 Like

Hi. I’ll move this thread to a more appropriate section.

As for the problem itself, there are actually several issues here.

  1. You want the low-poly cube faces to remain nice and flat (otherwise you’ll be getting a gradient in the normal map similar to your right-most maps in the screenshot). To do that, either shade the cube flat, or smooth-shade while using auto-smooth, so that splits the normals for you.

  2. Because of (1), normals on the cube will be pointing, in this case, along cardinal directions, or rather, they’ll be parallel within each face. That means that the bake will miss some of the high-poly surface. Look at this image:


    These are corners of both cubes. The side of the low-poly that’s facing you (not visible in the picture) will bake with its normal also pointing at you, which means it will miss the surface completely in that corner. And it will also create a “seam” on the edges, as it will either miss the high-poly there too, or sample a very different normal there. Same goes for the remaining five sides. That’s what leads to what you marked as the result you currently have.

  3. The above points suggest that either you need to bevel the low-poly (as you mentioned), or use a cage for baking. That cage should be a duplicate of the low-poly cube, have the same UVs, but shaded smooth all around, and pushed out along normals a tiny bit to ensure it’s surface is “above” the high-poly mesh everywhere.

Smoothing groups from Max equate Blender’s smooth-shaded faces divided by Sharp edges (or split normals, which are the result of Auto-Smooth, manual normal splitting with normal editing tools, or some of the modifiers). In this case, the cube in Max would’ve had distinct smoothing group for every face (not necessarily six different groups, but enough to make every edge sharp). In Blender, as mentioned above, that requires to either simply leave it flat-shaded, or smooth shaded with Auto-Smooth splitting the normals along sharp edges.

The UVs should be split along all of the sharp edges here, meaning you should have six distinct UV faces with some margin around them.

Try the low-poly, high-poly and cage from this file:
cube_bake.blend (117.6 KB)
This is how it should bake in Painter when you use the cage mesh:

The UV layout is just an example, you can position the islands however you need, but keep in mind that, again, in this case they must be separate to get the result that you’re after.

For export settings if using FBX, basically the only thing you’ll need to tick is “Selected Objects” only, so that you export one object at a time. I don’t know exactly how Unity reads an FBX, but I’d be surprised if it needs a setting different from “Normals”.

So, to recap:

  1. Split your normals along hard (sharp) edges.
  2. Split your UVs along hard (sharp) edges.
  3. Use a cage when there are severe differences in normal directions between low and high-poly, especially around areas where surfaces differ, and/or use a low-poly mesh that better matches the high-poly surface.
4 Likes

Thank you! This should help. I’m about to head out, I will post back later with the results.

This is how I’ve always done it to make sure the low poly cube gets all the details of the high:

I just scaled the low poly down a bit and made sure to play with the ray distances to capture everything. But I guess its not an ideal scenario, because as you mentioned, it’ll sample a different normal that doesn’t quite match up and give a noticeable seam?

In your file, I notice how the low and high pretty much perfectly intersect with one another. Giving that weird flickering effect in the viewport. I was under the impression that this shouldn’t be the case and the low poly should sit beneath the high and then use the ray distance to compensate. Would you advise me to stop doing that in general?
My knowledge comes from youtube tutorials and such, I suspect I picked up some bad habits here and there.

For clarification: When we bake the normals, is the low poly shooting out rays to capture the geometry of the high poly, or is it the other way around, as in the high poly shoots rays from each normal down onto the low poly?

You said:
“or smooth shaded with Auto-Smooth splitting the normals along sharp edges.”

Does that mean Auto-Smooth at 30°?
And for splitting the edges. I either use the edge split modifier or I mark them - Ctrl+E “Edge Split” Is that correct?

Thank you again for your detailed response. Its been very informative.

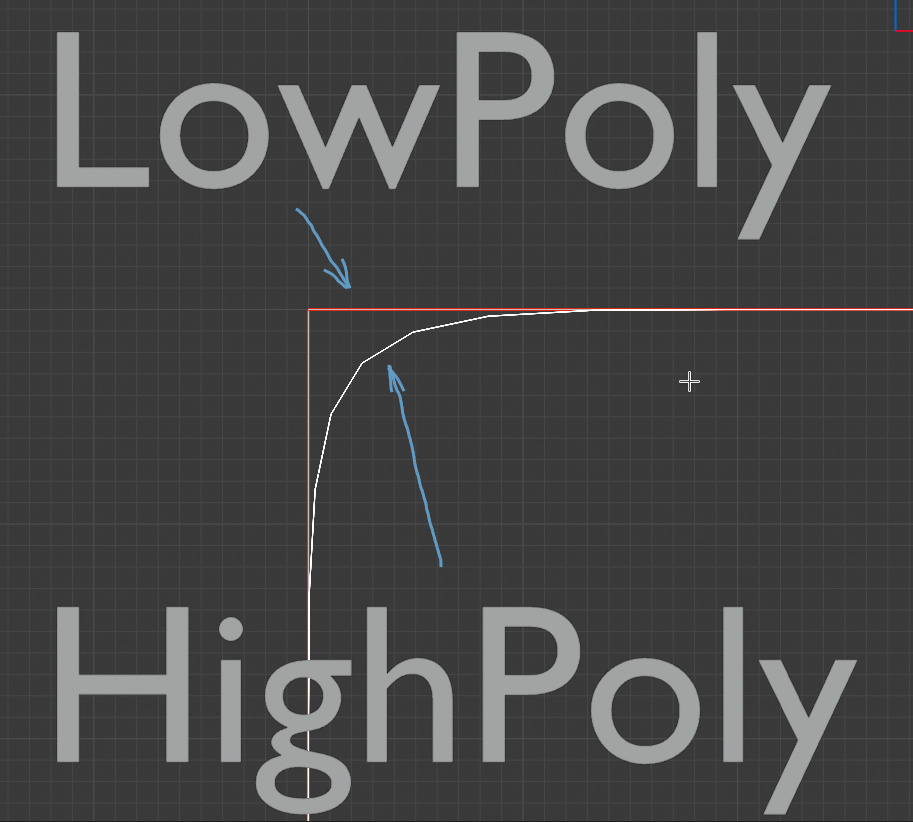
Whether the low-poly mesh perfectly overlaps high-poly one bears little significance. It can be slightly inside or outside. What matters the most is which direction the normals are pointing, and whether the envelope (i.e. ray distance) or a cage allows to capture all the detail correctly, especially between corners.

This is what happens without a cage:

  • First, rays are shot from each low-poly vertex¹ in the same direction as low-poly normals.
  • They travel until reaching ray distance
  • Then they are reversed, and an intersection is sought between resulting vector and the high poly. That intersection point determines direction of normal in the resulting map (i.e. the difference is calculated between what would’ve been the low-poly normal at the original point, and the high-poly normal at this intersection).

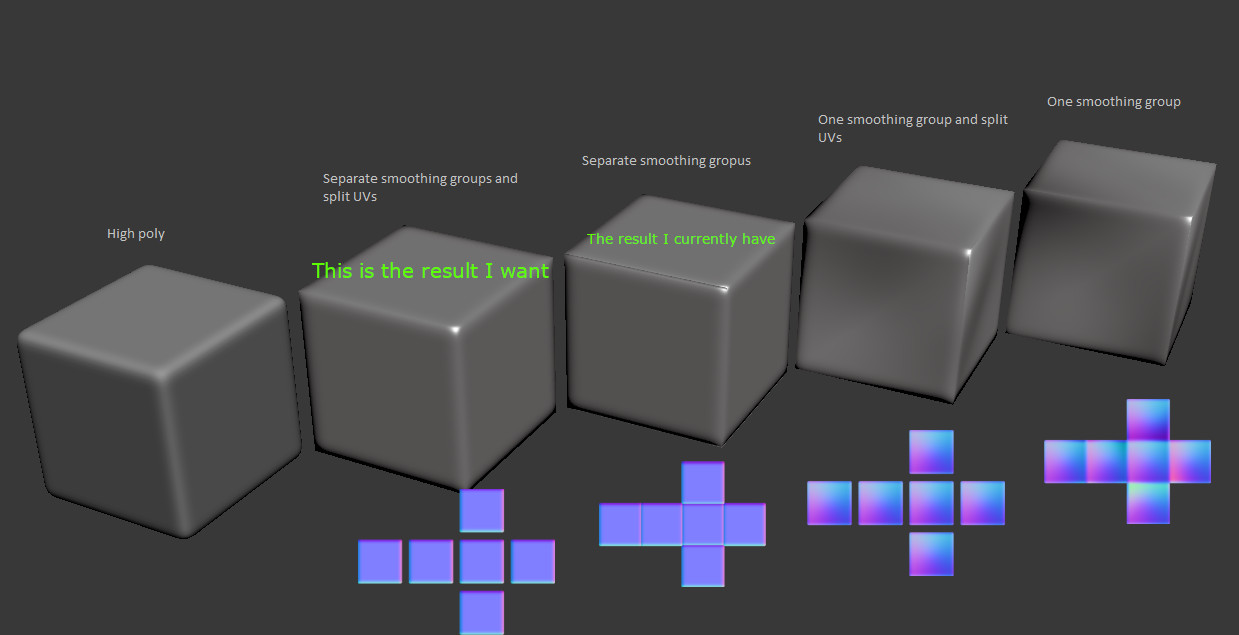
This is what allows the baker to find detail, regardless of how well the meshes actually overlap. But, with your new screenshot, it should be obvious then that not all detail can be captured this way when using a flat-shaded low-poly: all that volume between low and high poly would be skipped if you leave the low-poly completely inside like that; but if you scale it up, then you’ll lose the corners as in my example in the previous post. That’s why for such meshes a cage is needed. Of course, you could just shade the whole low-poly cube smooth and bake like that, but then your normal map will all consist of gradients, instead of flat faces with gradients on edges, and you’ll have a hard time projecting other detail, as it will be getting more skewed the closer it is to cube edges.

When using a cage, a relation is established between cage’s and low-poly’s vertices. Rays are shot from cage’s vertices² in the reverse direction of cage’s normals, and again intersection is sought with the high-poly. So a cage’s surface has to be outside of the high-poly, otherwise it’ll either miss it or hit some distant polygon.

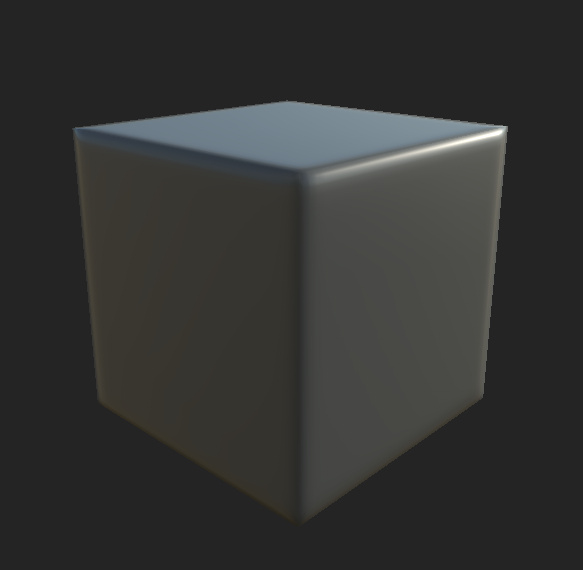
In the case of this simple cube indeed the default Auto-Smooth with 30° is enough. But I’m going on the assumption that in practice your meshes won’t be just cubes, where not all faces will be exactly perfectly flat, and not all will be smooth either. In which case the auto-smooth angle may not always be sufficient (i.e. when you want a sharp edge even though the angle is smaller). In that case, you’ll need to mark that edge as sharp; Auto-Smooth respects those marks. But in order to even use those marks you have to enable Auto-Smooth; which angle to use for automatic smoothing would depend on your mesh. You can even set the angle to 180° and rely solely on marking edges as sharp.

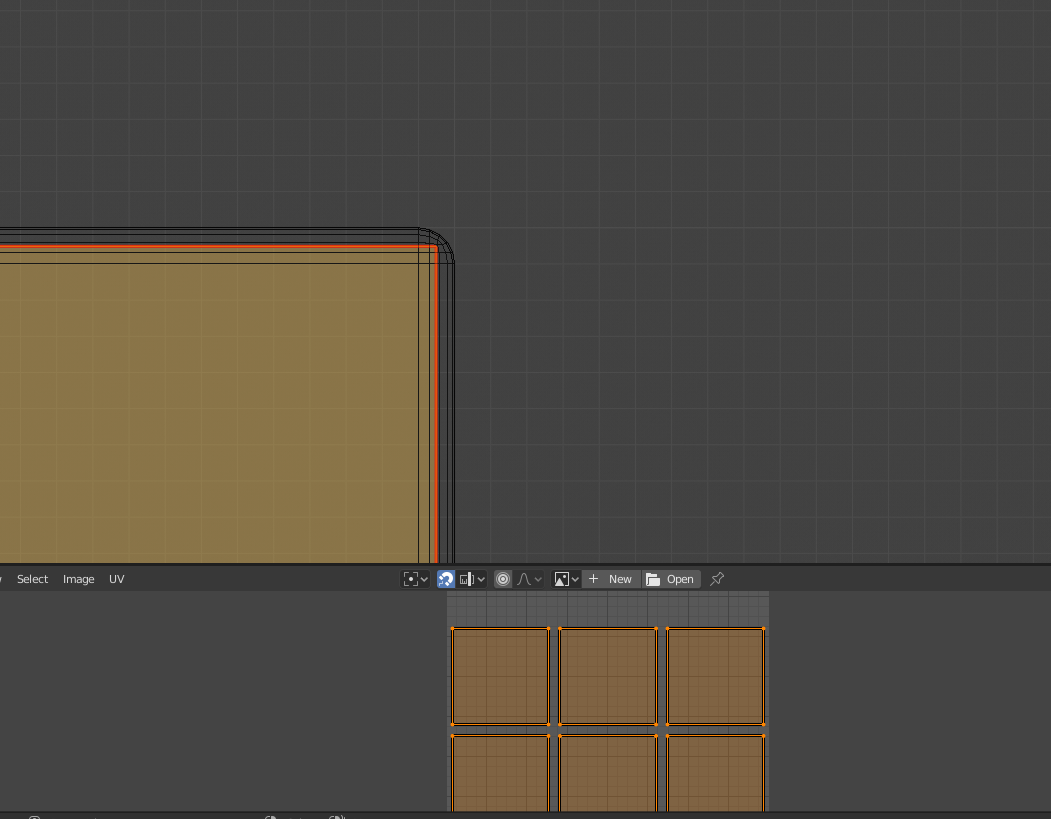
Don’t split edges manually, the exporter will do that for you based on which edges are marked sharp (or have split normals), and which have UV seams. In fact, if you do use a cage and try to actually split edges, you may even ruin the mapping between the low-poly vertices and the cage’s. Not to mention that you’d just make editing the low-poly more difficult, in case you do need to make some additional tweaks.

What I meant by splitting is simply having split normals along relevant edges (either marked sharp, or normals edited in such a way that they’re split per-face), not that the edges are physically split. Going by some other software’s teminology (i.e. Max), it’s the same as giving the polygons distinct smoothing groups: in Blender, all faces within such a “smoothing group” are shaded smooth, and all edges on border of that smoothing group are marked sharp (or have their normals split via normal editing tools).

They will be, of course, eventually split, by the exporter or by the game engine (basically, any data discontinuity at vertex level requires this, be it normals, UVs, vertex colors or some other attribute).

You’re welcome :slight_smile:


¹ ² This is of course not done just per-vertex, but interpolated across faces.

7 Likes

Hey Stan, This explanation is so awesome I’m bookmarking it to direct others to it in the future. It’s better than every attempt I’ve made at explaining smoothing groups to anyone. Thanks man!

1 Like

You’re welcome as well :slight_smile:

Stan, I want to second the thanks for this info. I’ve tried this sort of thing myself, and like the OP, failed. Your detailed information is a gold mine. Saved for future reference. Much appreciated! :nerd_face: :sunglasses:

You’re welcome too. All are welcome! :grin:

I find that information on baking out there is a bit scattered, and/or incomplete or mis-represented. And of course, depending on baker used, there may be additional caveats or options. But man, every time I actually try to explain these “basic” concepts, it turns into a wall of text :crazy_face:

1 Like

Wall of text? That’s the shortest good explanation I’ve ever seen. Everything else is a very drawn out technical details of the math behind normals (which most people don’t actually need to know and thus won’t read) or like you said, is basically somehow wrong.

1 Like

Couldn’t agree more, printed out and stored. As Stan says, everywhere I looked the info was fragmented, or only based on super high to what I’d call medium level detail. I awlays wondered why no-one had ever done a simple box example. If it works on that, you’re pretty safe with anything more complex.
I’d never had an issue with more complex forms, but the simpler you go, the more it becamse “seam-y”. Thanks to this info, I can side-step that issue in future.

1 Like

Wow what a great explanation! I just got home, still not quite ready to dive into this, but many thanks! Reading just this got rid of a lot of confusion for me. Exactly the kind of answer I was hoping for and then some.
Thank you. :heartpulse:

Update:
Yep, it just works! Awesome. I made a physical print of your answers and put them in a folder. XD Don’t think I’ve ever done that for something like this.
This has plagued me for a long time, I always ended up just beveling or find another workaround.
Anyways, thank you!

1 Like