Inspired by this thread in the News section of Blender Artists, I decided to post another example here (in addition to the one I initially posted) demonstrating Blender’s powerful internal rendering capabilities.
The goal here was to create a fake yet relatively believable advertisement featuring a perfume bottle, complete with (faux) reflections, refraction, and caustics - without raytracing.
Enclosed are three images:
- the final render
- the nodes setup
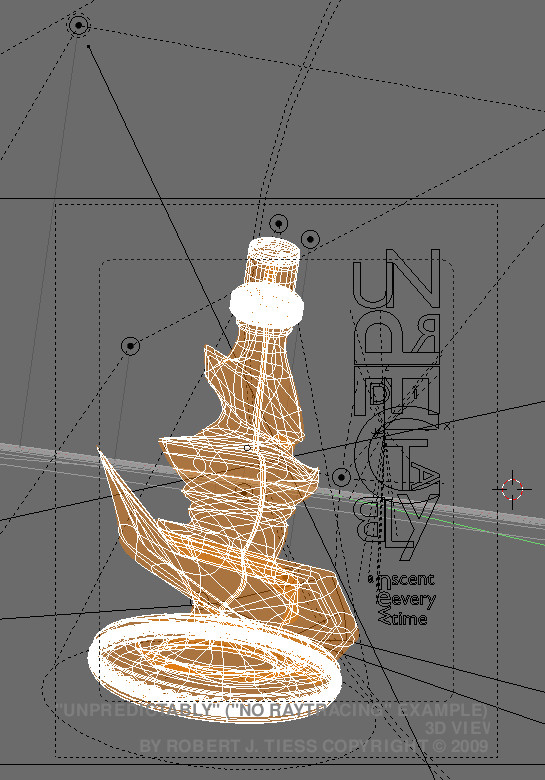
- the 3D view
BTW, you can ignore the silly text in the render  (it’s just there for demonstration purposes)
(When viewing any of the images, remember to expand them in your web browser to see them at full resolution.
How was the render achieved? The nodes carry a good part of the workload here, but the basis for this project begins with the geometry itself.
Since simple transparent materials are used here, we need a way to fake the effects of refraction. Notice the straw that comes down from the spray bottle’s top (inside the bottle). Notice how it curves.
You’ll notice that, when you look at a straw in a glass of water, the straw does not simply flow downward: it curves where the water begins.
This has been simulated here through several strategic loop cuts on the straw. The geometry below these cuts simply has been moved left or right.
Directly behind the bottle you might notice the edge of the floor plane is curved upward: this also is intentional,incidental as it appears, because it appears slightly through the bottom edge of the bottle. It’s a subtle touch that adds to the overall believability of the render.
Believability is the goal here, not realism. As you probably know, realism and advertisements rarely go hand in hand  What looks best is the usual preference.
Contributing in a major way to the look of this piece are several buffered shadow lamps at varying energy intensities. You can see in the 3D View image there relative locations and angles.
There are three layers in this piece:
- on the first is the bottle
- the second layer contains the floor plane
- the third layer contains the text (material set to shadeless)
Most lamps here are set to Layer so they affect only the layer they occupy. Why? Because we want to take total control over the lighting and, with respect to the floor plane, allow for some slight caustics.
On the second layer is a shadow buffered lamp pointing straight down. It overlaps where the bottle stands. The purpose of this lamp is to produce the ring of light below the bottle speckled with faux caustics.
This is not a new technique for me, as I posted a test back in 2007 demonstrating such a technique.
The bottle’s material uses Blender’s basic Fresnel material (Ref: 1.0; Fresnel: 1.0; Fac: 3.0) and a Toon shader for specularity (Spec: 1.7; Size: .011; Smooth: 0.5). ZTransp is on, and Alpha is set to 0.7.
The bottle uses two Distorted Noise textures to add some faux reflections and caustics. The first texture slot simply affects the color, while the second affects Ref, Spec, and Emit.
The floor plane uses a Minneart material (Ref: .87; Dark: 1.4) and WardIso specularity shader (Spec: 1.24; rms: 0.33).
A distort noise is also used on the world background (mapped as a Tube).
Now we will take a look at the nodes:
We see the project is divided into two render layers:
- the first render layer contains the bottle and floor plane and all lamps
- the second layer contains the text
Blender’s Defocus node is used twice here:
- the first time it actually defocuses the scene
- the second time it is used as a noise generator
Before there were nodes, many Blender users would take their renders into a graphics editing program and add some noise. Then AO came along, and it offered another way of “dirtying up” a render while affecting the lighting at the same time.
I prefer this technique because it is incredibly fast and does not require ray tracing.
The second Defocus (“noise generating”) node only uses an Image input. Preview is left ON (16 samples), and Zscale is set to 400: Zscale helps spread out the dithered noise effect. (This is a resolution-dependent phenomena, as the effect currently does not scale to percentage, only pixels).
Moving on through the nodes we see the Glare node is used along with Lens Distortion: these provide some extra glints and color modulations that add to the effect of the glass.
After this, the text from the second render laye is combined with the first layer.
Next, we see Rotate, Flip, and Translate nodes: these literally take the image, invert it and flip it upside down, and then move it down to the bottom edge of the floor plane: these nodes, when used with the Color mix node (set to Overlay here) help add to the slight sense of reflection on the floor plane.
This project was rendered at 1600x2000 pixels and took less than a minute to render internally
The materials are not physically correct. The modeling is unorthodox. The techniques are admittedly atypical, but the result is our primary concern in this piece: does it look somewhat convincing to the general viewer (as far as advertisements can be said to be believable)?
Notice I said “general viewer”: this is not an image meant to impress 3D professionals, simply a project intended to demonstrate Blender’s powerful array of tools and rendering capabilities.
Had I rendered this in an unbiased renderer at such a resolution, it would easily have been a matter of hours - several to many. For a “professional product shot,” that’s easily acceptable, but this perhaps assumes the “professional” in the situation is not facing an impending deadline (perhaps after a last-minute change suggested by a producer or someone in management).
You might look at the nodes, the material setup, and the lighting, and also contend it would take more time to set those things up rather than render this project in a more physically realistic renderer - and you might actually be right if we are simply talking about one render (but we are not)
The point here, though, is that, if you take the time to learn how lights and materials interact, and how to “get the most out of Blender” (or any software you use), you can discover ways to shorten your project time.
This project took me three hours to complete. What helped speed things along was that I was able to conduct numerous fast test renders: such a luxury does not come with more physically correct renderers: you have to wait substantially before you begin to see the result, then terminate the render, make adjustments, then rerender and wait again… and again…
Here is where time spent on learning lighting, materials, nodes, and pushing the internal renderer can save you hours and days of frustration - and also enable you to take on far more challenging pieces with greater assurance and ease.
Reaching such a point is by no means easy, judging from my own experiences in 3D, but it is worth building towards such proficiency if you intend to work regularly in 3D and take on projects that could otherwise claim entire days of your life.
Think of all the time you can free up and use that to either reinvest that time and energy into creating better 3D projects and art or just enjoying life more
In any event, I hope you find this information helpful.
Take care,
RobertT


