attention: some recent change in the python API broke previous versions of the addon. It’s already fixed, download v 0.4.3
The API change broke the automatic Compositor setup, so if you had problems with that, try again.
You should start with no Viewer node at all, or with the Viewer node attach to what you intend to render, same as before. The addon takes care of the rest.
Sorry for the inconvenience.
[latest version: 0.4, see below for changes]
[ warning for 0.31.3:
I changed the inverse gamma to direct, so if you used the former default of 2.2 you should change that to 0.454545, if you used another gamma you should change that to 1/old_gamma. Sorry for the inconvenience, we are trying to solve a slight difference in color between F12 renders and MB ]

(scroll down for updates)
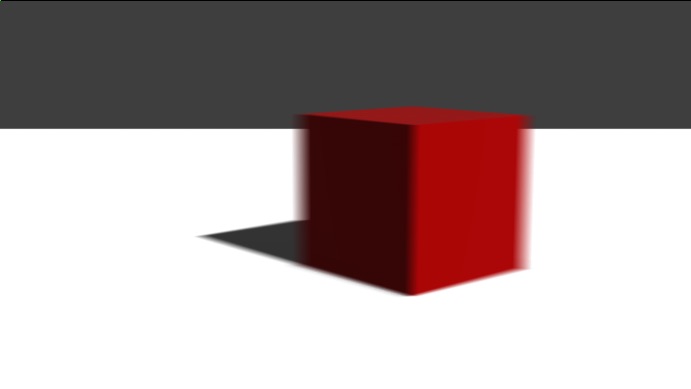
I made an addon to implement real Motion Blur in Eevee.
At this time the built in option for motion blur under eevee works only for camera movements, and only if the camera itself moves, it ignores movement if the camera is parented or rigged. That renders eevee pretty useless for profesional work.
But that’s a pity because Eevee is fast and yields very good looking results, so it’s tempting to use it for real animated renders, so I came across a sort of workaround that works pretty well, and wrapped it into an addon that handles the whole process seamlesly and in one click.
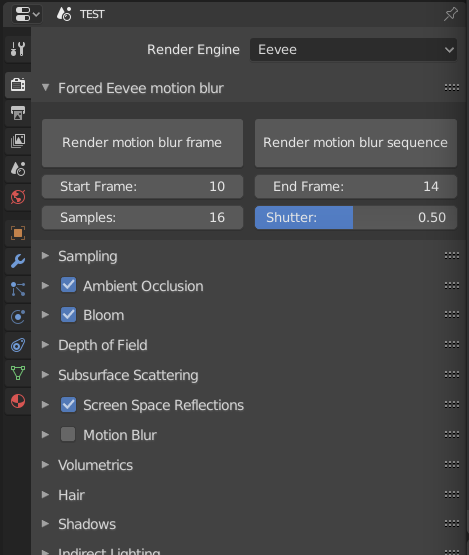
Just install the addon, look for the panel under render properties called Forced Eevee motion blur.
You have one button to render stills and another to render image sequences. It outpus EXRs only at the moment.
The effect is achieved using a very brute force approach: rendering one subframe for each motion blur sample, so it supports everything that Eevee supports, objects, particles, shadows, lights, volumetrics, etc. as long as its animations are at least linearly interpolated and not stepped.
This is in beta stage, just released, so be patient with some bugs/annoyances/unfinished features you may encounter.
You can download it from Github.
Enjoy.
The issues you WILL enounter, today, are:
- May cancel hitting CTL+C in the console a few times.
- The effect relies on a Viewer node connected to the same output as the Composite. It adds the node all by itself, but first it checks if a Viewer node exists, just to avoid disrupting some fine node setup, but in that case it will render whatever is connected to the Viewer.
- This may be a bug or a feature…
 this way you can motion blur any step of the compositor tree.
For the next releases I plan to add:
Adaptive subframe sampling: roughly estimate the amount of movement in each frame (measuring the maximum speed of the corners of the bounding boxes of each object, relative to camera) and tune the amount of temporal subsampling, so frames with faster movements get more frames, and and frames with little or no movement get little to no subsamplingDONE!- Better integration with the UI (keyboard shortcut, CTL+SHIFT+F12 ?, ability to show the render in the Image viewer automatically)
- ability to choose output format
[ Update July 1 2019] 0.21 is out! now supports alpha channel export.
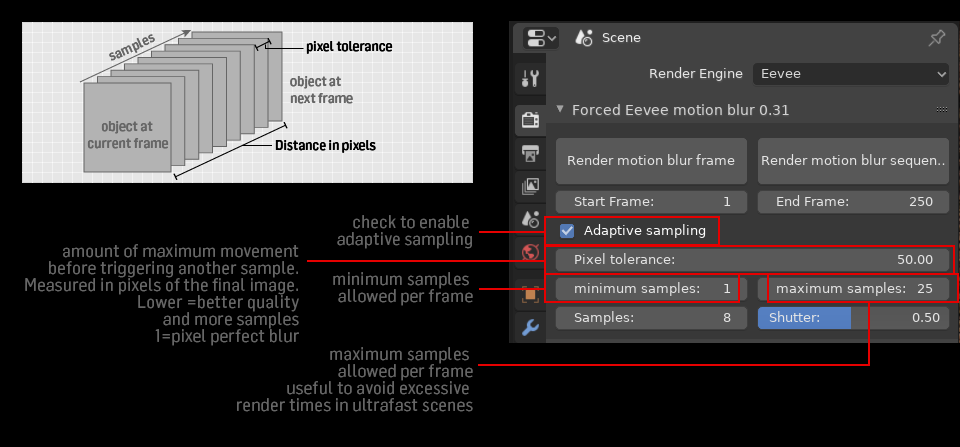
[Update july 5 2019] new feature: Adaptive samples!
Calculates the amount of samples each frame based on the actual movement at that frame. This way frames with lots of movement get more samples, and the ones with little to none may get no subframe samples at all. This way the render resources are allocated more efficiently ![]()
There’s a minimum and maximum samples override, to avoid rendertime-crushing peaks (I got over 500 frames in some tests, especially when an object gets too close to the camera the pixel speed can go up like crazy).
The minimum samples option is to compensate for some special cases (like particles) that doesn’t get calculated for speed (still), and whatever. Just in case.
[Update July 15 2019] New –barely noticeable– update: 0.4.
- Most changes occurred under the hood: code cleanup, some functions are optimized, should perform faster and overall the code is neater.
- Main change is in the technique used for the subframe rendering itself, that now uses real subframes instead of the time rescaling hack I used before. I wasn’t able to make it work that way before, so the need for the hack. Now I’ve realized i was simply making a silly mistake. I fixed it and rewrote the function
- The only visible improvement is that –if you manage to– cancel the render, your timeline isn’t screwed up anymore.
- And the script gives a neater console output too.
- The properties are now stored inside and object instead if directly under scene. It’s neater, less error prone and is the official recomendation too. Doesn’t change anything on the user side, except that maybe if you open a project created with older versions of the EMB, the settings (adaptive samples, etc) may be reset to default values.
In time i’ll fix everything I can.
Tell me what you think/if it works ok for you.
Issues/caveats:
- Particles are NOT taken into account yet. I’ll try to solve that, in the meanwhile if there’s particles in your render, set the minimum to, say 4 or 8 and you should be covered.
- Texture animations are NOT taken into account either. If you have fast moving textures –or anything that’s not an object set the minimum samples accordingly or turn off adaptive sampling.
- The movement is calculated using just a couple vertices of the bounding box, for speed, so the estimate is very approximate. Speed readings may not be always accurate, and may be ridiculously high when objects cross the camera plane. That’s what the maximum samples are for.


 ++
++