I vaguely remember seeing a video or addon that allowed doing this. Does anyone know what it’s named?
I have a very curvy mesh that sort of high-poly and I don’t want to rebuild it or unsubdivide it but I’d like to manipulate the UVs on top of a tiling texture to get some of the straight lines in the texture to follow the curves of the 3d model.
If I had access to the Bezier Mesh Shaper addon in the UV editor or the Curve function of Loop Tool in the UV editor I’d probably be able to achieve what I want quite easily.
If I could edit a mesh in the 3d viewport and then turn that data into the uv map on another object via geometry nodes, I would have access to those tools to use on the UV map.
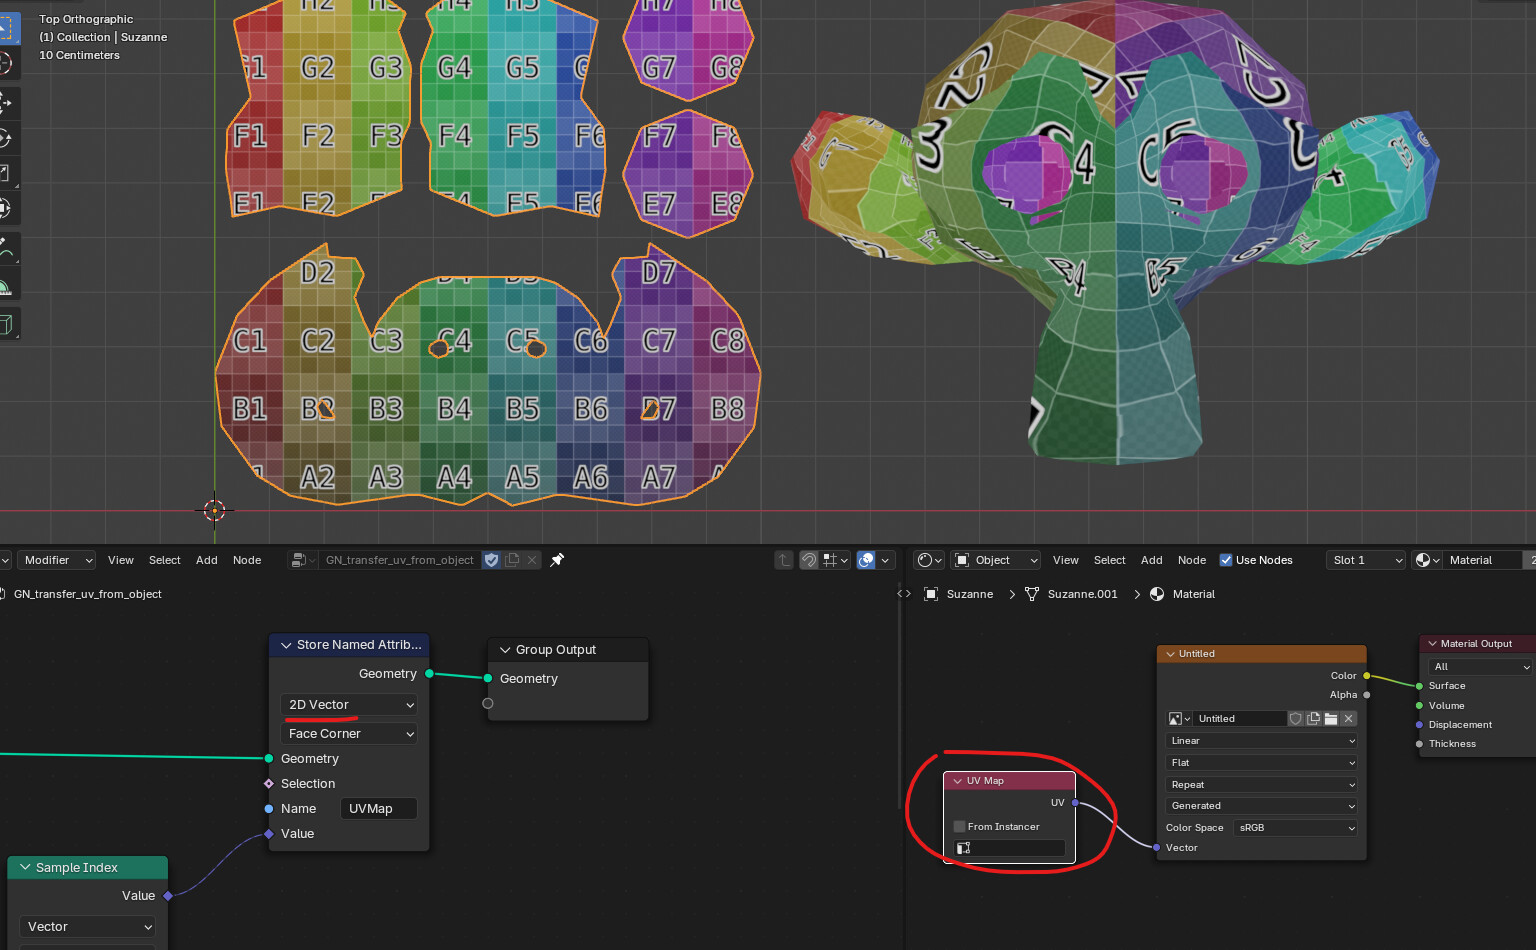
Here two GN nodegroups that might help you… One transforms the object to its UV coordinates, and the other stores the new positions to the UV space and returns the object to its original shape.
You may need to apply the first GN to your object before you go into edit mode… When you’re done with the UVs, add and apply the second nodegroup.
Perhaps… I’d need to experiment with this a bit more. The problem I suspect it will happen, is that when you go into edit mode in the UVprojected object, the original object won’t update…
I haven’t tested this extensively, so it might have some flaws here or there…
It’s now late in this side of the planet, so I’ll take a deeper look tomorrow.
If I understood you correctly, you want to change points locations of UV in Edit Mode and see updated results live on object.
Try to:
Duplicate original object, set duplicated object’s points positions to UV (use seam as boolean attribute on edge domain to use in Split Edges node), apply GN.
For original object take duplicated object points positions and store it as UVMap attribute on Face Corner domain.
For shader to work you need to explicitly provide UVMap from Attribute node (UV from Texture Coordinate does not work for some reason)
Can you explain what Sample Index does and why it’s necessary? Why can’t you just plug position from one object into position of another object when one is a direct copy of the other?
I haven’t figured out how to do step 1 properly but your file works exactly as expected.
Although they are duplicates their geometry positions are different (but indices are the same).
When you input Position node (to Set Position or Store Named Attribute) GN will retrieve positions of currently evaluated geometry. Sample Index is used to provide positions from another geometry.
Here is a nice explanation by harry blends.
It seems the name of the seam attribute has been changed to “uv_seam” but it also seems that suzanne does not have any seams. Did you make your own seams when you made that demo file or did suzanne used to have seams by default?
nevermind. I was worried I’d need to do a bunch of manual selection and seam creation but there is the function " UV > Seams From Islands " which saves me the trouble. No more problem, for now. There does seem to be a problem with the actual mesh i wanted to use this for but that requires more investigation and might not be a geometry nodes problem.
Note to self: the material absolutely must use the Attribute node to get the UVMap attribute.
After applying the modifier the UVMap attribute will remain but the actual UVMap “UV Map” will disappear. Need to use the Convert Attribute feature to convert the UVMap attribute to Generic Face Corner 2D Vector to have it appear in the UV Maps list again.
In Blender version 5.1.2 you will not see the effect of this UV map manipulation in the Solid viewport. It only shows in EEVEE and Cycles material preview and render viewport shading modes.
Don´t forget to set the attribute as 2d vector, not just vector, thats the reason you can’t see the manipulation in the viewport and have the issue when applying the modifier.