I want to make a book for my nephew so I hunted down a tutorial online. Problem is it’s from 2011. So I know the version of Blender he was using is older, but I don’t know the version. Anyhoot, in the tut here https://vimeo.com/22395148 at about 5 minutes in he is using a grid pattern to see how his unwrap went. In an attempt to clean things up he hits the space bar and selects apply scale then apply location. It doesnt work. Then he selects “conformal” in a pull down menu that I can’t make out because the tut is fuzzy. Then everything works. Bam! I’t straightens a lot of things out. Then he makes some cuts and continues on.
I’m using 2.72 and don’t see any of those options. Are they no longer with us or are they add ons I’m not aware of? I’ve attached the file at the point where i unwrap along a seam separating the paper from the binding. Where do I go from here? There are so many ways to unwrap and once it’s unwrapped there are other things that can be done such as the following I did on a didgeridoo project: (thanks Ognjen)
“Once it’s unwrapped, select a polygon square whose both x and y sides are parallel, (if you don’t have one, make one by pressing w and choosing align x or y depending on what edge you’ve selected.) then hit space and type in “follow active quad” and hit enter, this should all be done in uv map editor, but it’s also possible in 3d view which I don’t recommend.”
I’ve attached a file of the book with seams that separate the pages from the binding. So the question is how do I go about getting this thing unwrapped with a warped grid? If seems if you do all the permutations on all the possible combinations of things that can be done the math gets crazy. What would be the right methodology? Just having it done for me won’t help on how to approach the problem. For example,
blah blah because of blah
once your done with then, then blah blah because of this.
Then he selects “conformal” in a pull down menu that I can’t make out because the tut is fuzzy. Then everything works.
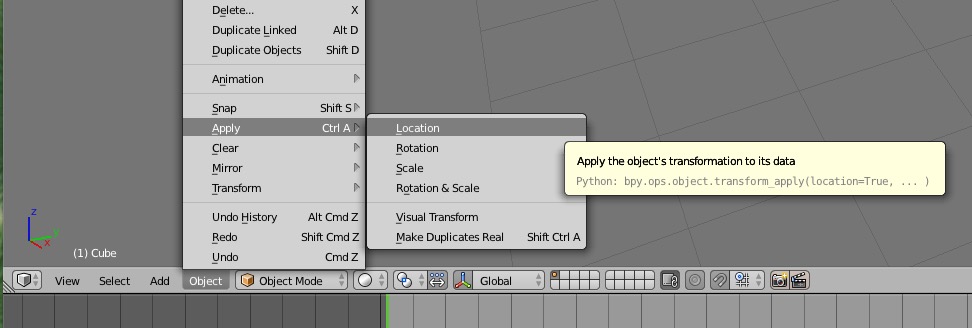
Press U / Unwrap and conformal is one of the unwrap methods in the toolshelf
Wow, that was fast. Excuse my ignorance for I am fairly new, but I don’t see a conformal selection and Ctrl+A doesn’t work. What version are you using?
All the steps outlined in that video should work in 2.73 too. Selection between Angle Based and Conformal unwrap methods appears in the operator panel (bottom of the tool region or F6 hotkey) after you do U -> Unwrap (this can be clearly seen in the video, by the way). What exactly about Ctrl+A “doesn’t work”? Applying transformations doesn’t magically “fix” the unwrapping, it’s just that having unapplied non-uniform scale may have effect on the unwrap.
Thanks for chiming in Stan Pancakes. Ok, I finally found the dang Conform thing. I clicked “t” all over the place before I posted a thread looking for it and never found it. I think my blender is haunted and moody. But nothing happens when I click Ctrl+A. I’m running a late 2011 MacBook pro with Emulate numpad and emulate 3 button mouse selected in user preferences. So I still cannon execute this “apply scale” and “apply location” stuff. He uses the space bar to find them, but it’s just not there when I try.
Ok, got it. Ctrl+A works in object mode. Ok, so what do these functions do? I googled them and there’s no good explanation as to why. So you don’t really learn anything, you just press buttons.
Yes, that link sums that up. What’s going on is that scaling in object mode doesn’t really change vertex positions, it just transforms object’s local space. For example, the object may “look” square when it really isn’t. Because of that, many operators may not behave as you would expect, e.g. unwrap, bevel. When you apply scale, the transformation actually gets applied to vertices, and scale itself is reset to (1,1,1), and you’re back to “what you see is what you get”.
I should note that this is not a Blender-specific thing, other packages too may behave differently when objects have non-applied transformations.
I think I understand. Going to let that funnel into my head slowly so it doesn’t overflow. Those commands straightened out lots of things in the book. so is the game now to try to make strategic snips then use commands like “follow active quad”, etc?
Mattgolfs, why are you complicated things now when you have cleared Scaling caused issues? Let’s sort this out.
Book cover is a complicated thing; you can take any hard cover and see how it’s made, where the paper’s cut to bend and glue it.
UVing does the same just vice versa - if real paper is cut, bent and glued UVs are what happens if the mesh is flattened
( on the table surface e.g.). If there are no cuts (seams) mesh would distort heavily which is what happens with your book cover (hint - there are seams -cuts but you could place them strategically more correct so that mesh can be easily flattened in a predictable fashion).
Now, this was all complicated and such but in a reality all you want is to put cover image on the flat faces of the cover and i doubt you care much how the image is stretched/distorted on the small remaining cover mesh faces. So do the unwrap just for the faces you want cover image to be on. UV unwrapping tools in Blender allow this: all you need to do is select front, spine and back flat faces and U -> Unwrap. As if you had a flat sheet of paper bent over the book cover to glue. Adjust and place the unwrapped faces on the image you have for the cover.
Now, select in 3d view mesh faces inverse Ctrl-I and scale them in UV editor to 0, exactly so - select inverse in 3d view, scale in uv editor.
G grab tiny dot in UV editor which is still selected and put it on any image pixel - rest of the cover mesh in 3d view will get this color.
Do not forget to set Texture to use UVs for the render…
Edit: There is mesh part representing pages … If you would to scale inverse selected faces this will include faces which make book pages too. Easiest is to assign a new Material for them and hide from the Editing view before you do cover faces.
Eppo, thanks for your input. It’s a lot to take in. I think the only reason it seems like I’m making it complicated is because the tut seemed to be complicated. I got tired of trying to make everything square that I just said screw it and put a material on it and it looked fine. I think my nephew will like it. It’s not quite like I wrote it in my book, but it sure is funny.