UV Mapping - Removing faces from mapping

Hi all,

I’ve just installed blender and worked through the basic tutorials so got a reasonable grasp on modelling and suchlike.

I went on to create my first model which is going to be a playing card - created using a cube with a cylinder to round off the edges and then extruding some more faces out of the cube to fill that side. I then deleted the extra vertices/etc where the cube and cylinder overlapped and I used the mirror X/Y adjustment to create the other corners and then applied the adjustment. I also used the w - remove doubles thing to get rid of any potentially doubled up points.

The result looks pretty good so I then moved on to trying to texture it. In the situation I want one texture which will be used for the back of all the cards. Each card though would have a different texture on the front.

The tutorials/documentation all seemed to fall apart here and as best I could work out they refer to an older version of blender. I managed to muddle through and created two separate UV mappings for the object and go into UV editing mode to try and create the two mappings.

The problem though is that when I select the object in edit mode there already seem to be some mappings present in the brand new UV mapping I just opened (I see a white square with a diagonal line across it). I have tried everything I can think of but they won’t go away except sometimes (and only sometimes) when I do an “unwrap”. What’s worse is after I’ve tried unwrapping one way and then another the “old” mappings still seem to just stay and pile up under the new ones and there is no way to delete or remove them.

So really my question is - how do I delete stuff from the UV map? I want the front and back of the card each mapped to a different UV map and all the other polygons unmapped… but I only seem to be able to add stuff to the mapping and never remove it.

I’ve been tearing my hair out over this all day trying all sorts of different approaches. Cutting, Hiding, Selecting different vertices, etc, etc. Some of them even look fine - until I unhide the hidden vertices at which point they immediately reappear in the UV mapping screen on the left!

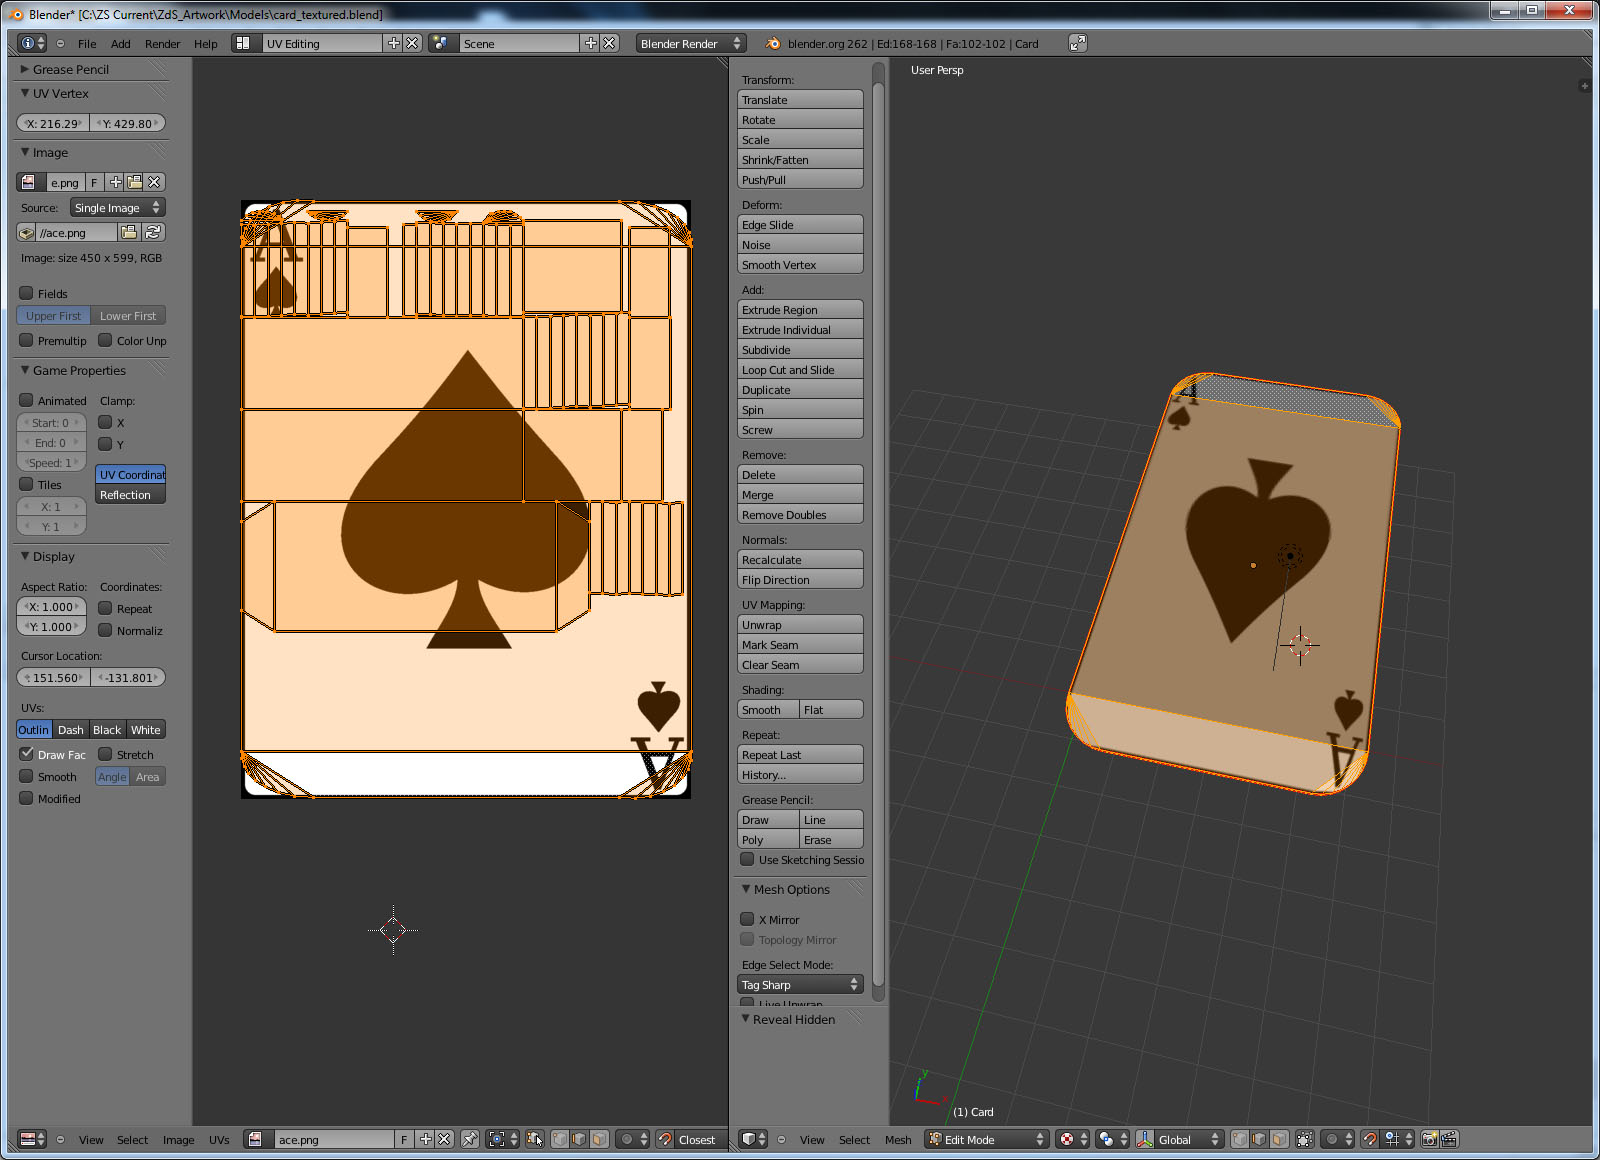
Screenshot attached to illustrate what I mean. - You can see its mapped correctly on the right and you can see the “good” mapping filling the image…however you can also see all the other faces being mapped onto it in a very random way. How do I get rid of them?


Thanks in advance!

Zarch

You can’t delete faces, if you unwrap you unwrap ALL faces. If you don’t want the image on any faces, just drag them outside the area of the image and in the texture mapping settings change it from repeat to Clip. This way there will be no image to be mapped to those faces.
I wouldn’t do two sets of uvs. Just use one so the front and back faces overlap each other in the image editor. Then just apply one material to the front face, another material to the back face with a different image used for each material. You could also jive another material to the edge faces with no texture.

Ok, that makes sense. You are right, I do only need the one UV mapping as I can use materials to select the correct texture…

And then to prevent the (pointless since its a tiny area) mapping of textures to the sides of the card I just drag them outside the image area.

One thing confusing me though is here:

http://wiki.blender.org/index.php/Doc:2.6/Manual/Textures/Mapping/UV/Unwrapping

Under Unwrapping Multiple Faces it says:

In general, you should only unwrap the faces you need to, and do so in a single unwrap operation. You only need to unwrap faces that will be painted using an image; all other faces can use procedural materials and textures or vertex paint. You want to keep your image as small as possible, so that means you want to keep the number of faces as small as possible. For example, if the body is always going to be covered in clothes or armor, there is no need to unwrap it, or they can be mapped separately.

This led me to believe there was a way to unwrap some and only some of the faces from the model?

Thanks for the help!

A technique I sometimes use to prevent any image detail from showing on some faces is to select the faces I don’t want image detail on, hit ‘Reset’ in the UV menu, and scale the faces down to a very small point placing them in an area that contains the base color you want to have on those faces.

It’s cheap, dirty, doesn’t require any new material indices and works on textures that need to be tiling.:slight_smile:

This can be done by selecting the faces in the 3D view you want to map to one image (or texture for that matter) prior to unwraping. If you use different unwrappings on the same model, you must define a UVMap for each unwrapping. So in your case that would be three: Front, back and side. Unless you texture the side the same way as the back.
I hope this can clear your confusion somewhat.
Cheers hotzst

Sorry, still confused since that seems to contradict what Richard said:

I tried exactly what you just describe - selecting the faces to unwrap and the UV map to unwrap them too. Everything looked fine when I hit unwrap. However when I then unhid (if hidden) or selected (if not selected) the other faces they immediately appeared in the UV map too - even though I didn’t hit unwrap again. It’s like they were hidden from my view of the UV map, but they actually were still there.

Ok, it’s easy to get confused with this stuff. You’re not the only one confused. We’ve all been there.

Multiple UV’s can be handy but are unnecessary in this case.

On an object you can have multiple material slots. You assign faces to each slot. So, for your card you would have 3 material slots, with a material on each.

Each of those 3 materials can have separate textures applied. Each of those textures use the same UV unwrapping of the object. But the assigned faces in the material determine which image texture is applied to which faces.

So a common workflow is to mark your seams for the unwrap, and assign the faces to your material slots. It’s easier with seams because the Key L (select linked) selects faces within your seams. Some people hide same after assigning to a material slot, for convenience, but it’s not really necessary for a simple object like a playing card.

So you mark seams to separate your card front, back, and edge. Then assign a separate material to the front, back, and edge faces. Unwrap if you haven’t already. Select one of the materials, then go to texture panels, assign a texture to that material. Move and scale your unwrap for that texture.

Hiding or selecting only the faces you want to see in the unwrap is just for convenience. So when placing the card front UV on the card front texture, you can isolate it in your view. Actually, you don’t need to hide anything. Just select the front faces and that’s the only part of the unwrap you will see so you can place them where you want on the front texture.

The front of your card’s UVs can be in the same place as the back of the card, because a different texture will be applied depending on what material is assigned to those faces.

In other words, what Richard said. :slight_smile:

Hope this helps.

-LP

Thanks a lot everyone, I seem to have it working (or at least I have a card with different images on front and back face spinning around inside my game). I need to work out the details with clipping and getting everything to fit together right (currently it shows the textures the right size in blender but not in the game engine) but fundamentally its all there :slight_smile: