if you find a better detail let me know
but i think i see wht you mean here
i’ll check some more inf my folders
mightahve something
i’ll probably continue tomorrow on this
got to complete my new hull now !
thanks for helping
if you find a better detail let me know
but i think i see wht you mean here
i’ll check some more inf my folders
mightahve something
i’ll probably continue tomorrow on this
got to complete my new hull now !
thanks for helping
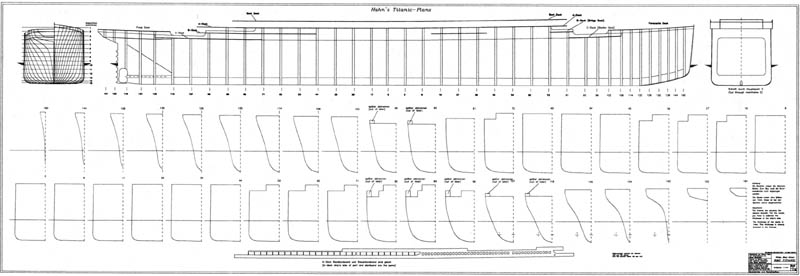
for drawing cross sections
first row if for left to middle then
second row from middle to right
i’m right here
some of the height are not the same by a little
i assume here this is a mistake in the drawing or photocopy may be!
thanks
yea the vertical height of the cross sections in that image are different because they go all the way to the top deck.

this one tho doesnt go all the way up, only upto bow and poop deck.
you only need to go upto the yellow line on the real titanic then do above that seperate.
I have to go to bed now, maybe i can help more tomorow
rickyblender check out rebogeys weekend challnge entry: a derelict ship
@ modron where can i find it ebogeys weekend challenge?
i need cross sections up about b Deck i think cause this is where it has maximum lenght !
the a b c d deck and boatdeck have to be model in 3D anyway to show how the top looks like
so no need for the cross sections there
but if included then i’ll simply remove these and model it in 3D
otherwise it wont’ look nice!
the top part must be done in 3D or it’s won’t even be looking good !LOL
and that will require a lot of verts but no choice here to get a nice 3D model!
and thanks for re scale dwg to Eppo
thanks guys
I meant when doing your hull you only need to follow the curve guides upto the green part. then the green part you can model as a seperate piece from higher res blueprints.
a drawing is worth 10 000 words
that’s exactly what i meant LOL
i’ll continue today to get a nice overall hull mesh
here as reference for deck names
thanks
got my first new hull with the proper cross sections!
now need to correct it a little to get final shape
then mapping technics
thanks
can you try the cross secton with this one here
http://img37.picoodle.com/i57g/mastercluedo/omch_fd8_ucg8d.jpg
it does not fit !
if you scale it to the lenght of the pic the height does not work !
but the frames beams cross section seems ok !
thanks
That cutaways way off
I overlayed the cutaway with the cyril plans that i gave you in pm.
this one http://atlanticliners.com/Images/ColorPlans%20CyrilCodus%20LG.jpg
now the cyril one matches the curve guides cross sections i gave you in this one
see
now the hull i have as you saw is a little rough
how about using the trick to subsurf it then decimate it to get a smoother hull?
is that a good one in this case ?
but don’t know if this would keep the vertical horz lines quads?
ok i think don’t really have a choice now if using this new cross section got to keep going with it !
thanks
ok did some testing on decimate and subsurf
and it does make it smoother but darn the mesh is loosing most of the quads and not really nice clean mesh!
don’t will try to seperate the front and back parts where it is rounded and apply the smooth and subsurf trick to it
at least i’ll keep the middle clean with quads!
thanks
I dont understand your problem, just use the subsurf modifier with the mesh cage like I did here http://i50.tinypic.com/334q62q.png
you dont need to apply the modifier till youre done.
this could work with surbsurf
but need to clean up now and min verts count!
i prefer to convert now and have a clean mesh
but still trying to keep verts count to a minimum
cause there are so many other details later on for the decks
so got to be prudent and keep verts low
or i’ll end up with a few millions useless verts !
i’m doing the front and back with mostly quads and a few tris near the front and back edges
but that’s ok i guess
i did a retopo with nurbs surface then converted to mesh and now it is smooth and clean quads mostly
but the front is the most conmplex shape on the hull i think
mind you neer the propelers in the back i may have to remodify it to fit all the accesssories there!
i’m getting there sorry a little slow but prefer to do it ounce and well
then have to come back later on and redo the whole thing!
thanks
I think this is officially a work in progress thread now. maybe more people would comment if it was moved there, seems to be just you and me.
i was thinking about it !
i’ll open a new thread in wip section later on today
i’ll also reserve a few post at the beginning to add pictures later on
to make it easier to see the end results near the beginning of the thread!
for now i want to finish the hull smooth and mostly quad
then do the back end with propelers and the roder
at least it will begin to look like the real thing!LOL
so take a break for today i have a lot of work to do on this today!
and thanks for your help again appreciate it a lot
nice to see peoples getting involved on this forum like you!
did you begin to work a lot with cycles ?
we did a lot of experimentaiton and still are in cycles
stlll missing many nodes but getting better over time!LOL
happy cycles
No I dont render much, I have about half a dozen projects I go between that all need finishing.
I only comment on things that interest me, 20th century stuff titanic bismark b-17
I was am waiting for bmesh to be complete before i attempted a titanic cos I wanted to do the hull plating but I need to buy some books first. Im in no rush. A couple of years maybe before I do that.
i saw so many documentaries last month on the titanic
so i decided to try to make a 3D model that looks like it
interested by 2 majors things
the mechanicals / electrical rooms
and all egreses / access for the people
i was reading about the electrical system
and it’s almost fascinating they were using 4 X 400 KW generators at 100 volts DC for distribution on the titanic
today you would never do it that way for certain !
i mean for 1912 that’s around 1600 KW of power on a ship it’s impressive !
while in america and the rest of the world there was almost no electricity being used by peoples!
ok advance a lot on the prop and the back of the ship
now at least the mesh looks a lot more smoother and no subsurf needed with less then 2000 verts
with all these rounded shapes i think it’s not bad and i have a very clean mesh now!
i’ ll continnue tomorrow and open a new thread in WIP forum
thanks
and i want to yue cycles for a more photorealist look
but also use dyanmic paint and ocen modifier to get a more realistic look
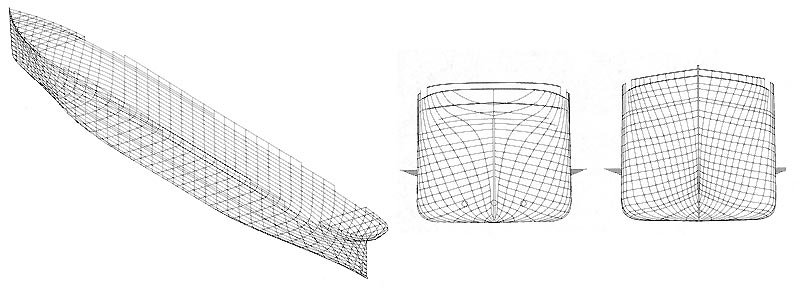
Do you have a step-by-step set of instructions on how you made that hull?
^ Its been a long time since I did that, I tried a few methods at the time so dont quite remember which that was.
but firstly I just drew the curves out and laid them out. then selected most of them except front and back and skinned them.
as seen here http://wiki.blender.org/index.php/Doc:2.4/Tutorials/Modeling/Surfaces/Skinning
I removed the edgeloops I didnt need to make it simpler then manually added a front and back and probably top too.
then I applied the subsurf modifierand moved the edgelops about the keep it looking sharp.
the step after that image would be to apply the modifier then manually remove every other edgeloop I dont need.
another method I was using was skin the curves as a base, then just polymodel over the whole thing.
most difficult part is around the propellers which I never got done.


