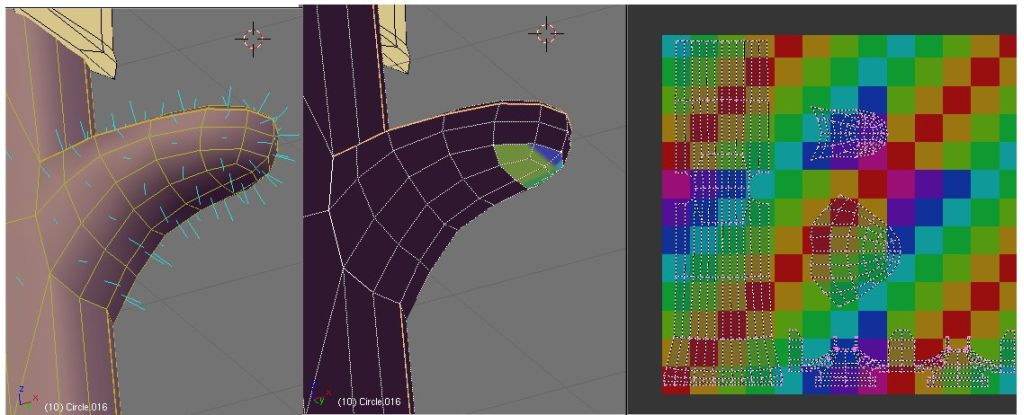
Ive attatched pics to show what I’m needing help with. I have tried replacing the image, reloading the image. I have checked normals. For some reason, most of my model is appearing black. Can someone help me please? I just want to see the test grid so I can check for stretching.
You should try flipping the normals of the faces that are showing up black. to do that you just go to edit mode and select those faces that are turning out black then go to editing buttons which is F9 and hit flip normals. you can also check is any normals are not facing outward byb going to editing mode (F9) and saying draw normals it should show you aqua colored strings coming out of the faces. cheers hope this helps
also make sure you select all the verts and press ctrl+N that should get rid of your black problem
I will try to elaborate. I have only one material applied to the column. The entire column is one object. Its whole map has the test image applied to it. I have tried several different images, with exactly the same results. The small section that is showing the texture is not seperated at all from the mesh. I have duplicated the column and get the same results with the duplicate. I don’t know any other information I could give.
oops thanks M@tchue. I was adding another post at the same time as you I guess. But as you can see in my picture, all the normals are facing outwards.
I have seen that before. Not really sure how I fixed it.
Maybe try just selecting all faces and then press U
and select Project From View. If that don’t work
then leave Face Select Mode and go to the Mesh Panel
in Editing, Delete TexFace and start over.
Thanks JDA. I finally deleted all my UV coords and started over and it worked. I really hope this doesnt happen to me after unwrapping a more complicated model!
The reason for the black texture is simple. You have selected the faces, and used the “Image->New…” Menue, but without activating “UV Test Grid”. So you’ve assigned a blank image to the faces. Then you’ve selected the few colored faces, and did the same thing again, but this time you’ve activated “UV Test Grid”.
To cure this you don’t have to delete the UV Coordinates, but simply select all faces and assign the image again.
This is incorrect, SoylentGreen. It looks and sounds like a correct answer,but I tried it several times with several different images. As you can see in the picture, all the faces ARE selected. Here is a small portion of the blend file (50kb) if anyone is interested in seeing it and can maybe help me out so I don’t have to remap my whole town.
Normally highly unlikely … ![]()
but this time …
“Set VertColor” will do the job.
Wow that did work. Thank you very much. Can you please explain why this worked and what caused this?
You may use vertexcolors to blend with the texture.
E.g. if you (unintentionally) click on “VertCol” in the Mesh panel, the vertexcolor is set to black if you have UV coordinates. (I’m not sure whether this is a bug.) This may have happened, but I can only guess the reason what has happend to your mesh.
You normally don’t see the vertexcolor in a render (set VColLight / VColPaint in the Material panel if you want to), but in the 3D window. So if you set the vertexcolor to white, your texture will become visible again.
Hope that made it somewhat clear.
Regards
Ok thanks I kinda understand. I have never used that button before, and it is weird that it only affected some faces. Maybe I accidentally clicked it or somthing. Thanks man.
