WHILE THIS TUTORIAL STILL WORKS THERE IS NOW A MUCH SIMPLER AND IMPROVED WAY TO DO IT - JUST USE THE ADDON FROM THIS THREAD:
[thread]326140[/thread]
Smoke in Cycles 2.69 Volume Builds

My very first tutorial. I hope you like it.![]()
This tutorial will cover how you can get smoke in cycles renderer with recent builds of blender where volume shaders in cycles were introduced.
It uses a workaround with custom scripts to overcome the current limitation that you cannot load the smoke texture currently. This will change at some point in the future (2.71 perhaps?) and at this time everything written here can probably achieved quite a bit easier.
For this tutorial a self written OSL and python script will be used. The basic idea is to craft a special image texture from the voxel information of the smoke simulation and use this texture to extract the density again. This is where the scripts come in handy.
You should know at least the basics in blender (how to navigate in 3D viewport, split and join windows, and switch between node editor/text editor/3D view…) If you are not aware of these aspects you should better start with some simple video tutorials for blender 2.6x.
Tutorial outcome: cycles_smoke_tutorial_finished.blend (663 KB)
- Install a recent version of blender
Ok, let’s get started. First step: You need to get a copy of blender with OSL and volume shaders enabled (the last official version 2.69 is not good enough). I cannot post links yet but the graphicall version 59762ff (Blender 2.69.9 Cycles + OSL for Win64) did the trick for me. Download it and extract it to a folder of your choice. IMHO it’s best to avoid special characters and spaces in the file name.
- Install LuxBlend
The export script which will follow needs to read the smoke voxel data. As far as I know there is no direct way to get it from bpy. To save me bugs and work I therefore use parts of the well tested exporter for LuxRender. However, this means you need to install LuxBlend - the export
script for LuxRender. Go to the LuxRender homepage (no links - sorry) and select Get LuxRender -> Standalone from the start page. Download the archive version corresponding to your platform. OpenCL or not won’t matter we will not you LuxRender itself.
Extract the archive into a temporary folder of your choice. In the folder you should find a zip file (it is LuxBlend26_1.3.1_64bit_NoOpenCL.zip in my case). Extract the zip file and copy the folder called “luxrender” into the addon subfolder (2.69\scripts\addons) of your freshly extracted blender.
- Activate LuxBlend
Start up blender. Open User Preferences (Ctrl + Alt + U) -> Addons. Type luxrender in the search and enable the checkbox for the plugin which is found.
- Set up a simple smoke scene
Select the default cube. Scale by a factor of 2 (S 2). Apply the scale (Ctrl + A, Scale). Go to the physics panel and a a smoke -> domain modifier. Increase the division to 64.
Add a UV sphere (Shift A -> Mesh -> UV Sphere). If the sphere is not at the origin then reset the position (Alt + G). Scale it to half of its size (S 0 . 5) and apply the scale (Ctrl A, Scale). In the physics panel select smoke “Flow”.
Save the file (mandatory!). Select the cube (domain) again and change the following in the physics / Smoke Cache panel. First give it a name (e.g. smoke) by double clicking in the list and typing it. Put End at 40 to save time and hdd space. Now click bake and wait for 100 % (a few seconds).
Select a time frame (down below the main 3D viewport) where you can see some smoke (e.g. 37).
Better save once more now.
- Export the special crafted smoke texture
Split the 3D viewport window (drag the top right corner of it to the left). Change the type of the left window to Text Editor (click on the cube symbol of the bottom part toolbar and choose Text Editor).
Click new. Name it export_smoke.py instead of “Text”.
Copy the python script of the end of the post into the editor.
Click Run Script.
If everything is fine you will now have a texture named “smoke_export_joined.png” in your blender project folder with a resolution of 64x4096.
If the resolution does not match check your smoke domain division they should be at 64. (You need to click “Free Bake” before you can change them and press “Bake” again after changing it). If the exported texture is all black you probably did not switch to a timeframe with smoke in it.
- Set up the cycles scene
In the top part of blender click on scene and rename it to smoke_creation. Click on the + button next to it and select new. Rename this scene to smoke_render.
Switch to Cycles Render.
In the 3D viewport: Be sure the 3D cursor is set to the origin (Shift S, Snap Cursor to Center) and add a cube (Shift A -> Mesh -> Cube). Scale it by 2 (S 2) and apply the scale (Ctrl A -> Scale).
Go to the materials panel. Click new and name it smoke. Click on Use Nodes.
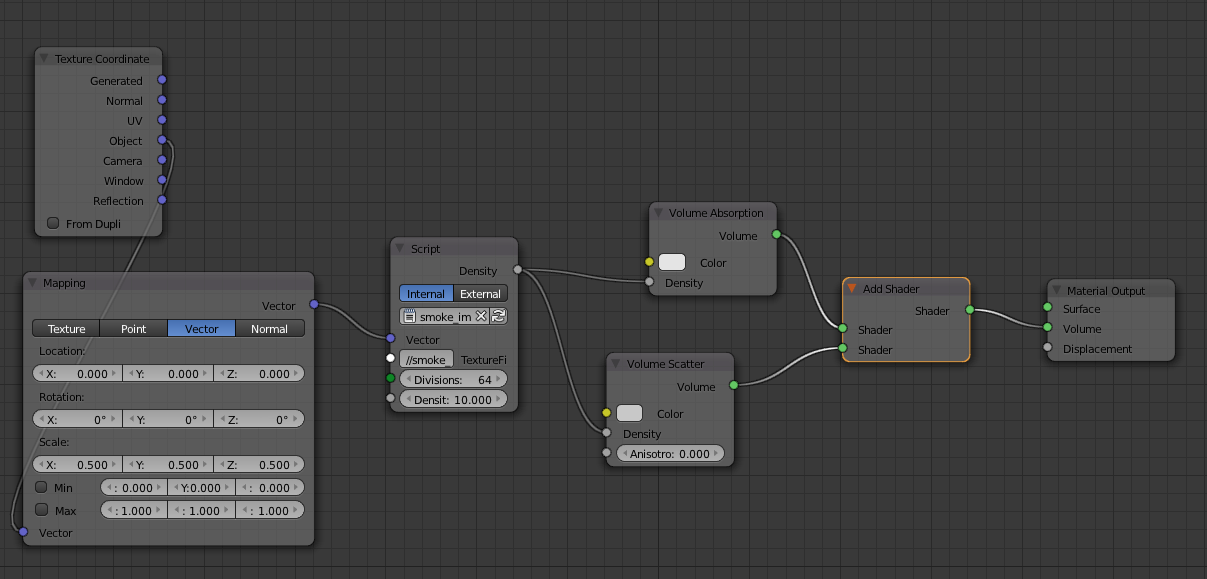
Split the text editor window horizontally and switch the upper one to a “Node Editor”. Make sure that material and object are selected. Delete the Diffuse BSDF by selecting it and pressing X. Add the following nodes with Shift + A:
- Shader -> Add Shader
- Shader -> Volume Absorption
- Shader -> Volume Scatter
- Script -> Script
- Vector -> Mapping
- Input -> Texture Coordinate
Better save here!
Before we connect them we will load the script node: In the “Text Editor” window click at the + symbol next to the name. Copy the OSL script from the end of this post into the editor. Rename it from “Text” to “smoke_importer.osl” (The Run Script button should be replaced by Script Node Update by that).
In the node editor, select the script in the script node. This compiles the osl-script and you should have input and output slots appearing next to it.
Set the “Divisions” value of the script node to 64 (same as the exported smoke!). Reduce the DensityScaler to 10. Connect the vector output of the mapping node into the script node input. Connect the script node density output into the two Volume … shaders -> Density input.
Connect the output of the texture coordinate -> object into the vector input of the mapping node.
Connect the volume shader nodes outputs to the add shader node inputs. Set their colors to C8C8C8.
Connect the add shader output to the volume input of the material node.
Set the x, y, and z scale of the mapping node to 0.5. (This compensates for the scaling by 2 of the cube).
- Set up some lighting
Let’s keep it basic here.
For example:
3D viewport: Shift A -> Lamp -> Sun Lamp. Position it: Alt G. G Z 4. G Y 3. R X -30.
In the materials panel change the color to a bit yellowish (e.g. FBFFEB) and turn up the strength to 5.
3D viewport: Shift A -> Mesh -> Plane. Position it. Alt G. R Y 65. G X 5. G Z 2.
In the material panel change surface to emission, color to B1002A and strength to 8.
In the World Panel set up a background color of 52658F and a strength of 0.2.
- Render preparations
In the render panel enable Open Shading Language (!). Decrease volume sampling to step size 0.05 or lower. Change under sampling “Path Tracing”
to “Branched Path Tracing”. Set AA samples for render and preview to 4, Volume to at least 5. Under Light path set volume bounces to 3+.
The preview render should work now.
- Add the camera
For example:
In the 3D viewport hit Shift A -> Camera. Alt G. Alt R. G X 7. G Y -4. G Z 2. Shift select the cube. Ctrl T -> Track To Constraint.
- Render it
F12
I hope this get’s you started for more exciting things.
Scripts are contained in the next post due to length restriction
