I’m here introducing a new add-on that I’ve been developing, named Voxel Master (Non-Destructive). This tool is designed to enhance your 3D modeling workflow in Blender, particularly focusing on voxel remeshing and mesh optimization techniques.
This is based on the the voxel remeshing tool from a blender build by bone studios some years ago.
It had some features that helped me for years, so now i got the oportunity to try and make some of those features more accecible.
This addon is still in its early stages; please give it a try and provide feedback on how I can make it a better tool for you.
This addon uses some blender built-in features to help ease the remeshing workflow
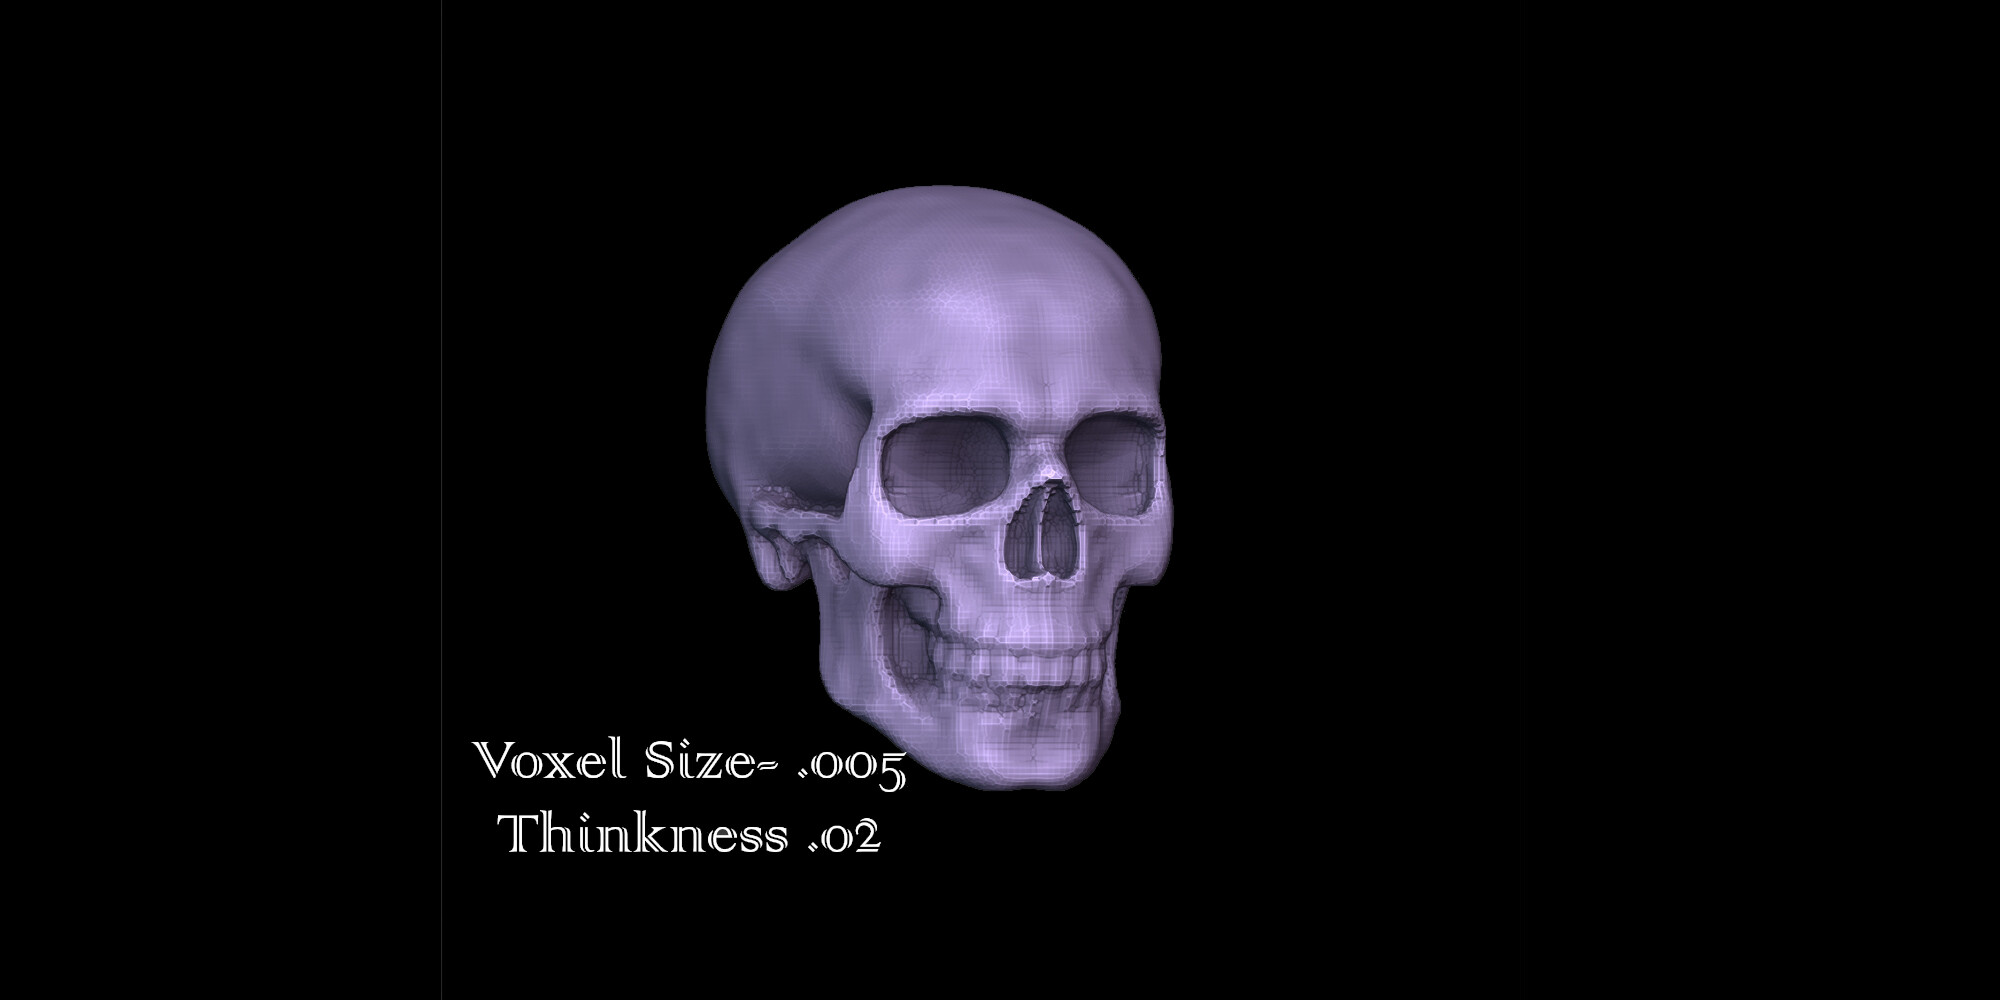
Voxel Remeshing: Quickly convert your mesh into a voxel grid format, allowing for easy manipulation and refinement of complex geometries.
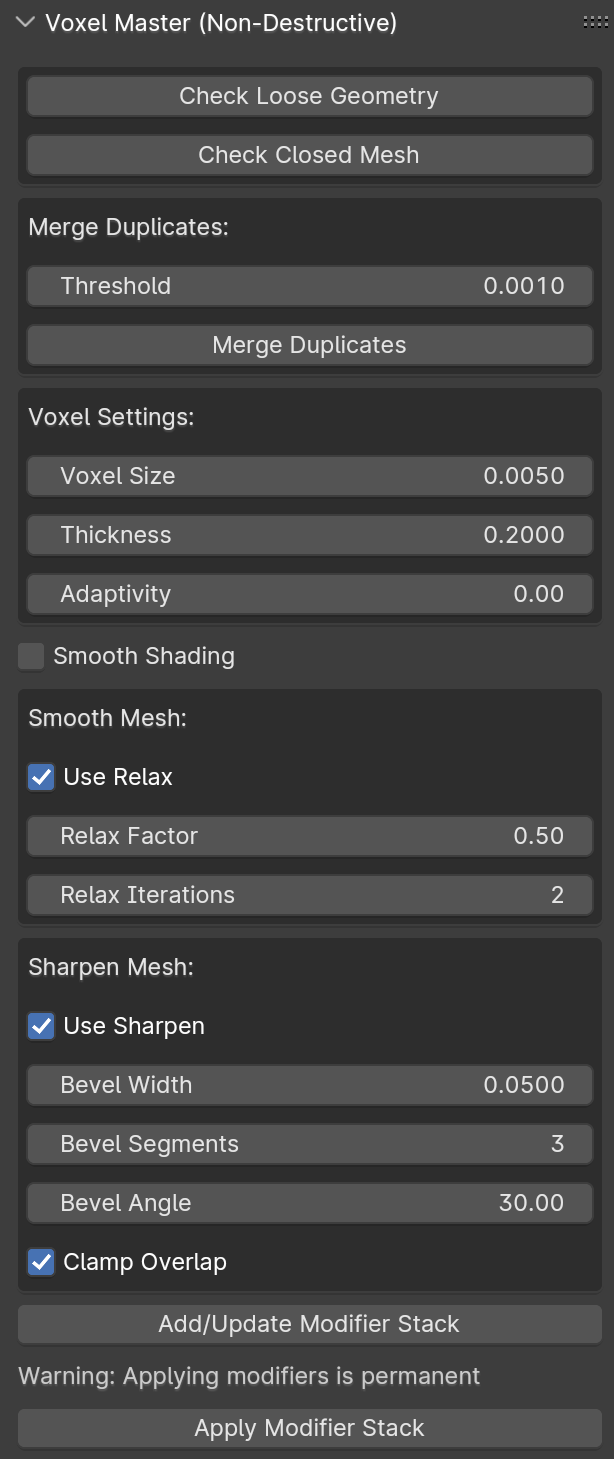
Adjustable Parameters: Customize voxel size, mesh thickness, and apply smooth shading to achieve the desired look and feel for your mesh.
mesh thickness aplys a displacement modifier to “inflate” the mesh a bit so that the voxel can better cover the overall mesh
Relax and Sharpen Tools: Utilize additional mesh processing tools such as relax smoothing for a softer appearance and bevel modifiers for sharper, more defined edges.
Merge Duplicates: A new feature in version 0.0.2, this allows for merging close vertices within a specified threshold, This is particularly useful for cleaning up mesh geometry to prevent remeshing artifacts.
User-Friendly Interface: Integrated seamlessly into Blender’s sidebar, offering intuitive controls and adjustments.
Enhanced Reporting: Post-operation reports, such as the count of vertices merged, provide valuable feedback for fine-tuning your projects.
New Merge Duplicates feature with threshold settings.
Enhanced feedback for users post mesh optimization.
General UI improvements and bug fixes for a smoother experience.
Who Can Benefit from This Add-On?
“Voxel Master (Non-Destructive)” is designed for both beginner and experienced Blender users who are looking to add efficiency and precision to their mesh editing workflow. Whether you’re working on complex 3D models, game assets, or simple geometrical shapes, this tool can enhance your creativity and productivity.
How to Get It?
On Blender Market
On Gumroad
The addon is currently free. Although I would ask you to support its development giving some feedback or making simple donations.
Future Updates:
Our development roadmap includes the following future goals:
Data Transfer Integration: We plan to integrate data transfer functionality, allowing you to preserve UV maps and attributes when applying the Voxel Remesh modifier.
Improved User Interface: We are committed to enhancing the user interface to make it even more user-friendly and intuitive for artists and modelers.
Non-Manifold and Closed Geometry checks: In order to help users identify where possible errors may originate from.
Integration and control of Quad remesher: Allowing good retopology without topology artefacts often occurring with voxel remesh.
Looking for Feedback!
I’m eagerly looking forward to your feedback and suggestions. Your input is invaluable in making “Voxel Master (Non-Destructive)” even better. Feel free to share your experiences, any bugs you encounter, or features you’d love to see in future updates.
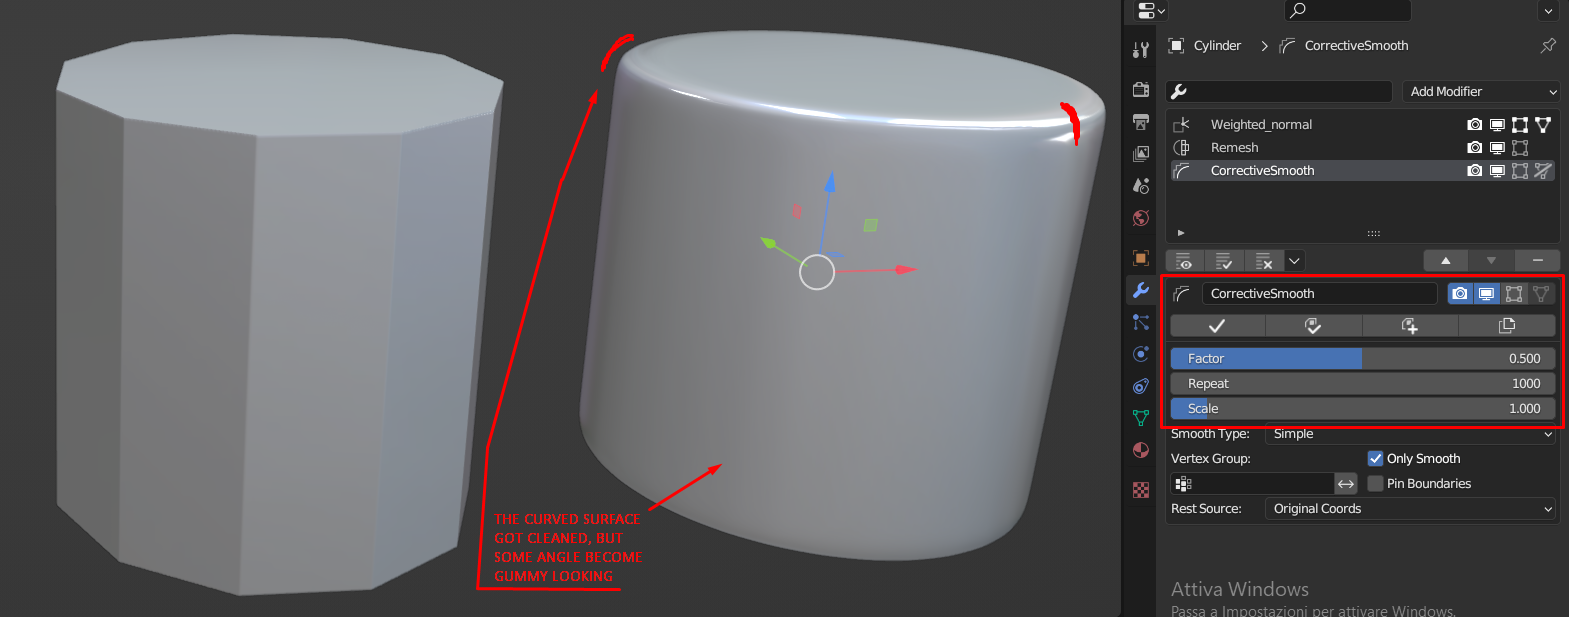
Some 3D experts use Zbrush dynamesh to make highpoly from lowpoly, then some tedious manual smoothing on spots surrounded by manually masked angles to affect just those spots (because a global smooth filter would destroy the entire silohuette = gummy look instead of hard surface) , I wonder if the Relax and Sharpen tools would make that process automatically and non-destructively to preserve the hard surface silohuette.
Hey, this is very interesting, usually my workflow goes from high to low(er) poly, or keeping the amount of geometry but remeshing so the topology is better.
I spent some time trying to get geometry aware weights from vertex colours, with this you would be able to select creases or concavities and use them as vertex groups to control the modifiers.
The smooth/relax works great, the sharpen/bevel doesn’t always have significant results, one of the reasons I’m sharing this and asking for feedback
Yes, to be fair (regarding my screenshot) the lowpoly that will generate the highpoly using Zbrush’s dynamesh it’s already somewhat highpoly itself since it’s exported from a CAD-like app (Plasticity) , yet the ugly effect on curved surfaces are still visible (which mean it will be even more noticeable if the lowpoly it’s ‘really’ lowpoly and you ramp up the voxel remesh ‘resolution’).
Short story short: those results are from blender modifers; it’s possible to get a much much cleaner result using this >destructive< method (video below) ; so since your effort it’s remarked as non-destructive my question is if the clean result showcased in this video could be obtained with your non-destructive approach.
(yes in the video he intentionally smooth the 90° angles, by simply inverting the mask you can smooth the 90° angles OR curved surfaces)
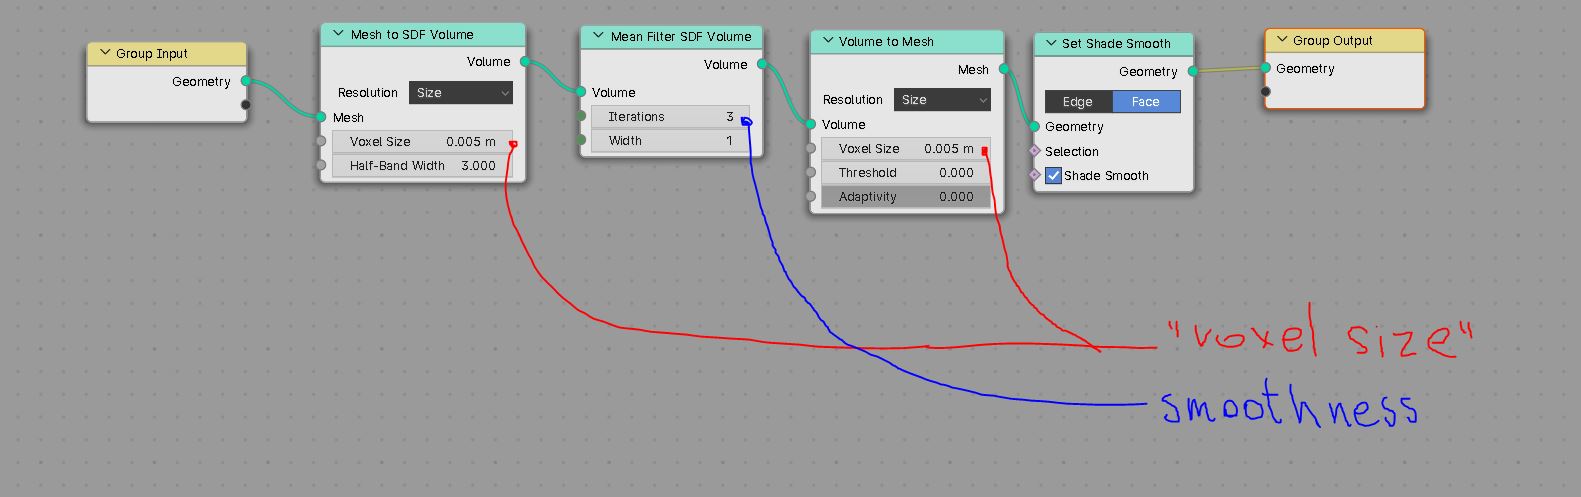
TBH i dont get what the reason to use any voxel remeshing approach even ZBrush Dynamesh, since it works better than any existing in blender, because now its all solved by Mesh to Volume node in geonodes which works significantly better.
The only thing which cause problem with blender are lack of ability to easilly and fast draw mask to control smoothness intensity. But since its literally the only one thing which solved in ZBrush, and its not always needed, all those voxel shenanigans looks a bit odd and outdated.
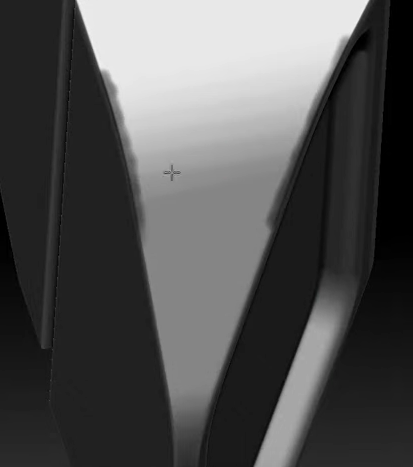
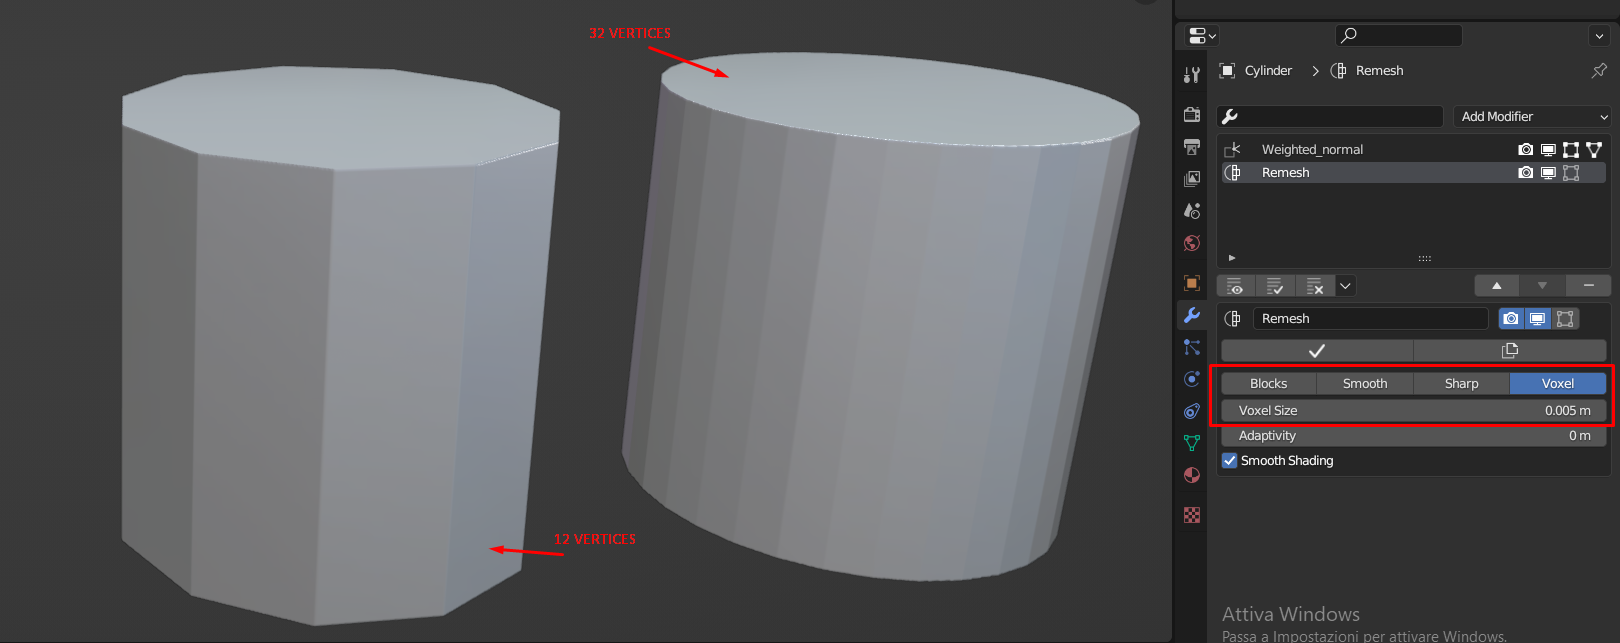
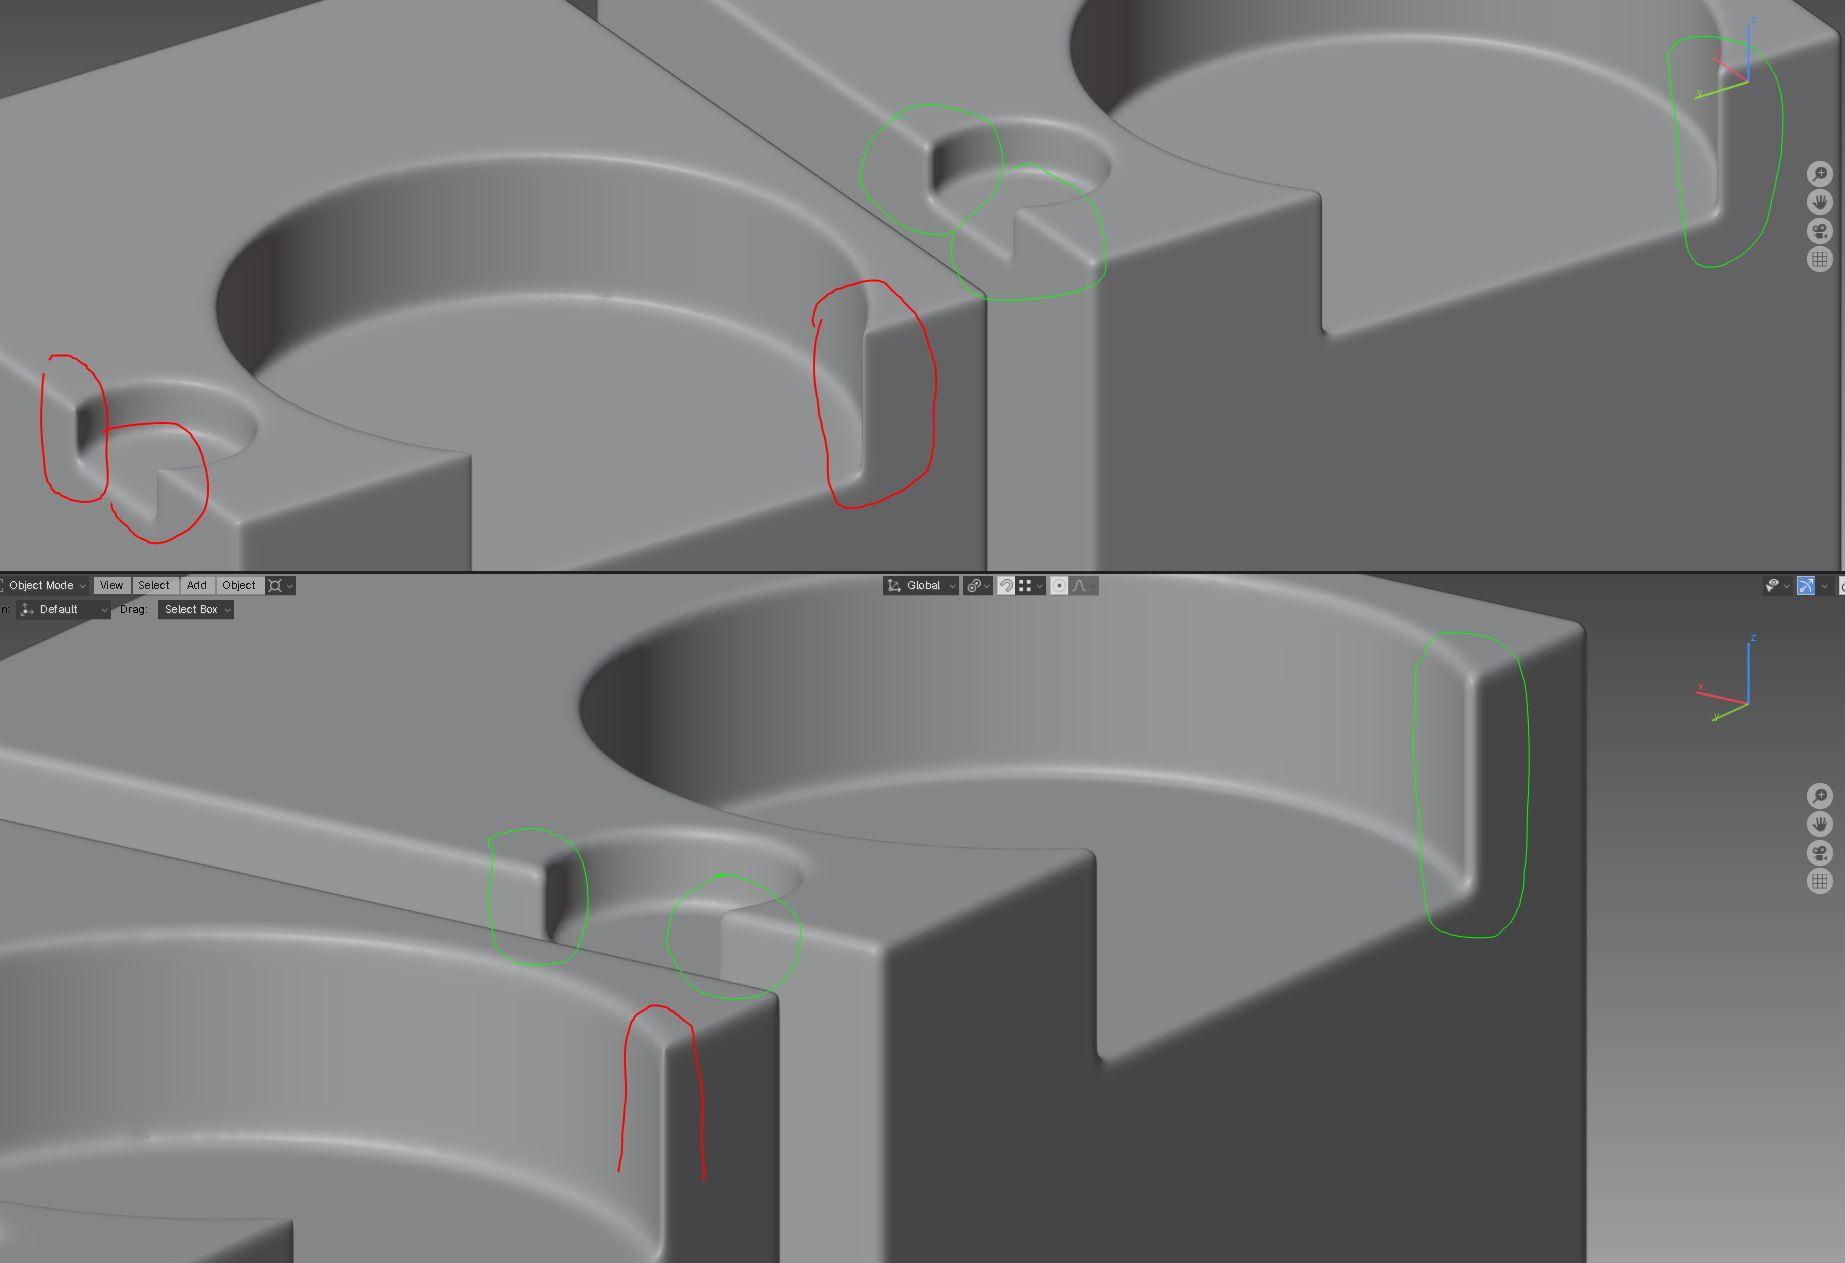
Here’s a typical “edge case” for classic voxel remeshing + smoothing which went out badly in blender and zbrush:
Notice those sharp edges marked in red. No matter how iteration of smoothness in blender (or polishing in zbrush) you would apply. It anyway would look too sharp.
On the green its a “mesh to sdf volume”. Here they look almost like it was a nice smooth bevel modifier applyed, or the fillets was created in CAD software.
Both object have almost the same polycount after remeshing.
Classic voxel remesh are 797k triangles, and mesh to sdf are 790k triangles.
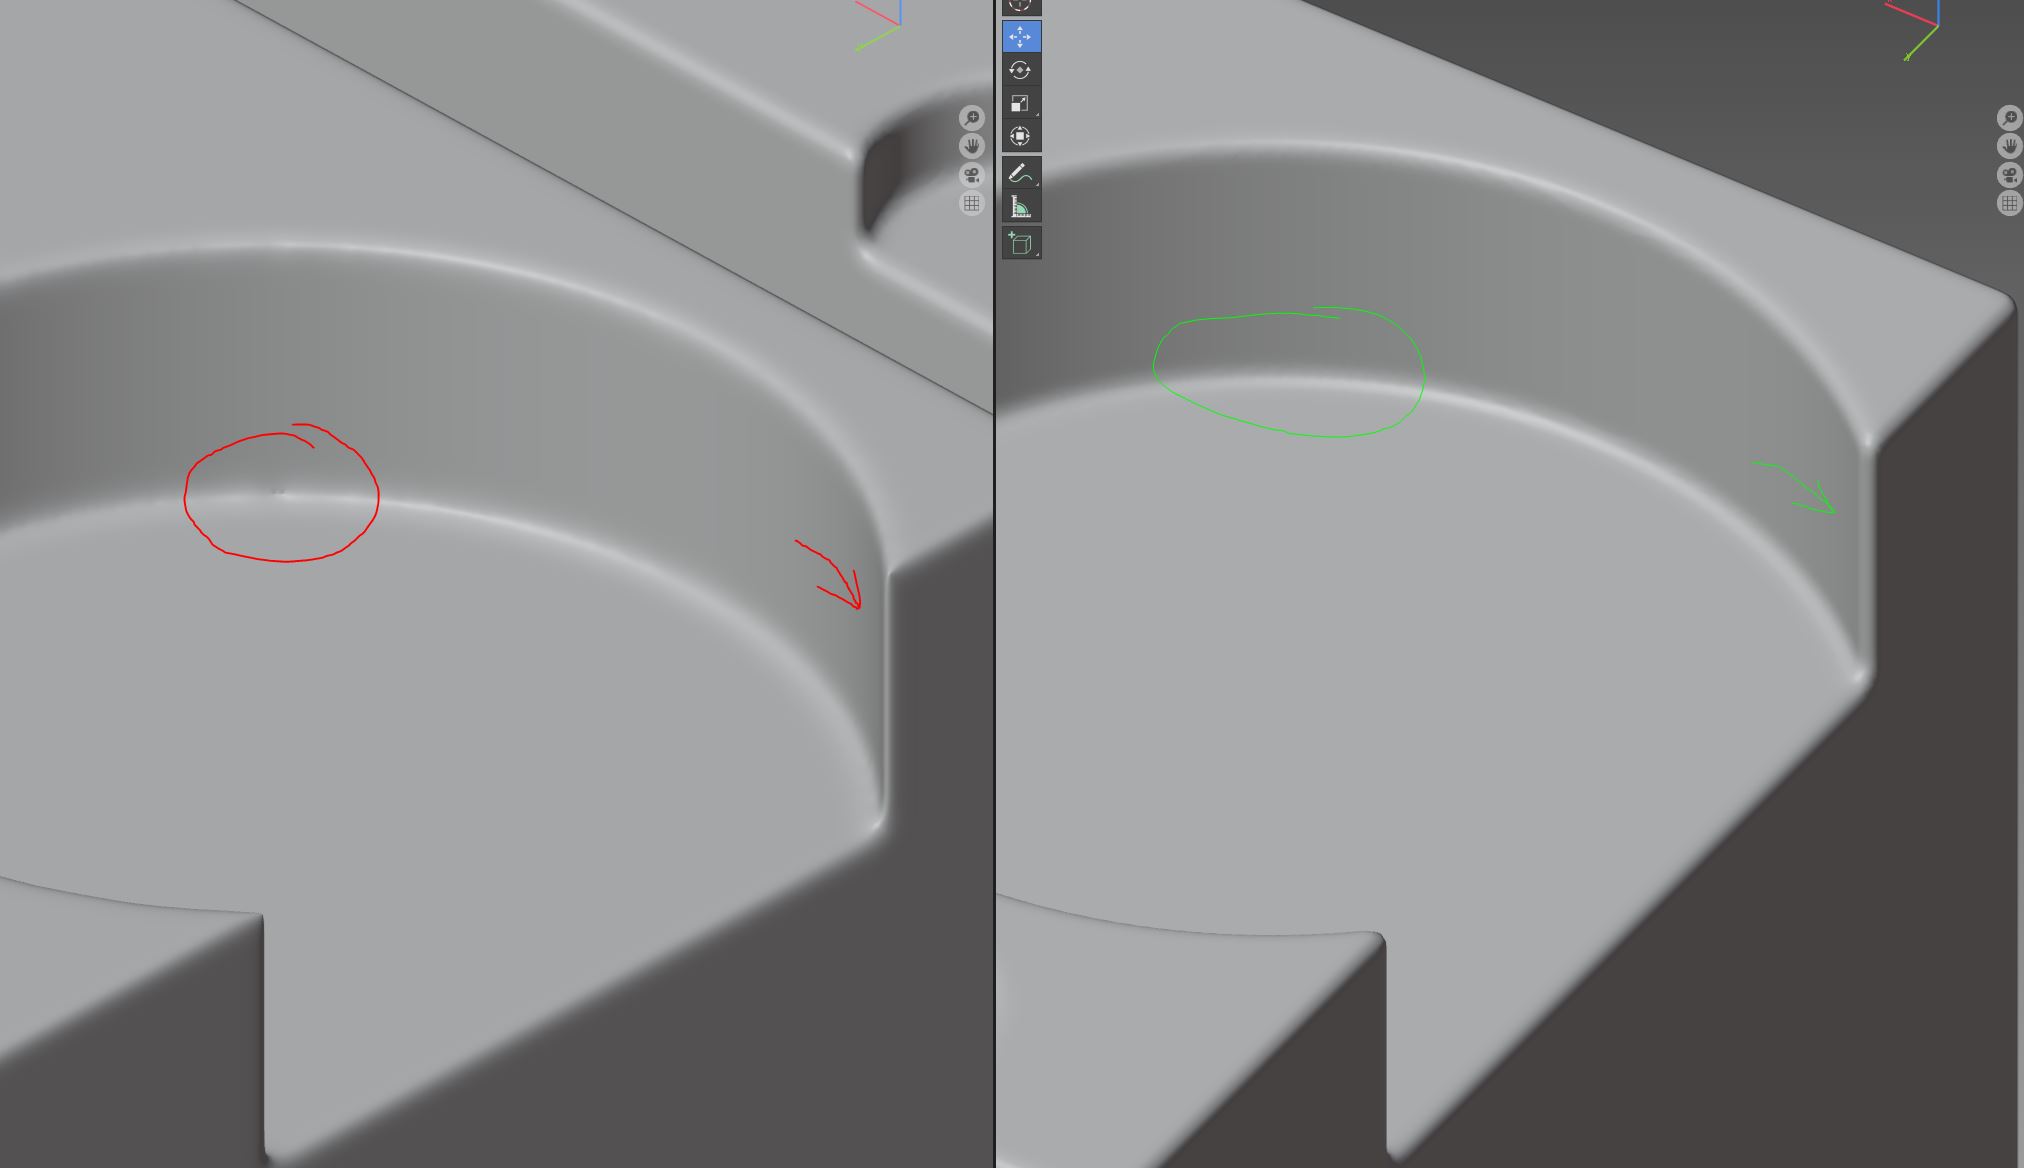
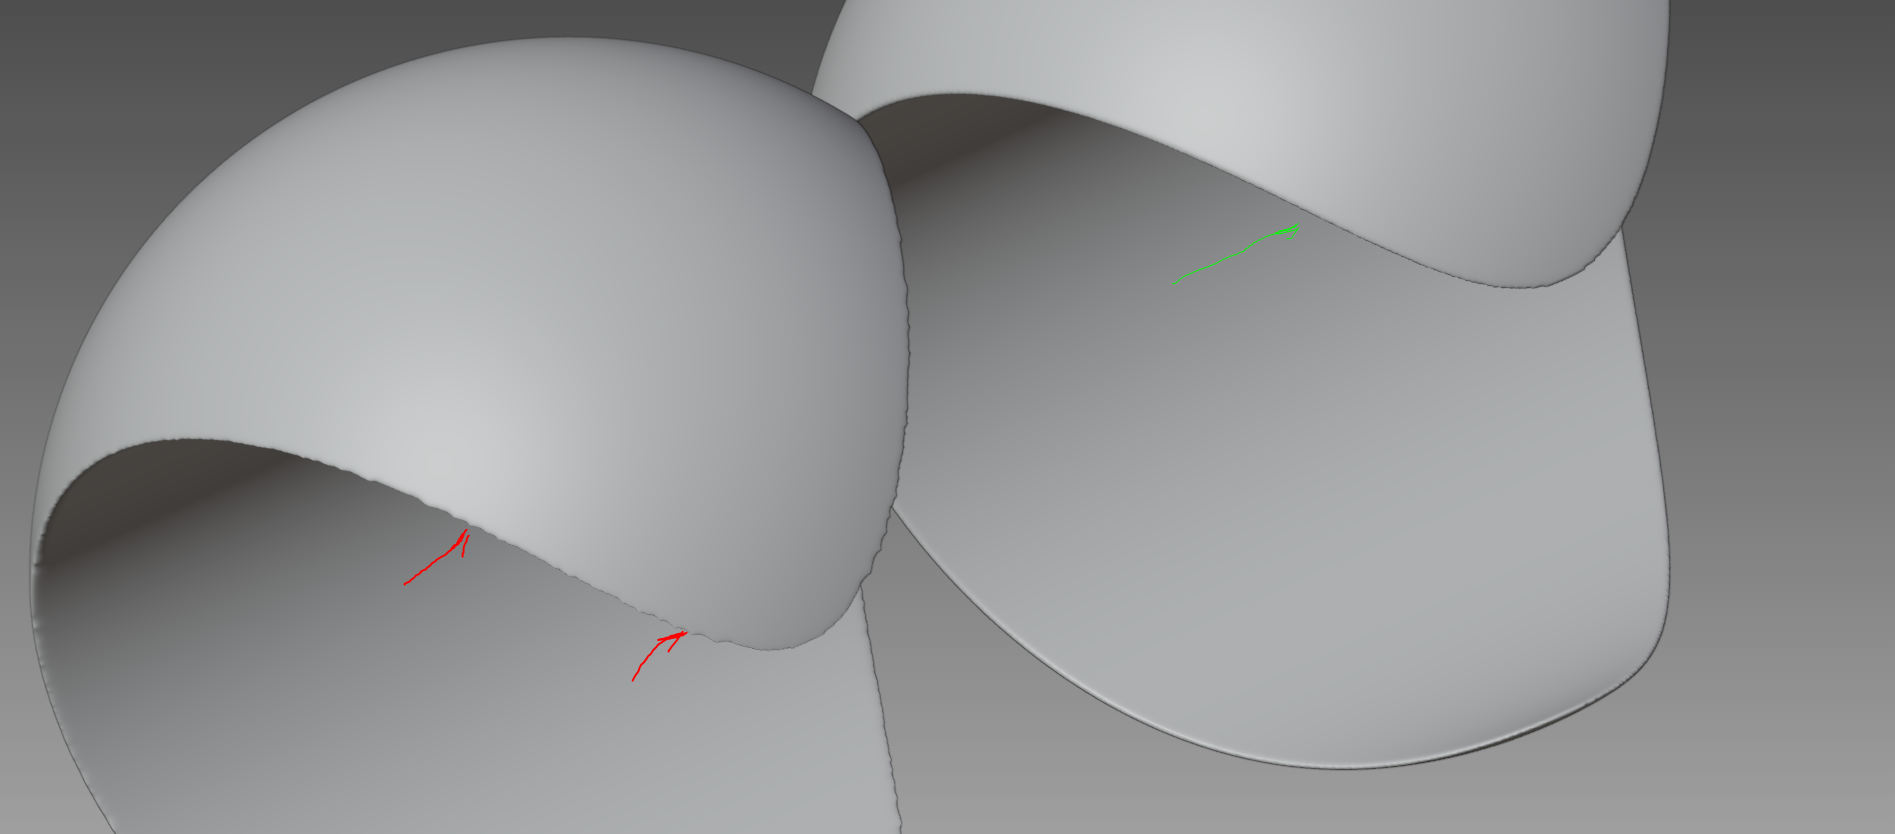
But lets go even further and make a case where classic voxel remesh start crying :
And again both object have almost the same polycound (sdf have slightly less polys)
How cleaner the sdf results are, huh?
The main difference which make… a big difference are the fact what in classic voxel remeshing approach we at first create an absolutely ugly-fugly high dense topology based on a mesh with razor sharp edges, and when try to smooth it out to get a nice bevels. And its not work well because out topo are really bad.
While in “sdf” approach, we dealing with volume and filtering (smoothing) those volume which works in a different way. And only after this we create a mesh and no longer care about topology because we no longer need to smooth it, cause its already nice and soft.
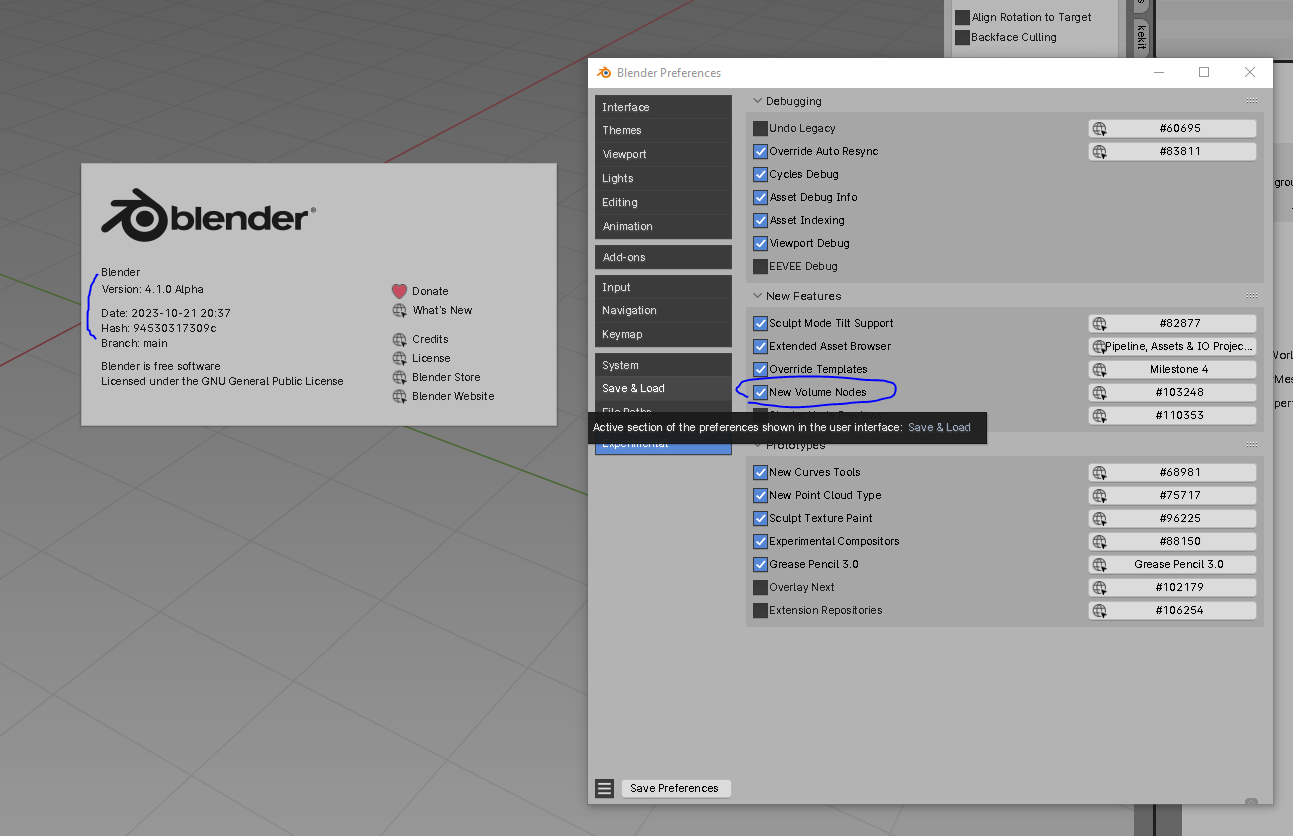
Hmm I’n not sure what you saying is true. I did look and the only nodes present are “Mesh to Volume” and “Volume to Mesh - in 3.6, 4.0 or 4.1”. Also afaik there are not preferences for geometry nodes (can’t find and google search also gives nothing).
Saying “regular” you mean without specifically SDF node? I dont think so. Any other approaches with GN would lead to basically the same results as default voxel remesh modifier.
Thank you, I’ve tried this with success and I agree that with mean filter SDF the result is cleaner.
Although, for the purposes of this add-on, I wouldn’t like to ask users to use a specific version of blender.
I’ll keep the development of that node under whach and when it’s merged into the main branch I’ll incorporate it.
Meanwhile on the background I’ll try to replicate the main body of this add-on on geometry nodes, for future Flexibility. In tha aspect, if you have any suggestions they are more than welcomed.