Hi! I’m learning animation and I’m working on this walk with the Blender Rain character. I’m still learning and I got the Animator’s Survival Kit Book and used the walk cycle page to help make this. I know it still needs more work and I’m here to get feedback on what improvements I need to make. Thank you!
2 Likes
You have a really good start here, I like it! ![]()
As constructive criticism: it looks too “stompy”, which is to say, the vertical motion of the torso is either or both too large, and too abrupt. Reduce the range of vertical motion a bit, and smooth out the “corner” at the bottom of the motion. (The Graph_editor is the easiest way to do both of these. The curve of the torso’s up/down motion should look more like a sinusoid.
Sometimes you DO want a stompy motion, but for a short clip like this, we don’t have enough of a story to justify stomping.
Putting a floor, and lighting + shadows in will greatly help the appearance of 3D. I recommend something like checkerboard-tiles, as it is the least forgiving of foot-slippage. (it will help you spot and fix problems with floor contact.)
All the other aspects of your animation look great.
Thank you for sharing this. I hope we see more of your works in the future! ![]()
Hi, Yes a very good start, just wanted to add to what all ready been said, I think you need to add some rotational movement to the hip to correspond to the large stride.
1 Like
Thank you so much for your feedback! I’m trying my best. I’ve posted this to three different communities and only gotten feedback from here. So I appreciate the help. This is an updated playblast with the suggestions implemented as I understood them.
As constructive criticism: it looks too “stompy”, which is to say, the vertical motion of the torso is either or both too large, and too abrupt. Reduce the range of vertical motion a bit, and smooth out the “corner” at the bottom of the motion. (The Graph_editor is the easiest way to do both of these. The curve of the torso’s up/down motion should look more like a sinusoid.
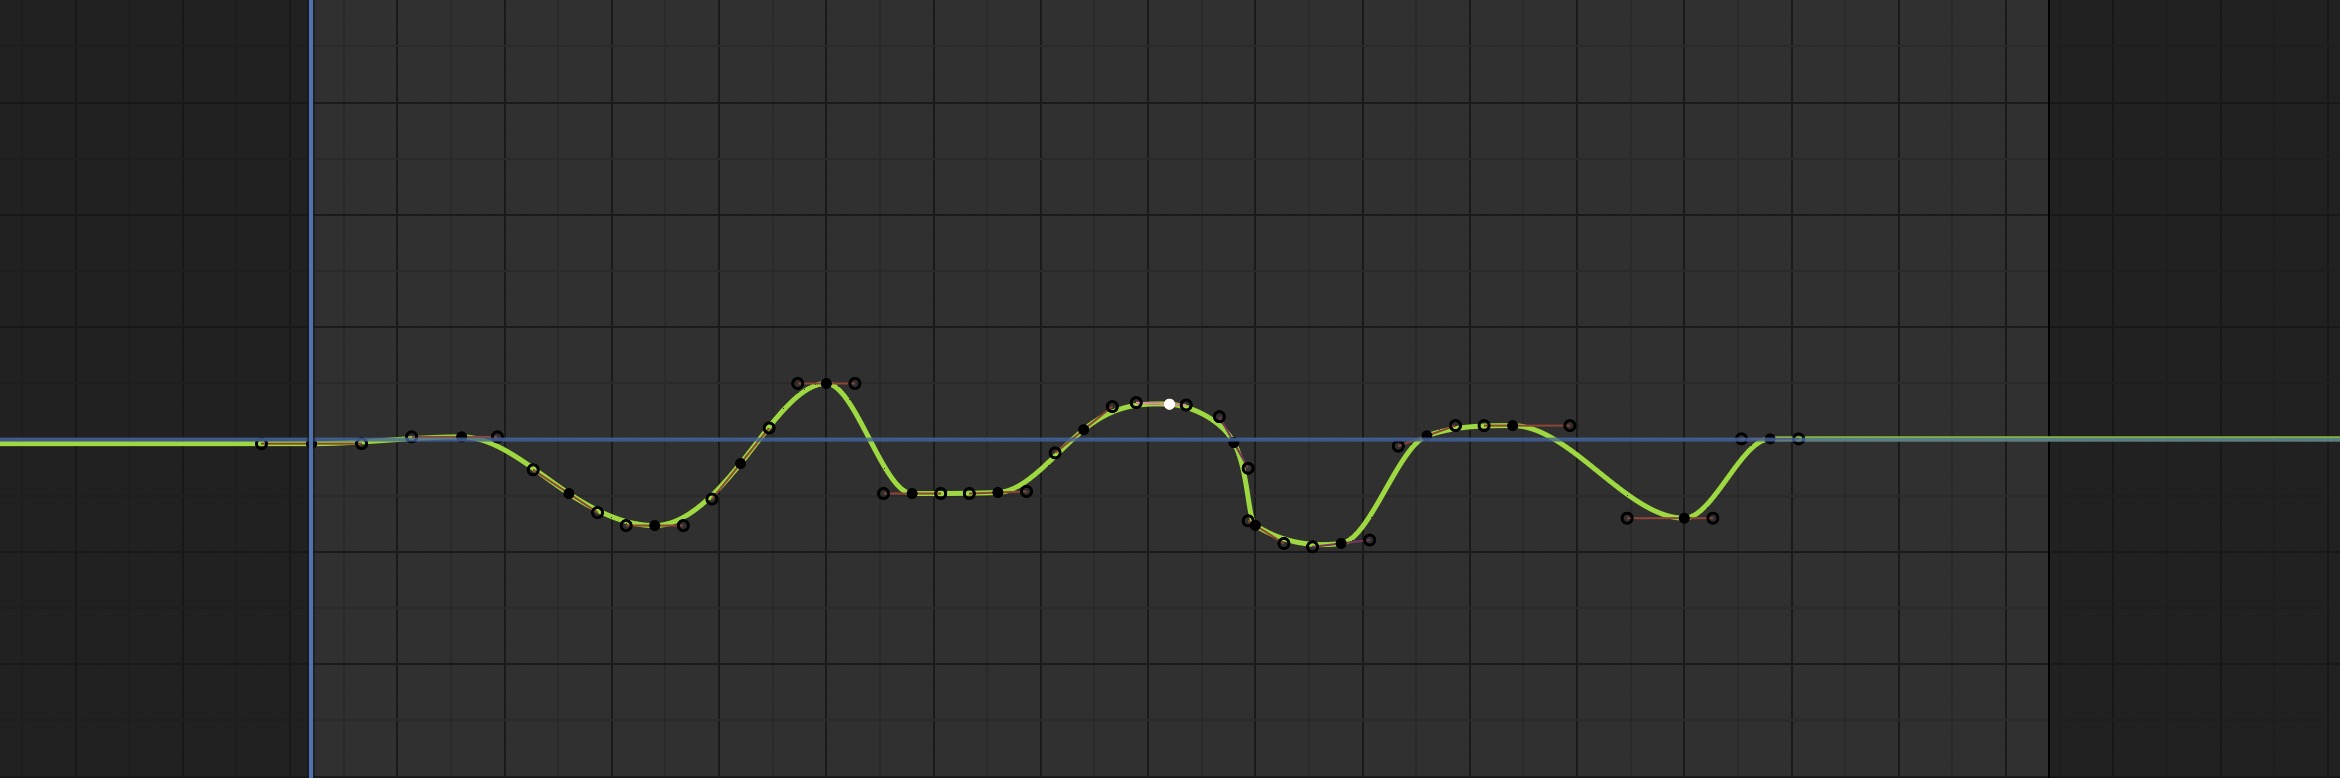
I toned down the vertical drop in the down poses. It certainly looks better than before I can tell. If it still looks stompy let me know please. This is a picture of the curve of the vertical movement of the spine, after making the adjustments. It’s not that perfect curve and maybe I have too many keys for it? I don’t know.
Putting a floor, and lighting + shadows in will greatly help the appearance of 3D. I recommend something like checkerboard-tiles, as it is the least forgiving of foot-slippage. (it will help you spot and fix problems with floor contact.)
This was such a great idea! I was able to see the first two steps had some sliding going on and was able to fix them. I also learned how to show materials in the viewport and create shadows. You rock for this.
1 Like
I added some twists to the hip control on the contact poses I hope it looks better than before
I like what you did with the shadow on the wall. For artistic purposes, this is something you may wish to explore further at some point.
But… I was actually suggesting a more top-down lighting, with shadows on the floor. These provide the viewer with more information about how far from the floor the foot is. Think of a sphere / ball sitting on the floor, where we draw a fuzzy ellipse shadow on the floor to suggest that the ball is in contact with the floor (and the shadow). When the ball is bouncing up off the floor, the ball and its shadow separate.
I am confused that you still have no visible shadow or occlusion on the floor itself. Which render engine are you using?
Something I’d never noticed, till I read a book on lighting, was that TV & Movies always place the couch & chairs & kitchen-islands farther from the walls, specifically so that the characters & their motions do NOT cast shadows on the walls of the set. General practice states that shadows behind characters distract the viewer from watching the character.
For artistic purposes, sometimes you DO want character shadows on the walls (shadow boxing, artsy dance sequences, dramatic lighting during tense parts of the story…), but “they say” to avoid wall shadows in the general case.
Please keep taking what I say as constructive criticism, but the graphed curve you posted above is frightening. This will need a smooth lead-in and lead-out (to start/stop the walk), but the center portion should be MUCH more sinusoidal. All the peaks (maxima) should be at almost exactly the same height, and likewise, all the valley bottoms (minima) should be nearly equal.
(save your existing work somewhere before trying the following)
Select all the maxima (only the maxima), enter S Y 0 (that’s a zero) to scale all these to the median value. Then G Y + mouse-drag to move these to some point just above the zero line (to Y=+h where h is some value). Then select all the minima and also S Y 0. Then G Y + mouse-drag to move these to Y=-h.
Follow these steps by careful adjustment of the tangent handles to make the whole curve (minus lean-in & lead-out) look much more like a sinusoid.
People & animals in the real world tend to move with the least expended energy. Sinusoidal movements in position vs time graphs guarantee continuous & smooth 1st, 2nd, 3rd… derivatives (dy/dt in differential calculus terms). If you have a decent sinusoid, then all derivative will also be sinusoids (& smooth). If you DONT have a decent sinusoid, then in physical terms this means you have unsmooth velocities, accelerations, and jerks – the motion will appear jerky-er than it should because in phyical terms it literally IS.
Aside from the torso, each “leading” foot is still coming down with too much discontinuity.
These suggestions are just for a generic walk (walk-cycle).
All rules are meant to be broken sometimes.
Animation is a form of Acting, so motions are part of the story… sometimes you may want to create a very non-standard (non-smooth) walk-cycle for a story. But first you should achieve a “normal” ignorable walk-cycle.
…ignorable in this sense is a GOOD thing. You don’t want people to fixate on “what’s wrong with that character? Why are they walking funny?”
You have a good start here. ![]() Make it smoother. Make it flow. Seek “Poetry in Motion”.
Make it smoother. Make it flow. Seek “Poetry in Motion”. ![]()
Keep having fun with blender!! ![]()
![]()
1 Like
Okay after reading your reply I have a better understanding of what you mean. I began to fix the curves and watched an interesting video on Splining that helped explain the workflow. So I have that newfound knowledge lol. As I went about doing it I realized I may have been too far gone and ended up starting over. I started with the translations THEN did the rotations. This is the result of doing everything in stepped and changing the interpolation into Bezier.
I still have to do the splining cleanup but it already looks much better than before.
I am confused that you still have no visible shadow or occlusion on the floor itself. Which render engine are you using?
Before I was using Cycles and I still am. My light was just so far down because I thought you were suggesting shadows on the wall. This one is above the character.
Aside from the torso, each “leading” foot is still coming down with too much discontinuity.
Once I finish doing the cleanup the feet and everything else in general should look better. As I was keying each control I was looking at the graph editor change while in the stepped interpolation like a hawk! Lol. I just wanted to post what I did from scratch today. Thank you so much for your wisdom. ![]()
1 Like
This is looking better and better! ![]()
About the only thing I can suggest at this point, regards the leading-foot step-down : the forward knee seems to be doing too much of a snap back (from bent knee to straight leg) right after the lead foot plants fully flat.
I don’t know what you have for an armature,
but sometimes I drop the center of the hips (bottom of spine) 2-3 cm during walk-cycles only, so that the legs can always reach the floor without needing to absolutely straighten.
I combine this with rocking the “pelvis” (slightly) : rotating back-and-forth around the z (vertical axis) and the y (forward) axis… so that each hip-socket of the pelvis ends up describing a circle – much like feet pedaling on a bicycle, but much smaller circles.
This is looking great! Thanks for sharing your work!! ![]()
2 Likes
I’ve made it so the legs don’t fully straighten so the popping has stopped. I did some spline cleanup which was minimal since I was so meticulous doing the blocking. I implemented the advice you gave on the pelvis and it does give a subtle rotation that looks really nice. I’ve also unhid her ponytail and did some keys on that.
Here’s what I have
These past few days I’ve learned so much and its all thanks to you. Pretty soon I will use this character to work on a run animation and I hope you can see it when I post!
OK, going to throw in my 2c worth.
It’s better, but still rather stiff and robotic, from the arms and hands to the feet pretty much just being lifted up, moved forward and put back down.
From the very first video to this one, the hips, torso, shoulders and head look to be just one solid un-moving block. I’d love to see a direct front or side on, but I bet there is no up/down movement of hips/shoulders. Along with the fact that the whole body moves up and down while walking and yours doesn’t seem to.
You see in the Animator’s Survival book exactly what I’m talking about. From the side on page 103, to the front view of the hips/shoulders on page 120. It means that front on the spine is in a bit of an S curve.
For live reference, do a Youtube search for Swimwear Fashion Show (tho keep in mind most of that isn’t a ‘normal’ walk, the hips/legs are usually over-moved, while the arms are kept to as little movement as possible, along with them being trained to keep the very straight, think deportment classes. But even then, they still can’t totally fight basic physics and human anatomy, so all the general motion still applies).
1 Like
Thank you so much for this input. I still see how it looks robotic and I want to make it as realistic as possible.
I’d love to see a direct front or side on, but I bet there is no up/down movement of hips/shoulders. Along with the fact that the whole body moves up and down while walking and yours doesn’t seem to.
Here is a front and side shot.
You are correct I don’t believe I animated the shoulders up and down just forward and back. I will implement that.
For live reference, do a Youtube search for Swimwear Fashion Show (tho keep in mind most of that isn’t a ‘normal’ walk, the hips/legs are usually over-moved, while the arms are kept to as little movement as possible, along with them being trained to keep the very straight, think deportment classes.
I watched a video and see what you mean about how they move as little as possible but subconsciously can’t withstand body mechanics. Thank you again for this information.
1 Like
Yup, those front and side videos completely prove exactly what I was saying and totally confirms one of the main reasons for the stiff and robotic look.
Yup, at this point you’ve just about animated what the models dream they could do, but of course can’t. Hence why it looks wrong.
Additionally, it’s possible I also have some concern over the actual process and workflow you are using to do the animation.
Maybe have a quick look at my little production process video, especially the animation section.

And/or do a bit more Youtube searching for the animation process of blocking/inbetweens/splining, along with the general basics of the timeline/graph editor, etc.
Next questions:
-
Are you using Inverse-Kinetics (IK) to do this?
(for arms & legs/feet I think you should) -
Are you using a 12-24 frame walk-cycle (ie; only 1 cycle),
and then using the NLA_editor (Non-Linear Animation) to multiply expression of that basic cycle, while a separate channel is responsible for moving the entire character forward?
(because you have specific (non-walk-cycle) animation at the start and end, these will still need to be separately animated from the walk-cycle strip.)
Single walk-cycle multiplication (via NLA) is a technique you should learn, if you are not already using it.
Individual walk-steps (“whole animation” ?) is also a technique you should learn, and it allows for variation and more “acting”.
Your progress is inspiring. Keep having fun with Blender!! ![]()