As I said I was already working in an improved version of the model. I actually had worked already for several days when I did the previous post an I was about to finish it. It is just that I didn’t have Internet until yesterday so that is why you will be seeing this new file so fast after the original post.
I only had but a few things left to do to finish the newer one and here it is.
Note: This is an improved version of the higher poly model only. If you want to have the two lower poly models you have to download the version 1.0 file that is still available there in Deviantart in my gallery which also includes those two.
Version 1.1 Update: This is an update of the 3D model that has several improvements and refinements to the mesh. I know that when I released the model originally (version1.0) I stated on the PDF documents that it was going to be the last version because of time constrains but I pushed it further and decided to make more time cause I thought that it was already starting to look pretty good and that it would be a pity not to work more on it. I have to admit that it was hard to put down too cause when I saw how good it started to look I wanted to work a little more on it and correct a few things that I already knew could be improved so I decided to make the time to work more on it and the result is a much improved model, still not perfect or complete but with many, many refinements and added details.
This is a list of the improvements in version 1.1:
• More depth has been given to the large and medium wheels relief work.
• The smaller upper wheels were redone and now they have 64 divisions too instead of 32. Their bevels have been improved somewhat too.
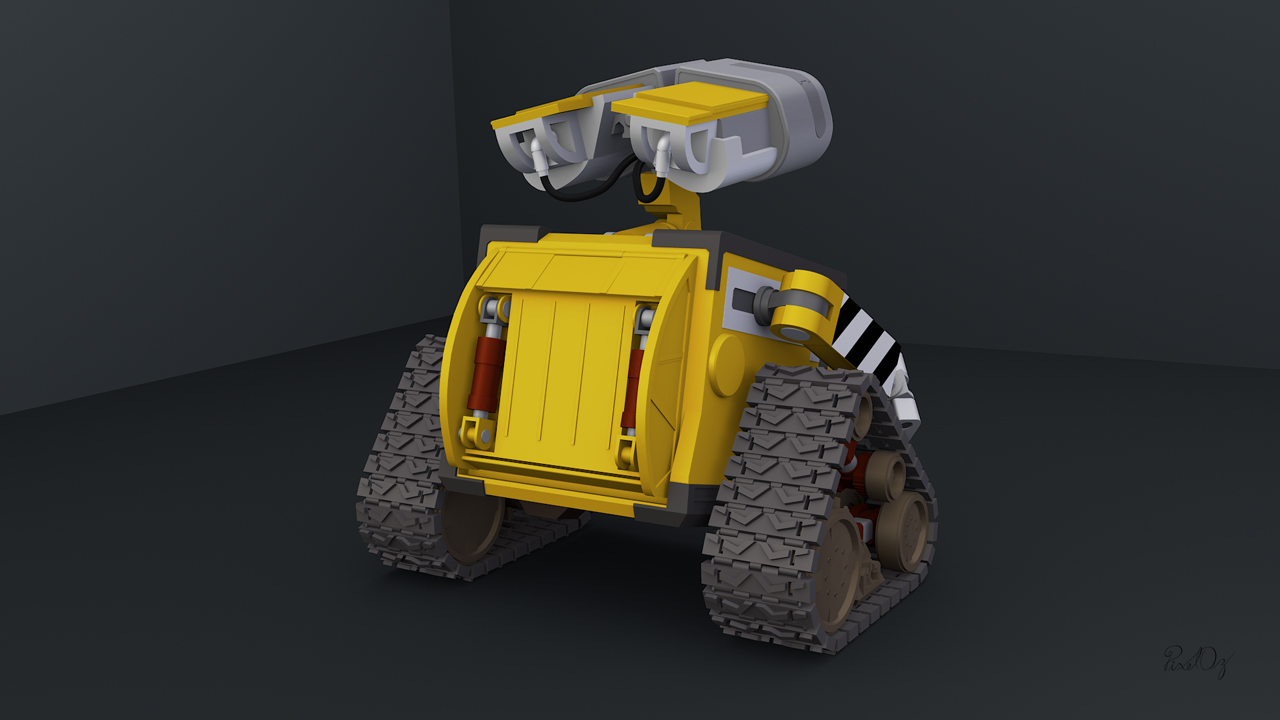
• The two inset details that are round at the bottom (like an inverted arc) have been added to the sides of the body (in the gray area at the side of the body, at the front, close to the top).
• The upper frame of the body has been completely adjusted (mostly redone) and it also has been cut from the inside to conform to the body so it has been made to fit the body cause before it was just intersecting it and the body was adjusted in the same area according to that too.
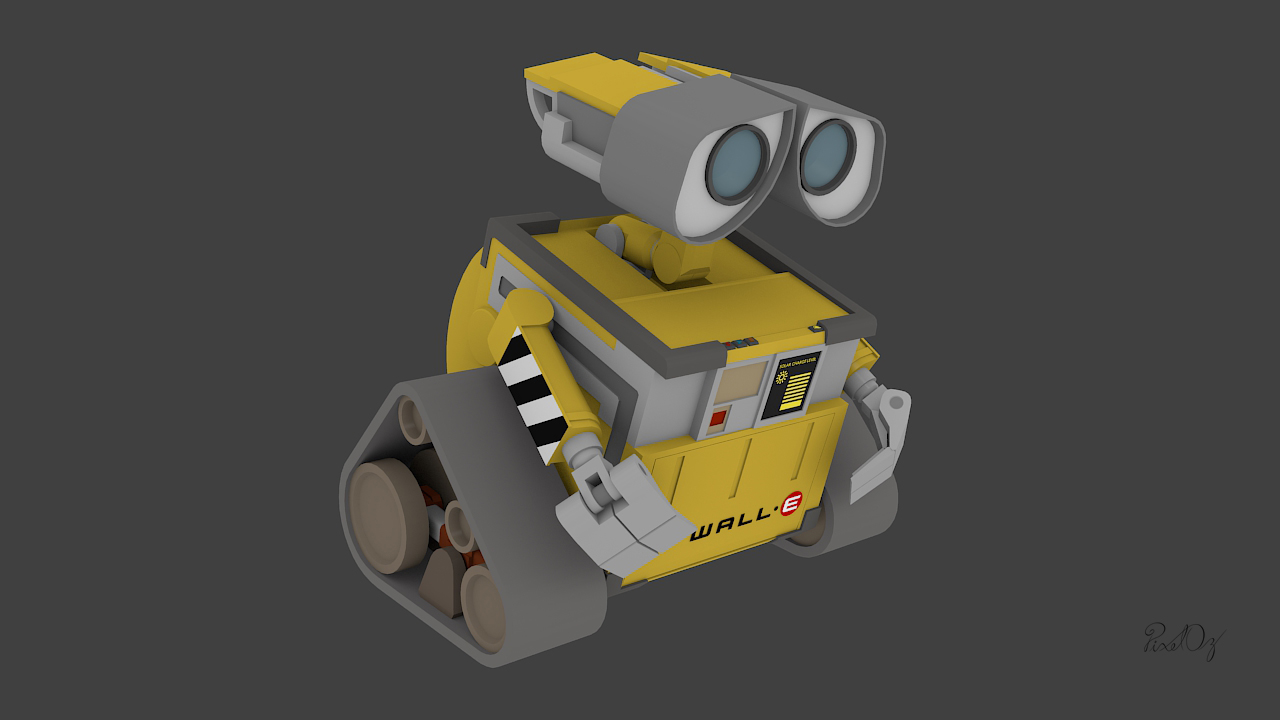
• The upper part of the body has been completely changed and adjusted and more relief detail has been given to it including the plaque with bolts that Wall-E has at the right side on the top (closer to the rear of the body).
• The red warning lamp that Wall-E has at the front has been redone with more detail and adjusted proportions, before it was just an inset rectangle.
• The front door now reaches all the way to the top of the yellow area of the front of the body and ends just below the front grille and display area as it is in the original Wall-E. Also the relief detail of the door have been improved in shape (now the inset rectangles tapper as they go up) and given rounded corners to be more like the original.
• The front grill and display area has been readjusted completely and added much more detail including small bolts. Therefore the whole front of the body was virtually redone too.
• The rear hydraulics have been given more details and they have adjustments in some of their parts to be more accurate.
• The rear door round panels at each side of the back have their curves smoothed better with more resolution and refining (the curves were redone as beziers and then converted to a high poly resolution mesh that was then rejoined with the part so they are very smooth now) and the interior now has the inset curve relief that the hydraulics are supposed to use to slide. They can still use more relief detail on the outer side but they look much better now.
• The rear panel at the bottom in the back has new inset details at the bottom with rounded corners, before it was just flat at the bottom.
• The buttons were redone and their shape improved and their relief logos are now inset instead as they are really supposed to be. The gray panel under them with the inset rectangle for the buttons has been added. The sun logo of the button at the left has been redone with the correct logo.
• The bottom of the hole (beneath the neck base) has been redone and now it has the relief channels that the neck base is supposed to use to slide. The neck base has been adjusted accordingly.
• The “eyebrows” now have slight rounded corners at the top (toward the middle of the head) instead of just ending as squares.
• The eye lenses have been given depth instead of them just been thin surfaces.
• More detail was given to the bottom parts that support the tracks system even tough they still need more work.
• The arms pivot parts had their radius increased in the circular area to match better the curve of the shoulder of the arms and its edges has been beveled.
• The upper panel at the back has been readjusted in several areas and now instead of a mere relief ornament it has a real hook that opens, extends and slides that can be used to hang the ice cooler. The ice cooler has been created for it and placed (its layer can be turned off if so desired and the hook can be retracted).
• A somewhat nicer but still simple new background (like a display stand or display base) has been created for Wall-E with a turntable disk that is separate that can be animated if so desired.
• If you open the ice cooler (or look through in wireframe mode) you will see that Wall-E has now a small gift for you. That object was also modeled by me. You can also see it by turning on the seventh top layer from left to right without turning on the ice cooler layer which is in the layer to the left of the gift (the sixth top layer from left to right).
Overall a whole lot of things were redone or improved mainly in the body but also in other areas. But of course it can still be better cause the body is still not cut and the interior has not been modeled. I wish I have had more time to do more but at least I was able to do these improvements. which I think make quite a difference in the overall appearance of the model.
Instructions for opening, extending, sliding and retracting the new rear hook and for straightening the ice cooler (and the object inside) to its default horizontal position are in the accompanying PDF documents.
The lower poly models are available only in version 1.0 of this file which will remain available for download in my places at Deviantart and Mediafire. The version 1.1 file will only include an even better more updated version of the higher polygons model.
These models have a pseudo rigging that can be used to pose them rather easily but is not a formal rigging in the standard way, it is something simpler. Instructions on how to pose them are in the accompanying PDF documents.
Deviantart link to download the new improved model:
http://fav.me/d5xk4of
You can use the previous Mediafire link to download the new model also.
Clay renders:
http://img259.imageshack.us/img259/5638/wallever11aorenderclayw.jpg
http://img189.imageshack.us/img189/5638/wallever11aorenderclayw.jpg
http://img62.imageshack.us/img62/5638/wallever11aorenderclayw.jpg
http://img826.imageshack.us/img826/5638/wallever11aorenderclayw.jpg
http://img801.imageshack.us/img801/5638/wallever11aorenderclayw.jpg
Alternate ambient occlusion renders:
http://img109.imageshack.us/img109/3981/wallever11aorendercolor.jpg
http://img694.imageshack.us/img694/3981/wallever11aorendercolor.jpg
http://img442.imageshack.us/img442/3981/wallever11aorendercolor.jpg
http://img705.imageshack.us/img705/3981/wallever11aorendercolor.jpg
Alternate ambient occlusion wire over mesh renders:
http://img7.imageshack.us/img7/3981/wallever11aorendercolor.jpg
http://img839.imageshack.us/img839/3981/wallever11aorendercolor.jpg
http://img90.imageshack.us/img90/3981/wallever11aorendercolor.jpg
http://img90.imageshack.us/img90/937/wallever11aorendercoloru.jpg