What is the equivalent of ISO100 in Blender’s Color Management Exposure?
I finally found a camera app for my phone that shows me exposure values, but I don’t know how to translate that to Blender’s Exposure slider.
What is the equivalent of ISO100 in Blender’s Color Management Exposure?
I finally found a camera app for my phone that shows me exposure values, but I don’t know how to translate that to Blender’s Exposure slider.
The Photographer add-on lets you use real world camera values but I don’t know that vanilla Blender has a standard conversion
Would it not be something as simple as knowing the “magic number”? Like if Blender’s -5.25 exposure is the equivalent of 100 ISO is all I really want to know.
I think you can do this with Gamma, not Exposure.
Changing gamma changes the saturation of the image in a very different way compared to changing the exposure slider.
Yes, you may be right. This is an idea.
This is math in the “Photographer 2” add-on.
( Log2( (100 * (Aperture * Aperture) / (ISO * (1.0 / Shutter))) ) * -1 ) + 9.416
I’m pretty sure Aperture, ISO, and Shutter are variables created by that addon. Somewhere deeper in the code they may or may not be using whatever creates Blender’s exposure slider as a participant in the creation of those variables.
This is total math. I did not copy and paste code. I examined code and wrote this math.
I did not try this math. In a free time I will try this math.
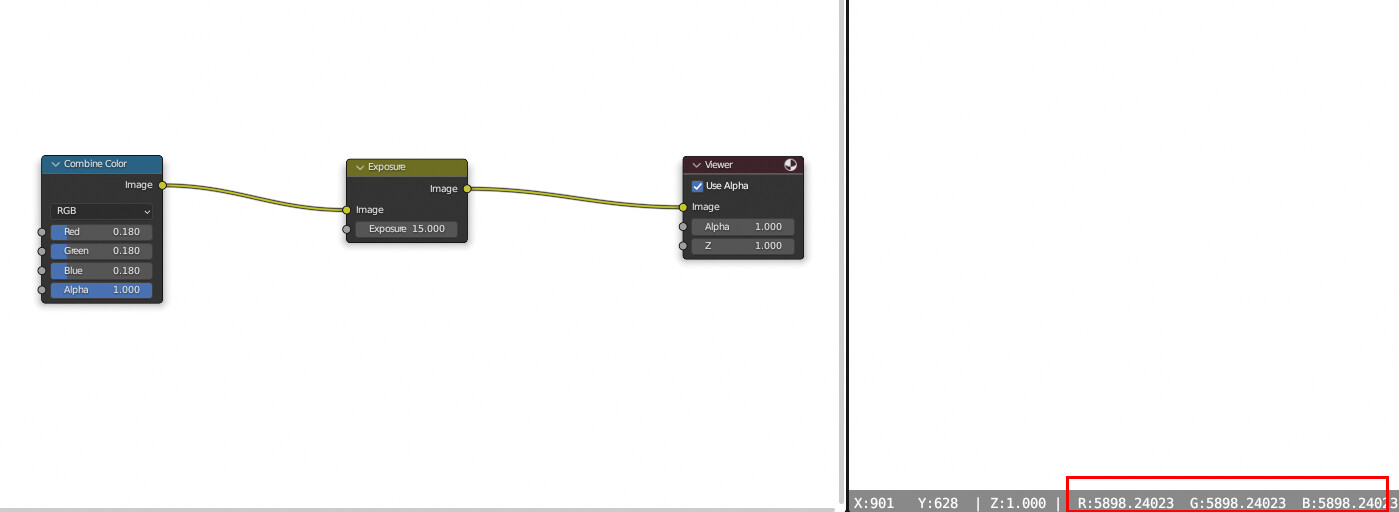
Blender’s exposure is the universal exposure stop value:
2^stop_number * middle_grey = actual_value
for example, exposure value of 15 with middle grey of 0.18 is 5898.24:
The inverse of the formula:
log2(actual_value/middle_grey) = stop_value
e.g. log2(5898.24/0.18) = 15
When you are dealing with real life camera, all three of these affect your exposure, ISO is just one of the factors, so ISO 100 is not enough to know the corresponding stop value. You need to know the other two as well. I believe most phones have fixed aperture (I think it maybe included in some phone photo’s metadata, you can look it up), and you already get the ISO, so you now you need to figure out what the phone camera app’s shutter speed is set to, and follow the formula posted.
BTW it is better to modify the shutter speed than the ISO when boosting exposure, ISO is software-calculation whereas shutter speed is physically exposing more lights to the sensor, therefore increasing ISO can lead to noisier image comparing with slowing the shutter speed a little.
I suggest adopting to sunny/16 rule. Photograph a (human) subject or reference in direct front lit sunlight with a real camera at ISO 100, shutter 1/100s, and f/16 (no extra glass on lens). It should be fairly well exposed simply following that rule, and not over exposed. Setup scene in Blender simulating same conditions with Nishita sky at strength 1 with sun activated. Don’t forget to model similar ground as well. Adjust exposure until you get close to the photo. That exposure setting should be the same as the sunny/16 setting. In the old Photographer addon (when we didn’t have Nishita as a reference but based sun and sky on other math), I believe 1 change in exposure was the same as a full stop in the camera. Not sure if that applies to the new one.
Well that depends entirely on the circumstances. Shooting sports or action I’d definitely shoot shutter priority.
A strength of 1 in the sun of the Nishita Sky is equivalent to what value of a regular sun lamp?
This is tricky because the sun’s emission intensity varies depending on the time of day, in Nishita sky’s case, the sun’s position.
The default sunset position is going to be significantly dimmer than the sun elevation of 90 (noon position).
Anyway, Nishita Sky’s sun is very close to real world values so I think it’s safe to use it as reference.
I would actually leave ISO low and shoot some darker “raw” dng files, and leave the exposure boost to the computer software. As per my test with my phone camera, increasing phone’s ISO setting will bake the hard clip and color skewing to the dng file, I would rather have a darker looking preview and increase exposure in editing software with view transforms like AgX or Filmic etc. to get rid of the hard clipping and color skewing.
This only applies to my experience with my phone camera though. I know that pro cameras like ARRI Alexa 35 have good view transform on par with (if not better than) AgX, and it also seems to have advanced denoising algorithm to allow lower noise while having higher ISO. But with my phone camera, I would almost always leave ISO to the lowest value, and use the DNG with a better view transform when boosting exposure in editing software.
I’m just trying to figure out a way to get a value out of nishita that I can put into a normal sun lamp so that I can have more parity when switching from cycles to eevee. Navigation is too slow in cycles but when eevee looks too different I can easily forget what I was intending to do next.
It will vary with the rest of the setup, so the best thing is to experiment yourself. In my startup file, I have Air: 1, Dust: 8, and Ozone: 8 to match my HDR of choice, where the sun is clipped (to complicate matters more, and I’m also colorizing it to match Nishita sky), and Sun Elevation 18.4 degrees, intensity 1, and sun size 0.545 degrees. In that setup I get sun lamp at approx 60 strength and 4400K. I’m not claiming this to be scientific or even super accurate, it’s just what works well for me and flipping between the two images doesn’t show any noticeable difference.
Do denoised test renderings with 20 samples and reduced size, and store Nishita sun+sky in one slot and Nishita sky + manual sun in the other and adjust until it matches. I’m only doing this to be able to turn off the sun in post using light groups.
Yeah ok, I was mostly talking about DSLR cameras myself, not phone camera which I hardly use.
Here is a screenshot of how I approach it:
Hi, sorry I’m not clear about @Hikmet 's exposure formula:
( Log2( (100 * (Aperture * Aperture) / (ISO * (1.0 / Shutter))) ) * -1 ) + 9.416
Let’s say I have these camera values for a full-frame (36x24 mm sensor) DSLR :
| f-number | ISO | Exposure time |
|---|---|---|
| 1/8 | 100 | 1/640 s |
Since the f-number is the inverse of the relative aperture and @Hikmet 's formula says it uses aperture, I suppose I’d have to use 8, not 1/8 in this case, which gives a result for the exposure of 12.738 (otherwise it’s 24.738).
In Blender, with the AgX View Transform (and Look set to None) and a Nishita sky set to a ~25° elevation, matching the date, time and orientation of the photograph, this exposure is very far from what I should actually use (the value should be negative, around -3 if I trust my materials).
What am I doing wrong ?
Transform formulas different than exposure formulas. Transform formulas use more complex equations. It is basic exposure formula.
Hi,
Sorry I’m not sure I follow you. If by Transform you mean “View Transform”, I can set it to Raw but it doesn’t change the fact that an exposure value of 12.7 is very far from what it should be.
Either I’m not using the right values in your formula (in which case, could you please tell me which one(s) I got wrong?) or the result is not meant to be used as is in the Exposure value under Color Management, in which case, does anyone know what formula gives this value ?
View Transforms are not work with only change exposure value. Computer is not a camera, and it is not work like a camera.
Change “Exposure” value under “Film” panel for this, not “Color Management”.
If you a programmer, I can tell you easily. But if you not, it is impossible.
And result of your example is “6”, not “12”.