Oh wow, I didn’t even know you could. I used to put a ‘Seperate XYZ’ node inbetween and have been wondering why the spreadsheet wouldn’t be capable of showing a whole vector.
Now I feel kinda dumb.
But yeah, that enum should be on the viewer node itself instead of the N-panel (which I tend to only occasionally open for very specific things such as renaming).
So this is how far along we’ve come. Now we’re complaining about UI-papercuts in the humongous Blender-whining thread.
Yeah. And while we are at it, the little goblin that sits inside Blender who decides what to show in the spread sheet when you set the viewer to “auto” appears to be an avid smoker of pot.
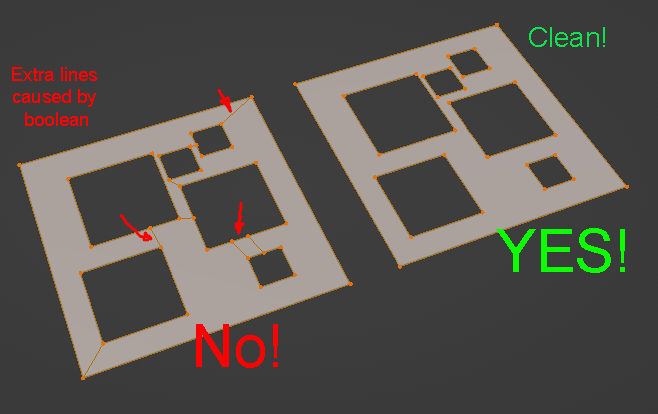
You still can’t do N-gon holes on N-gon faces when modeling. Been waiting for that ever since b-mesh was a thing.
The concept of “Active tools” still isn’t finished. They are barely usable as they are now.
Wireframes in edit mode are still orange. They should be green. Orange is for objects, green is the color of object data.
Multi-selection editing in the properties editor, as it was written in the original blender 2.5 UI design paper.
Object Grouping! That’s a big one. And it’s so straightforward. All grouping is, for the most part, is parenting multiple objects to an empty, then hiding that empty and redirecting selection to that empty when an object is clicked.
That is interesting. Never thought about that, and right now I don’t know why that would make difference for user. But as far as I know you can change that from theme properties, no?
There are propreties for Vertex Select, Edge Select, and Face Select
Sure, you can change that yourself, but it should’ve been a default color change ever since object data was colored green.
The benefit for the user: Color coding is there for communication. The green color for object data is reflected in the properties editor and the outliner.
Wireframes being green would communicate that the user is currently editing the object data datablock, not the object datablock.
Pablo proposed to make the wireframes green a long time ago to the blender team, but it was kinda pulled under the rug and forgotten, it seems…
Well, since it can be changed by user, I don’t see that as an issue. Should be by default is just your opinion. I’ve never had a problem with understanding which mode I am in. If it was an issue and somehow confused people, there would be talk about it, at right-click select, or some addons or something. But I don’t think thats a thing anyone cares about.
However I’ll try to give a green wireframe a go and see how it is
If the icon for “Extrude” was a teddy bear, it would make no sense. Even if the user could change it, the argument, after you’re used to it, to say “Well I never had a problem understanding that a teddy bear is for extrude”, is not a good one.
The UI/GUI should aim to be the best it can be out of the box, and follow common sense, and even the nitpickiest things such as this should be considered.
Not only are you using the straw man fallacy out of nowhere, but I tried your idea and can tell you why it was discarded. It’s utter shite. I can’t properly see the selection no matter how high the saturation and values are. Compared to bright orange you can just see very easily obviously correct choice was made. User experience is much more important than just simply “things matching”
This is not a strawman. It’s equivalent, given that you do not consider it a problem just because no one cares about it enough to talk about it. Which is what you expressed in your previous comment.
To say that you tried it and did not like it is a whole new argument.
In both Dark and Light default themes they’re magenta (CC0099), lightish blue (00A5FF), red (DB2512), cyan (00FFFF). I’ve never discerned any particular reason for those colour choices, and so I just learned them by heart. They don’t mix if you apply more than one, the colour indicates the last one you applied.
Aren’t you colour-blind? Apologies if I have you confused with somebody else, but that might affect how easily you can tell those apart. Though I ran those colours through a test of “show what various colourblindness types would see” and except for Monochromacy/Achromatopsia they are at least distinguishable, so somebody put some thought into it.
No, Blender doesn’t show non-manifold edges by default (I’d like it if it worked like Face Orientation, in an overlay), but you can at least select them specifically, or can use the bundled 3D-Print Toolbox add-on to show them. None of that qualifies as “bat-guano-insane” for me, but I think the thread has moved towards “little stuff that annoys me” since.
I struggle to see colors on thin lines. Colors I have trouble with need to take up a significant portion of my field of view for me to begin to make sense of them. For example I never have any idea which object is the active object just based on the outline color.
Ah. I’m guessing that setting the interface to use the Thick option for lines doesn’t help enough –
actually, it doesn’t help at all IMO, now that I am looking at it closely. I have mine permanently set to Thick, but it doesn’t really make the colour more visible because it just forms a thin line along both sides of the edge which is itself more neutrally coloured. The data colour is actually more clearly visible on Default, for me. But yeah, in any case, not really all that visible.
Speaking of options that annoy, that one does. I want thicker lines, but not necessarily fatter vertices, and I want even thicker lines than this measly option gives me. I’m often hanging with my nose right up to the screen and all the way zoomed in, peeking over the rim of my glasses.
As i recall Joe regrets not adding support for holes in faces when bmesh was created. Now it would be a lot of work to add it because every tool rely on current bmesh assumptions. So untill next mesh data rewrite its unlikely that there will be support for holes.
One of the built in addons already has “parent to empty” command that I set to ctrl+g. An empty that automatically knows it has children should behave slightly differently from a regular empty. It should have a bounding box that encompasses all children. The move and selection tools could have an option to automatically select the parent of whatever was clicked or automatically select all siblings with the same parent.
You want Quick Instance Grouping if you want to group in blender, forget everything else. It’s so good its hard to believe its not an official feature.
Shift+G just creates group. Which under the hood is: It adds all the objects to the collection, takes the collection to the scene called “Library”, and instances that collection in the main scene. So you just have empty with all the objects.
But what is the big feature is that if you press tab on the group empty it takes you inside the group, where you can go into edit mode on objects, realign them, or whatever.
I don’t want to be kicked over to another scene when I try to edit an item in place. If i’m intentionally using instances it’s ok but if i’m using “groups” like in other programs I’d just want to edit the thing in place because it’s a regular group.
Both are needed, regular boring maya style groups, and collection instances with a formally implemented workflow around working with them. In this addon’s case it places the original in another scene and it sends you to that scene when you want to edit. In another addon you can tab into any collection instance and edit it in-place instead of being sent to another scene which honestly is the least useful way to work in my opinion. I need to work in-context to really see the effects of my changes in the final render. Editing in another scene is annoying when I don’t have multiple monitors so I can see both scenes at the same time. When the asset is in a whole other file it’s 10x more annoying.
Also that addon uses the Exclude From View Layer checkbox to control which collection is visible when you tab into the library. That checkbox boils my blood so this addon will just expose me to that annoyance every few minutes
Your concern is understandable. If I don’t want to go into another scene to edit I quickly ungroup, do whatever and regroup again. Add-on does all of this very quickly and doesn’t leave empty collections or empty empties or whatever here and there, so outliner is never cluttered.
Also what would be your ideal workflow, if you dislike both methods?
My ideal workflow is boring parent based grouping like in Maya when it makes sense and then also something “instance” based but with the freedome to tab into any instance and make changes as if I’m editing the original. I think sketchup has something like that. But this would be best if it was separate from Collections due to the complication of objects being allowed to belong to infinite collections. I doubt that will ever happen.