Yes or at least change it for Angle limiter with ~ 60-80 deg treshold to exclude not very sharp edges.
But you remember that LightWave always asks you. Right?


So that means as far back as the invention of the printing press, this has been an option. ![]()
noob Q: can that Selection be automated? Like with “Select By Trait”?
'Cuz, then that infrastructure can be leveraged to implement this feature.
++++++++++++
LOL. --Quit making me miss LW!
I wonder what Allen Hastings is working on nowadays… --Oh brave new world!
https://www.linkedin.com/in/allenhastings
An actual default! ( ¡Quelle surprise!  )
)
Default scene length = 250
Default motion paths range = 250
—Default Path Animation Frames = 100.
…ttttthhhhhaaaaannnnnkssss devs!
And the physics simulation till 250, and when you change the animation/timeline range and you forget to change the physics simulation range because IT DON’T AUTO MATCH THE TIMELINE !!!
Where does 250 even come from ?!!! Someone’s phone number or something ?!!!
Something historical ?!
1 Like
ten seconds at 25/fps.
Hey he cut his hair!
Last time I met him, he was a hippy…lol
Nice guy though.
10 seconds in PAL, which is the European frame rate.
Just a good guess.
EIDT: The forum was in some kind of closed mode for me yesterday and I could not see Jeric answered this first.
Maybe I was making too many posts and they locked me out… lol
I often wonder if some of the less felicitous choice in the Blender UI make more sense in Dutch.
(It’d be Dutch, right?) Same w/3d Coat and it’s menu, for want of a better word, ‘system’. Perhaps it’s perfectly logical in Russian.
1 Like
Sounds like something for an anthropologist.
Default Zoom: when you hit “NEW” in the texture editor, it always seems to be zoomed in too far to see the edges of the new image.
Fact that if you cancel some operation (duplicate, extrude, etc) in the middle of the act the operation is still created is sometimes very annoying. I know it has it’s use but still it seems kinda counterlogic and it is confusing.
PS: And fact that after so many years you still can’t rotate triplanar (box) mapping makes it almost useless.  (and don’t tell me to dodge that with object origin rotation - no)
Yes indeed. This bug has actually been in the bug tracker since 2015 (https://developer.blender.org/T44014), and still hasn’t been fixed…
Every time i put the cursor to the center it also zooms way way out and I have to zoom back in again. I am consonantly having the shift key plus middle mouse to pad often does not work the first time. I am constantly going into the camera view because I want to use the ZERO on the num pad. When I learn things and then I have to re learn them because the program changes so I have to go dig to find the answer. One thing I hate about computers is they are always changing it drives me crazy that I have to keep re-learning how to do the same thing when it could have been just left alone.
2 Likes
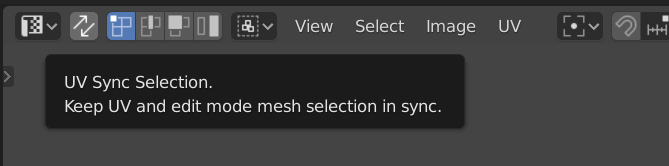
That the “UV Sync (with Edit view) Selection” defaults to “OFF”.
Is there any case where NOT seeing the UV map is somehow more useful than seeing it?
Collection exclusions or toggles can not be animated.
Complain was supposed to be handled by dynamic overrides in original design of 2.8.
That part was not done.
But currently, we can put an object in one collection and a duplicate of it in another collection, each view layer using collection with object with a pertinent animation.
They were used to animate the value with a driver.
Using a value of 100 is making divider or multiplier used by driver as a percentage.
But yes, I always thought that came from a twisted mind.
First, I am not sure if you did something to your preferences, but it is not that way by default. By default when you go into an object the first time all of the faces are selected. And it gives you one of two edit modes for UVs.
The default mode is that there is no sync between the mesh and the UV. If you are coming from the Maya side, this is the same as editing the UV points not the vertex.
Maya:

Blender

In Maya if you edit at the Vertex level you will get it “synced” to the mesh. Like this:

It means that when you select a mesh point, it means that that mesh point is actually connected to more than one UV point. So all the UV points connected to that point also move.
In Blender, to have the same thing happen, you have to switch modes from the default.
and then you get this:

The default mode gives you more options than just components:
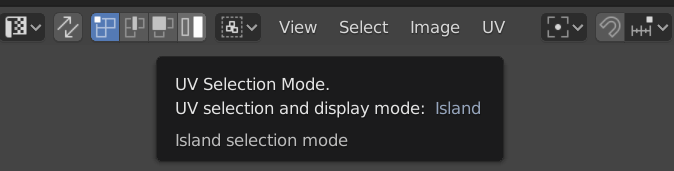
You can move islands.

But components stay connected if there are no seams.

Component (synced) mode is handy for pulling things apart.

regarding “is there any time you don’t want to see the UVs?”
For me, usually when deep in a UV editing project on a complex object. Or series of objects that need to be atlassed. I find myself liking to be able to only show some UVs at a time and is a great way to also islolate parts of the UV by selecting the mesh and then moving them out of the way to concentrate on one part.
Of course you could do that if the UVs always show. But sometimes no clutter is nice. So maybe we need another option. And in that case it would wind up working more or less like Maya does by default.
Good news everybody, the annoying B = box select, C for Circle and L for NOTHING because Blender logic is fixed !
And also the issue where you have to explicitly go to wireframe mode to box select what’s behind and yet in object mode box select will automatically select what’s behind ridiculous inconsistency is fixed !
Using an Add-on [yes an add-on have to be created to fix this…imagine that…]
Check out number 2 on the very first post that is constantly updated !
This is the switch I was referring to - TMK I never touched it until I saw it used like 2 days ago in a tute:
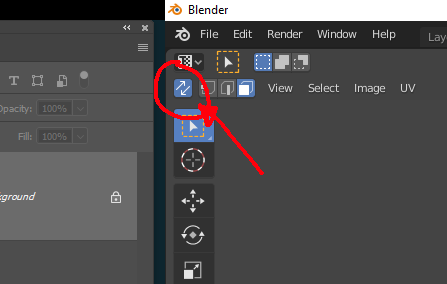
Here, it was defaulting to OFF. So, when I invoked the UV workspace and no faces were Selected (because of the order in which I did things), nothing at all was displayed in the UV Editor. Only if I selected some Faces would they be displayed in the UV Editor. And, at least in straightforward meshes, I find it disorienting to NOT see the entire UV map, in context. I can see the utility in being able to suppress display of unselected UV faces (in a complex unwrap), but IMO not as a default.
With this switch on, as depicted (ie ‘blue’) it was as I would expect - I can see the entire UV whether or not Faces are Selected.
That my good man. Is exactly what I referring to.
That is the proper UV edit mode. You don’t want the other one most of the time.
So live with it until they change now UVs work in Blender.
By default, all objects come with UV’s now and with all faces selected. Sure you could do any number of sequences and wind up with no UVs there the first time.
But you are not going to win this one on that alone because by default you are in UV edit mode. And in UV edot mode there are no UVs unless faces are selected.
If you change that switch, you won’t be in UV edit mode. You are in component edit. And that is completely different. And you don’t want to be there for Editing UV. Most of the time.
Which is why I took the time to create that post so you could see how it is working and compared to Maya.