What is the most ridiculous Blender defaults you have learnt to live with but still pisses you off?

But that is not a debate about what is the most frequent case against a rare one.
That is a complaint about coupling of display and selection.

If you think that modifying selection mode should not modify display when editing mesh in Viewport ; that is logical to think same thing about UV Editing.

That is UV Editor. Only thing that you edit in this editor are UVs.

It is a selection mode in UV Editor synced with selection in 3D View.
There are 2 selection modes because one may be more pertinent than the other, according to what you want to select.

But the goal is still to edit UVs.

Another thing:

  1. When I hide an object in Blender, I can’t select it in outliner. So for example when I want to change properties, etc. That makes no sense. Maybe I want to delete hidden Objects, etc.
  2. What I love in Modo is, that I can select a hidden object, go into edit mode and the mesh becomes visible. That way I can edit object that have many instances, without getting them displayed, etc.
    In Blender my main problem is that I often go into edit mode, but find myself having the wrong object selected. Out of edit mode, I can’t easily select a different object.
2 Likes

I really want to second this. In general, no actions are possible on a hidden object in Blender : not even deletion ! Which comes from the fact that the delete operator works on selection, and you can’t select what you can’t see in the first place… but to be honest, I’d like this to be an exception to this paradigm. Having to unhide an object to delete it is really convoluted.

This is a great idea. Just like how subtool display works in Zbrush as a matter of fact : the active subtool will always be shown, even when it’s set to hidden. I think this deserves to be worked on. @William I am taking the liberty to ping you for thoughts.

1 Like

Another usage would be hide all objects in your scene and the just select the one you need to edit, it’s basically an automatic isolate, whit out enabling it. Helped me a lot in complex scene.
For example I often put he original of instances in a group. Let’s say you have 500 airplane seats and need to change a part on them. Hide the scene base group, select the source seat part you want edit…

One thing I find better solved with parent inheritance of display attributes. If I set the parent objects visibility to something like invisible, but visible in render, I get a much deeper control then using collections. Of corse a child set to render off won’t render. This is in my opinion a much richer and easier workflow then collections in Blender.
Another thing is parent transforms influence child transform. So if I set the transform of a child to zero, it’s on the parent position. Whit this I can easily control offsets, so like the center of a door is the parent, the door handle is the child by setting the child to same position but a high of 1 m, I know exactly where it is positioned. Doing the same in Blender is really hard. And can break easily
.

The complaint is related to the button that changes between two edit modes. That is the complaint.

One mode is the UV edit mode. That is what it is. Does not matter what you call it. Each point in a mesh can have more than one UV. The only way to edit the UV separate from the mesh is to be in this mode. The default mode. And yes. Most of the time this is where you do your editing.

In the other mode, is you select a point. You are not able to edit that UV point independently from the mesh because now you are editing the component (edge points and faces).

There are times to do this. And there are advantages when selecting polygons especially because now you are break them away from the UV island.

That is how UV’s work in Blender.

To change this would be feature request. Not a default change.

The feature request would be to have the option to have all UV’s displayed in UV edit mode when nothing is selected on the object.

It is not accurate to ask for the default to be changed to component edit mode, just because the way Blender works is that it is the only mode that shows all UVs.

Richard, Maya comparisons won’t help me, since I’ve never used it. LW was my poison of choice.

Anyway, I’ve taken up too much of this thread with this, my consfusions continue in a new thread over in materials & textures (or whatever). Thanks for the effort.

What version is all this good news in?

The only reason why I mentioned Maya was to illustrate the difference between editing a UV and editing a point. If you are a Blender user and you have never used Maya (and I am really sorry you and I were exposed to UVs in LightWave…lol) then you won’t understand this fundamental difference.

And this won’t make any sense at all.

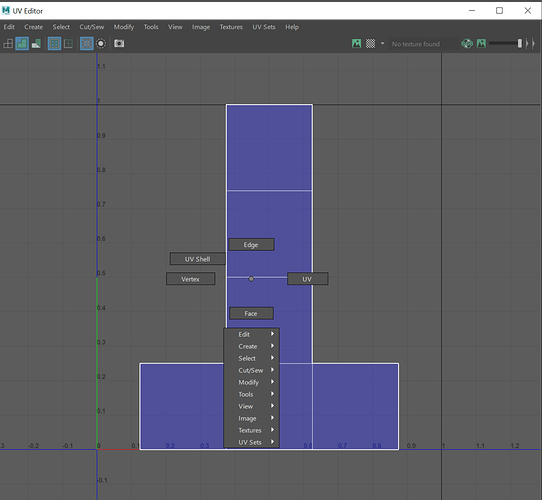
image

Now that I explained in my illustrations using Maya for educational purposes. Hopefully this helps to unpack what that means.

It means you are either editing UVs (which is the default) And UVs only share points with the mesh. They are not the points on the mesh.

Or you are editing the mesh. Which means you are moving the points and all UV’s connected. This is why in this mode if you select and move one mesh point, it also selects other UV points that are associated with that mesh point.

The Advantage that Maya has is these modes are combined.

And as you can see you can edit UVs or mesh components with UV’s always visible.

The thing I do like about Blender is the ability to decide which UVs will be on display by selecting mesh components in the 3D viewport when in UV edit mode.

An argument could be made that the Maya way is better.

FYI. When you import a mesh into Unity that has UVs. It will split the points that share UV. And if you are in a situation where you need to know the vertex order or vertex numbers, which has happened to me, you will find that the vertex order changes because Unity for some odd reason needs to see only one UV point for every Mesh point.

You’ve been very generous and patient, but I think we should abandon this thread to its subject.

If you’d like to witness my continuing confusion, please join me here: hopefully other noobs will benefit from my pain.

I’m currently studying your above posts to see if they can clear up my confusion, to which end I started a new Blender file, but… well, to the other thread! Thanks.

In that case, you can translate 4 UV points sharing same location without a problem in UV Editor.
When you do that : you are editing UVs.
When you use Select Linked tool With Delimit option set to Seams in 3D Viewport in order to select an UVIsland ; and then, you move that UV Island in UV Editor : you are editing UVs.

That is a misconception to talk about an UV Edit mode.
There was one, long time ago, in 2.3x. It was merged with Mesh Edit mode.
And nowadays, in 2.8x series, UV/Image Editor was split into 2 editors.
So, what is really determinant is the Editor.

When you do a manipulation in UV Editor that only influence UVs, that does not mess-up your mesh or other UVmaps than the active one.

I don’t disagree that decoupling display from selection would be a feature request.
But what pushes @Jeric_Synergy to have button ON by default is the absence of display of unselected UVfaces.

1 Like

This is correct. -That and my probably fundamental confusion as to how UVs are treated in Blender.

Yeah we are talking about the same thing for sure. Just different ways to arrive at the logic.

I just love how respectful and civilized these conversations are.

4 Likes

Please tell me if there’s a way to fix this. The default clip start is set to .1 m. I find myself having to change that to .0001 in every window in order to avoid clipping. Can’t this default be changed?

Also, this may sound like a dumb question, but m = meters right? but that can’t be. The default hair diameter is 1m?? We’re talking about hair here. No hair I know of is 1 meter in diameter, not even a millimeter in diameter. So what’s up with that? Does m mean something different here? I see that in a lot of measurement boxes in Blender. Could we see measurements in millimeters, centimeters?

Thanks.

After making all changes, you have to save them as a new startup.blend file.
File > Defaults > Save Startup File

In Hair Shape panel, there is a Radius Scale used, as a factor of Diameter, set to 0.01.
So , by default hair diameter is 1 cm.
In terms of realism, that does not make sense, too. But that does not make sense to try to display an hair guide of 0.001 unit if this unit is only 100 pixels wide. That would simply correspond to an almost invisible hair guide with a default scene with 1 unit = 1 meter.

During years, Blender had no measurement system. The idea was : user can consider displayed unit as a meter, a millimeter, a feet. It was his arbitrary choice.
So, Blender grew in size with additions of hair, smoke, rigid bodies, … without any try to unify measurements between those fields.
Features were built with the idea that a quick setup from default scene should work with arbitrary unit.

Then, under pressure, developers started to implement a unit system allowing to use values from imperial system or metric system.
Then, they improved UI by displaying letters in numerical fields.

But we are not, yet, arrived at the step where every default of each feature is tweaked to become coherent with its purpose.

You can see measurements in millimeters, centimeters by tweaking settings in Unit System panel under Scene tab.
The guy in charge of making a character may prefer centimeters or millimeters to meters or kilometers.
But for, the one who is building environments, that is probably the opposite.

This default is not the fruit of a debate about what case is the most frequent.
It was more natural consider 1 meter as a unit and not as a subdivision or a multiplier of pertinent unit.

1 Like

Here is another way to do them all prior to saving the startup file:

def set_clip(start, end):
    for cam in bpy.data.cameras:
        cam.clip_start = start
        cam.clip_end = end
    for screen in bpy.data.screens:
        for area in screen.areas:
            for space in area.spaces:
                if space.type == "VIEW_3D":
                    space.clip_start = start
                    space.clip_end = end
set_clip(0.001, 100000)

By an ex colleague of mine.

2 Likes

For 2.83 the default has been reduced to 0.01m.

2 Likes

Not necessary a default but not being able to change objects properties (eg Cylinder sides) after creation leaves a bad impression on the otherwise nice modelling capabilities of Blender and makes blockouts tedious.

That should be adjustable by the user, everyone works in a different scale. Hard coded stuff us always stupid. When I worked for aircraft I had it to 1 inch and set a shortcut to switch it back to centimeters, every time I wanted.