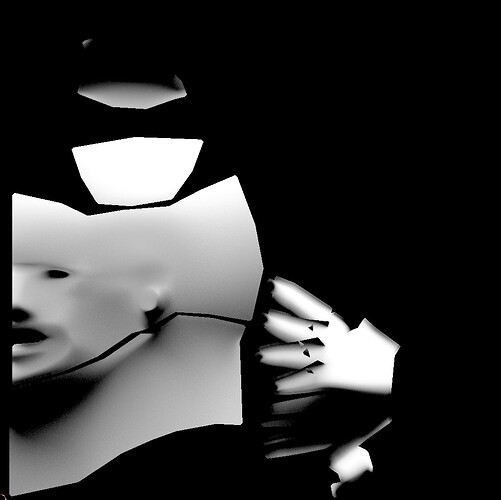
I’m baking a 1024x1024 shadow map for a character and I’m getting a lot of triangular artifacts around the eyes and banding around the upper skull and jaw. I don’t think I’ve encountered this before - does anybody know what’s causing this or how I can get rid of it? Happy to provide .blend if you need to look at that.
Looks like that is just the way the model is constructed. If enabling Smooth Shading doesn’t solve the problem, try adding a subdivision modifier before baking.
I’ve actually tried both of those solutions, you’re seeing the outcome with smooth shading and a subdivision modifier for texture baking. (Just added the .blend above in case you can spot the error in the file)
I’m still looking at it, but one big problem is that your unwrap isn’t up to par, and your edge padding from your neck is overlapping with your chin and jaw.
@Renzatic - ‘isn’t up to par’ is quite a generic phrase - could you clarify? Regards edge padding, fair point, I’ll increase the distance a little there, but I’m not sure how that’s creating the artifacts that I’m referring to. Any other thoughts? I’d really like to get this problem solved!
I’m not too well versed in unwrapping character models, but from what I’ve seen, you usually want to make your seam along the back of the head, behind the ears. Places where you won’t notice an obvious cut.
I’ve used multiple cuts for unwrapping. I’m currently trying out the layout methods used for the Telltale Walking Dead games 2012-2019, which definitely do not lead to an ‘obvious cut’.
My issue, as stated in the op, is “a lot of triangular artifacts around the eyes and banding around the upper skull and jaw”. Do you know what could be causing this, or how I can get rid of it?
I’m poking at it now. At a casual glance, it looks like it should work perfectly. I’ve tried doing a merge by distance to see if you have any coplanar faces or unattached verts in play, and toyed with the smoothing to see if that’d work, but I’m still getting those same artifacts.
Next, I’m going to try to apply the mirror, the subsurf, and maybe make a cage to bake a high poly to low poly from. See if that does anything.
Hi Ren! Thanks so much for looking into this, I really appreciate it!
I was speaking to another user, and his suggestion was to just bump up the subdivisions in the subsurf modifier - I had it at 2, and I turned it up to 4 and… well, it looks like it’s worked! =D
This user told me that smoothing doesn’t work while baking maps - which seems odd, to be honest, but it seems to explain where the artifacts are coming from. Maybe the idea is that smoothing would add extra detail or smoothing that would be counter to the texturing intention. I do not know.
However, this seems like a solution for now. I think there’s a smoothing modifier somewhere also, so I’ll give that a try, maybe.
Again, thanks a million, Ren! What a weird issue, eh? You’d think it’d be common knowledge among low-poly modelers, but go figure…
Baking does take the high and low poly into account when producing the end results, which can occasionally cause problems, but this is the first I’ve heard about it ignoring smoothing altogether.
Then again, this is the first time I’ve tried baking shadows from a a fairly low poly object to an even lower poly one, so it could be some edge case I haven’t run into until now. Either way, the help was no problem, and I’m glad you got it working.
Yeah - I thought the problem might even be something to do with this (https://www.youtube.com/watch?v=oecXkpAoq9U ) but it’s really too low poly to even be related…!
Btw, my contact came back re. smoothing being ‘off’ for baking, and apparently he was wrong about that. =)
Next, getting a highlight map to work…! =) Thanks again!
EDIT: Seems like going to Object Properties → Shading → Offset Terminator , set to .25 fixes the baking issue without requiring extra subdivision. The more you know.
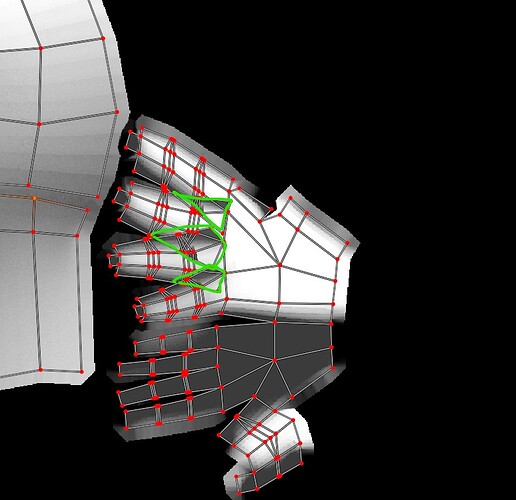
Increase your Render Subdivisions to something like 6, and reduce your margin to something like 4 pixels unless you intend to reduce the map before using it. The artifacts in the fingers are coming from overlapped UV’s - so you’ll have to fix that before you’ll get smooth results (and by “fix” I mean re-thinking your seams and unwrapping a bit differently). You don’t really have a shadow terminator problem, just the fact that the shadow baking doesn’t take mesh smoothing into account - so you work around it by adding a subdivision modifier with a high render setting.
Hi @JoeW ! Thanks for the advice, however the fingers are not the issue (the overlaps in the UV are part of my workflow, though I’m always up for learning better/easier ways to unwrap!), as mentioned in the OP:
The solution to my problem was either the Subdivision or Offset Terminator methods as mentioned in my posts above! Seriously appreciate the input, however! =D
EDIT: Actually - can you point me towards the docs which say shadow baking doesn’t take mesh smoothing into account? I can’t find it, but I’ve been told this twice now…! Thank you!
I haven’t seen it in the documents - but then I haven’t searched for it, either. I just know this from experience. You’ll see this behavior in other software/renderers as well (when baking to textures), and the usual approach is to just use a high number of subdivisions for baking. You’ll encounter this when baking Ambient Occlusion as well.
On the subject of UV’s: Layout and seams will be driven by topology (obviously) and in the case of your hand meshes, you don’t really have a good place to split the hand top and bottom to give the traditional “glove” layout. If you aren’t limited by polycount, I would suggest adding another edge loop splitting the top and bottom of the hand and using that as your seam. If you are limited by polycount, then you may have to set your seams so as to cut the fingers loose from the main hand mesh and unwrap them as separate islands to eliminate the overlap. Again, I don’t know your workflow or limitations so it’s hard to make actionable suggestions.
PS - Be wary of depending on Subdivisions to make up for less-than-optimal geometry - especially on rigged and animated models. You really need enough “real” geometry to get good deformations - or you’re going to see a lot of odd creasing/stretching/collapsing when you animate.
Hi @JoeW ! Apologies for the late reply, I only just saw your response - thank you so much! I first want to say that I really appreciate any intervention or suggestions from experienced users - I’m always looking to learn!
I’m just getting back to the model now - I’ll take your advice and CUT THE FINGERS OFF… as drastic as that sounds. =D I’m not exactly limited by polycount, but I was targeting a PS1-PS2 era polycount (~600-3000 tris). Ideally I’d like to get into the Polycount LowPoly Thread (less than 1000 tris), but I’m probably going to add far more detail in clothes and accessories shortly.
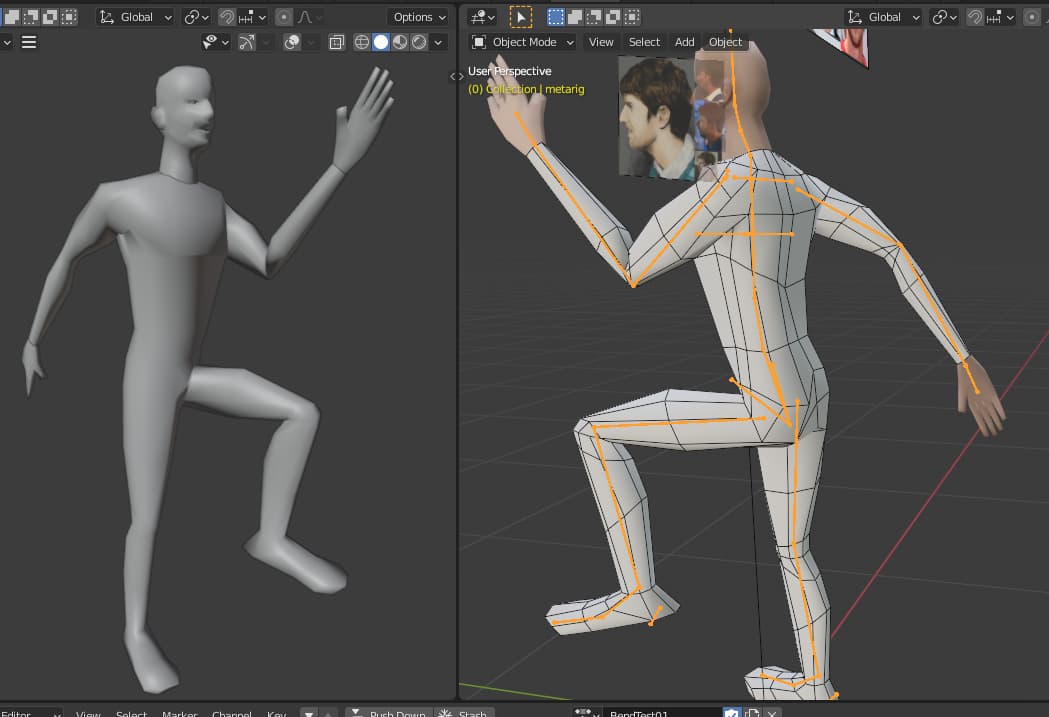
I can usually get workable deformations on characters with this polycount (or less!), but shortly I’ll be working on characters with a lot more tris. Here’s an image of the character in a bend test… which seems to have reasonably functional deforms for ~900 tris. YMMV, plus I’ll be adding clothes etc shortly.
However - I’m basically an ignoramous when it comes to characters! If you have any notes or further advice, I’d love to get it! Really need to improve…!


