Snake FBX test 210420a.zip (1.3 MB)
I’ve got a little test animation of a snake moving along a loop (Curve) works in Blender by using the Curve Modifier and animating the mesh along it’s Y axis. Neat.
I’d like to export this to Unity via FBX. I’m guessing this is not straightforward, and at the least I’ll have to bake the deformations into the mesh. Is this correct? I’ve managed to get a deformed (adhering to the Curve) mesh to Unity (“Apply Modifier” is checked in the FBX export dialog) , but the imported asset doesn’t display any animation frames.
Nothing like trying to learn TWO complex softwares at the same time.
If you want to export deforming animation to a game engine with fbx you need to animate the mesh with bones (most common way for games). Otherwise you need to use a vertex displacement format like .mdd or Alembic.
Add some bones to the snake and constrain the bones to the curve instead of the mesh.
I’m looking into this method, and the first tute I found is a little aged, and seems wildly round-about, with, I’m hoping, a lot of extraneous Objects:
I’ll continue my search, but surely there’s a more direct method to constrain a single-linked armature to a path/curve?
The simplest solution would be to just add the SplineIK constrain and then be done, but that doesn’t work as you can’t move the armature with that constrain on. So we need to do a little workaround and I didn’t get this to work at first, until I found the little magic button in one of the modifiers.
So this is what you need to do.
create a curve that is as long as your bonechain and with the same amount of segments.
I call this curve the bone_curve.
select your armature and go into pose mode and select the last bone in the chain. Add the SplineIK bone constrain to the bone and set the chain length to the same number as you have bones in your armature. Set all chain scaling to none.
Now we can make a curve that we want the bones to follow.
Choose the bone_curve and add the Curve modifier to it and select the curve to follow as curve object in the modifier. Now there is a little button highlighted in green that you must press for this to work.
Now when you move the bone_curve it should follow the other curve.
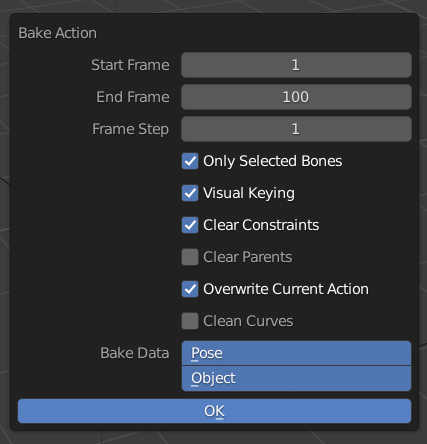
Now you need to bake this to be able to export the motion to a fbx file.
So save your file as new file or duplicate all your objects before baking so you have the originals to go back to later.
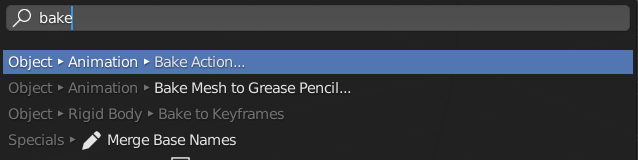
Select your armature and search for bake action
Oh, We have the same experience of baking the curve modifier.We use the same way to deal with it. This need me to bake twice with armature. My paper rolling up can work well
Bloody genius! You’ve answered MANY people’s questions with this one!
NOOB ALERT: the Bone Constraints tab can play hide and seek with you-- just spent some time watching the tab appear and disappear (thaaaaanks, devs). For instance, it doesn’t seem to appear in (Bone) Edit mode. It does appear &function in Pose mode, so that may be the quickest way.
Sometimes the Bone Constraint tab appears, but the dropdown is all ghosted. (Wow, so convenient!) I hate the modality and gas-lighting here, now-you-see-it-now-you-don’t UI ‘philosophy’. It doesn’t make the UI ‘cleaner’, it just makes it confusing. IMO the Bone Constraints tab should always appear if Armatures or Bones are selected.
I understand it like this, it will manipulate the curves/surfaces(nurbs) and send the curve/surfaces as they are and not convert the object into a mesh as it seems to be doing otherwise. That also explain why the splineIK didn’t work before pushing this button as it only works with curves. I don’t know if this was any better explanation?
I don’t really know. But as you want the bone deformation and all bones are in the armature I would assume that you would need to check that button. Otherwise it’s easy to do two exports, one with it checked and one without and see what differs when you load it in.
Good Luck!