I was watching some tutorials on charter animation and saw the user moving the hips and the entire charter reacted. When I do this the bones move like they would if they were not attached. I’m in pose mode and selected a bone. Is there a way to attach bones so they effect the connected bones instead of acting independent.
did you make the rig yourself from scratch?
if so you need to look into bone parenting in edit mode of the armature
select child shift select the parent Ctrl+p
connected will make the bone sticks into it’s parent tail
keep offset as it’s name suggests it will keep the offset distance
I started with an existing one and added bones, they are all parented if that is what you mean. Nothing is parallel to other bones.
How did you add bones?
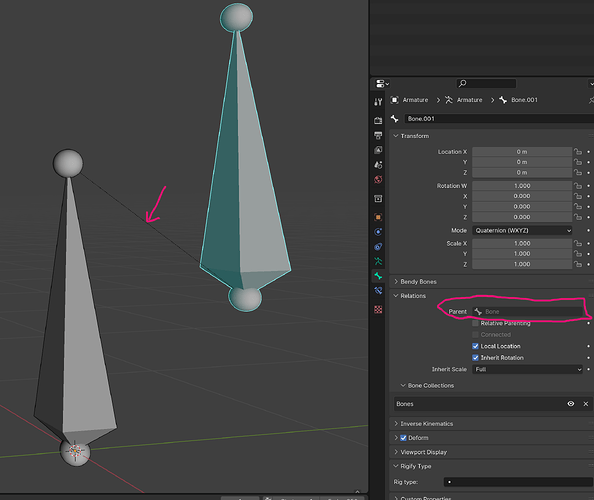
if you select what is supposed to be a child bone do you see a relation line like this, and you can see the parent in the bone proprieties:
connected is more easy to spot even in edit mode they will move together (parent-tail with child head)
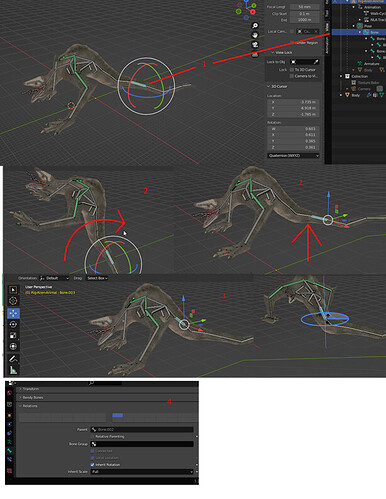
Hey cGPixel, thx for offering help, I’m lost here I think. Let me add some screen shots to explain what confuses me.
issues, number to match screen shots
First if click a bone it does not select that bone in the hierarchy, I really hate that. I have to first click in the hierarchy to see what is what.
-
Another is my root bone is in my tail, I imagine this is bad and may have to re do all my parenting.
-
moving or rotation makes that action change for all my object, not just the part I want. I’d expect the tail to bend.
-
if I try to use the move tool, it rotates the bones?but here is sorta acts right, mending the mesh. but I wanted to move not rotate?
-
I know it would help to have my bones labeled as it didnt come that way. That is a todo for sure. but yeah I see parents relations
-
The tail as a root bone… Super bad! I would except the hip. The center of gravity of your character. Better is to have a main root bone on the floor (you will see the benefits of that over time) and then the hip child of that. After that think of every limb as a chain (dettached child from the hip but a connected chain ) growing from the hip (and other chains like arms child of spine and spine is child of the hip) to the end of the limb. (Direction of the chain is important too)
-
Rotate that bone will rotate all. if it’s the parent… Of course. That’s what’s parenting is about.(child inherit parent)
-
Moving a bone it rotate… If it’s it is CONNECTED CHILD that’s the behavior. Since it’s head is connected to the parent and it can’t control the parent. Only it’s tail move and that results in a rotation.
-
It will help you more yeah
Sorry im on mobile right now. And can’t offer screenshots
Ok I didn’t really follow (2) but also I think I need to re parent things and label them. I will work on that.
- If you rotate a bone. All its children will rotate with it. By default all child inherit the parent transformation. Move, rotate and scale. Unless you work on disabled something.
Oh whoops, sorry I meant t (3).
but I’d expect this
(2:53 for motion
(7:39) for rotation
When that guy rotates the charter bows, it does not rotate the entire thing. I am in poser mode.
- if a bone is a “connected child” think of it like a hing in pose mode
i was about to tell you this when back on the computer to be prepared to learn constraints and FK/IK. bones are FK by default at 2:53 that’s IK
i would even recommend using rigify, but if you want to learn you’re on the right track
so yeah what you really want is to learn how to set up an IK constraints
to be sure you understood the parenting and chains first before moving forward with that:
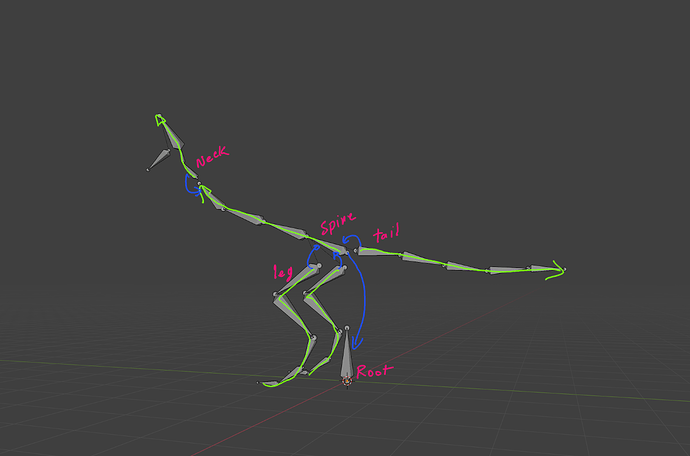
here is an example:
the pink names are each individual chain and the green line showing the length direction of the chain, that’s what we refer too as Connected children
the blue arrows are children with offset
you need that root bone too (important) cause you will make it the parent of the IK controllers in the next step which is really what you want (that’s why moving the hip isn’t moving the end of the limbs) cause they following a controller and the controller is the child of the root
then take a look here. and let us know if you need help with IK…
well, I saw how rigify works and the cat may do the trick for me. But how can I delete my current armature and leave my mesh in the shape its in now? When I delete it my mesh goes back the way it was before I transformed it to the pose I wanted.
Or I could just resize the cat skeleton and fit it in place. but the pose the mesh is in would be better if it would stay how I have it rigged.
go the to modifiers tab of your mesh
apply the armature modifier before deleting the armature object
if you looked at how Rigify works, i assume you already asking about scaling the METARIG to fit your model before generating the real rig.
possible… one thing to be careful about. if you scale it in object mode
press Ctrl+A => apply =>scale
or you can enter edit mode (not pose mode) and select all the bones and scale them
Damn amazing man! I may have to ask a few more thing as I attempt this but yes my model is how I want it now. Time to rig with rigify.
I have to say everything is much nicer now. There is one last thing that still confuses me. Some times when I grab a bone and try to transform it in poser mode the move and mesh move independent. Sometimes they move like I’d expect, all joins react. Other times, it rotates not move. I do not understand how to do what I intend to do, its like bugged or random and nothing makes sense.
I’d like to grab the hips, and move the position around the screen while the other parts react, I have seen this done and have done it myself, but can not do it when I want to.
I will say I had to remove some bones, but only limbs no rooted or connected points. Everything is still named ok, and seems linked.
is this about Rigify rig?
some screenshots or screen recording will help understand your issue
yeah rigify, I just made a new bird and made a video.
rec.mkv (4.4 MB)
I’m looking for the action seen in the video “learn charter animation” above I posted @ 2:53
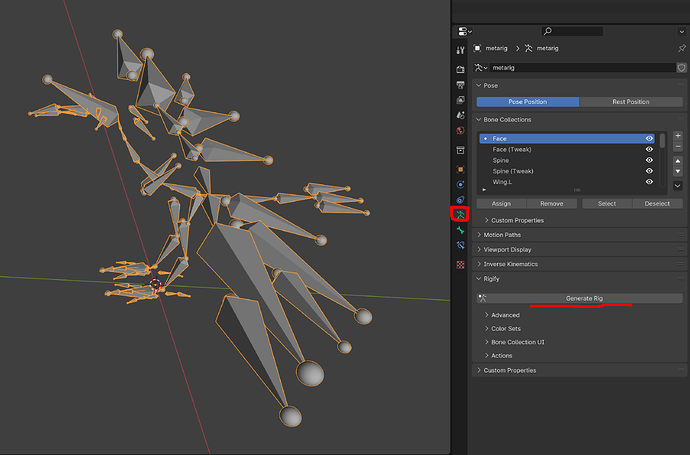
that’s the “metarig” you’re trying to manipulate. and not the rig at all.
in a nutshell:
the meta rig is a template (it’s just made with bones too)
it’s goal is to place your bones (in edit mode) where you want your bones of the rig to be (so you’re telling rigify where the create your rig)
then you will hit the generate rig option: and rigify will generate the real rig
another more sophisticated armature object with more bones and controls that will behave like you want and see on videos
i really recommend watching some tutorials about Rigify
i recommend @ToshiCG CgDive tutorials on youtube:
https://www.youtube.com/@CGDive
yeah I see there is a rig layer, I do not even know how to open that. I go to the same place on my blender and its missing. Will try that video.
I think I was missing generate rig…
