Like obviously an hdri is the real image thing, but the sky texture looks unbelievably fake.
It’s not intended for a background in a render- it’s for lighting a scene using scientific models of celestial and atmospheric illumination ![]() you can use a Light Path node to have one background for lighting and one that’s actually visible
you can use a Light Path node to have one background for lighting and one that’s actually visible
The Nishita is ok.
Well it would only pass for a clear day (no clouds) and more or less turbidity but it is not that bad.
The default settings are very bright so you either have to either turn down the strength in the background node or adjust the exposure in colour settings.
With a bit of tweaking it is not that bad for a “clear” day.
Also if using a sky HDRI, Nishita is the go-to to tweak the HDRI output to match a reference level. You want those indoor lighting assets to produce believable results in combination with the sky. A downside with Nishita is that it doesn’t have any control for indirect lighting from the ground, that stuff has to be setup manually and realistically.
I’m using Nishita pretty much all the time, using light path to show background plate for camera rays and possibly HDR reflection plate for reflections. I’ll do some window pulling to not overexpose the outside too much, but not overdo it or it will just look like garbage.
could you show an example scene if its not too much trouble?
I’ll try to remember it, but no guarantee ![]()
Using Blender Nishita Sky demo file and a HDR from Ethereal Skies, you will see that Nishita is actually pretty good. For a complete artificial tool, is very capable of achieving good results with some reference, and it’s lightweight. Won’t have many details as a good HDR, but it’s not that bad.
Ethereal Skies HDR:
Nishita Sky:
You can add other textures, gradients etc to your sky texture.
what do you suggest for realistic clouds?
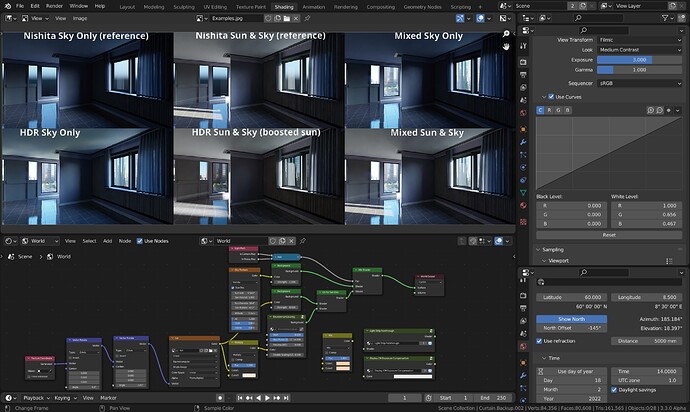
Example of a typical workflow - and I happen to use “LA_Downtown_Afternoon_Fishing_3k.hdr” a lot. I’m pretty much locked in with the time and date given that sun elevation in the HDR with a fixed rotation of -9.3 to reorient the HDR to the time, and now I can orient northing as I see fit to any angle and use that angle in the other rotation node.
Left: Here I know I will be rendering with sun, so I don’t attempt to bounce Nishita back into the ceiling as the sun bounce will overpower that effect anyway. Hence the HDR version appears to have brighter lit ceiling when no sun is used, because the “ground” of the HDR produces quite a bit of light.
Middle: Turning on the sun I get closer to ground truth with the HDR, but I have to color correct for the sun in this one, and also attempt to “boost the sun disk” to appropriate values using the environment scaling node (too old, ugly, and buggy to share) since the sun is clipped in this particular HDR. The shadows are softer because the sun disc and sun glare are all at the same maximum value, no simple solution to fix this with nodes alone.
Right: What I achieve combining lighting with Nishita and camera+glossy (depends on situation, usually I get away with nishita for glossy too) for a sky only render and a sun & sky render. The room is quite dark in shade so not a lot of light gets bounced in this particular example. All renders use exposure 3 so the non sun ones look significantly underexposed.
After a denoised test render, I measure some point I want to retain closer to white, add it to the top of the mix RGB node. Then I crank up the value to 1, copy the color to the bottom slot and desaturate it slightly to not completely neutralize the picture. Then I switch to RGB mode and copy the RGB values of the slightly desaturated colors of the lower slot into the CM curves white level.
If you start adding interior lights with a color temperature, say 2700K-3000K for typical warm household lights, you might want to take another color measurement and slightly neutralize for that to get it closer to white. Or you can do it in post. Slightly more cumbersome imo, but it won’t screw around with node previewing, where I will often switch to RAW anyway (to view values).
There is no scientific fast way of doing this. HDRs varies in the conditions they portray, cloud and mist, exposure setting, clipped vs non clipped, and white balance. If white balance is available and adjusted to “appear more white”, you can try to restore it to 6500K (or 5500K?) to get “recorded” colors back. You may even have to adjust the Nishita parameters, ozone, dust, sun disc size and sun strength and so on, in order to get closer to the conditions portrayed in the HDR.
But, that’s just how I think about this, having some experience in photography. I’m not trying to be too accurate, I just want ballpark values that kinda works with interior lighting assets I use. And yeah, sometimes I tweak those too. I’m looking for a pleasant good enough result, not hyper realism.


