World settings, how to get same settings as earlier versions of Blender

Going back to version 2.79 and any earlier 2.7 versions there was a method of setting up the world background that I used that did create a cartoon looking background yet worked very well for perfectly fitting an image as a world background plus the edition of adding the texture feature of clouds that seems to have disappeared in the 2.8 version. The process in 2.7 series went like this, first I would add a nice blue sky as a background by clicking on the World button then check box the “Paper Sky” option and “Blend Sky”. From there I would set horizon color to a light shade of blue while setting the Zenith color to a deeper darker shade of blue. From this point click on over to texture and choose the clouds option after opening a new texture, and then fine tune the variables for clouds.

As an alternative the option of opening an imported image into your scene as a background was relatively a stable procedure of instead of choosing clouds in the drop down menu for texture select “Image or Movie”. From this point move down to the menu option entitled “Image” and select “Open”. You would then browse through directories to locate the image you want to place into the World background. I would then proceed to “Influence” panel menu where check marking all four options of “Blend”, “Horizon”, “Zenith Up” and “Zenith Down” would result in the entire image no matter what size to fit into the World background of my renders sometimes streched yet without any cropping. From there you could adjust the size with the “Mapping”, “Image Sampling” and “Mapping”.

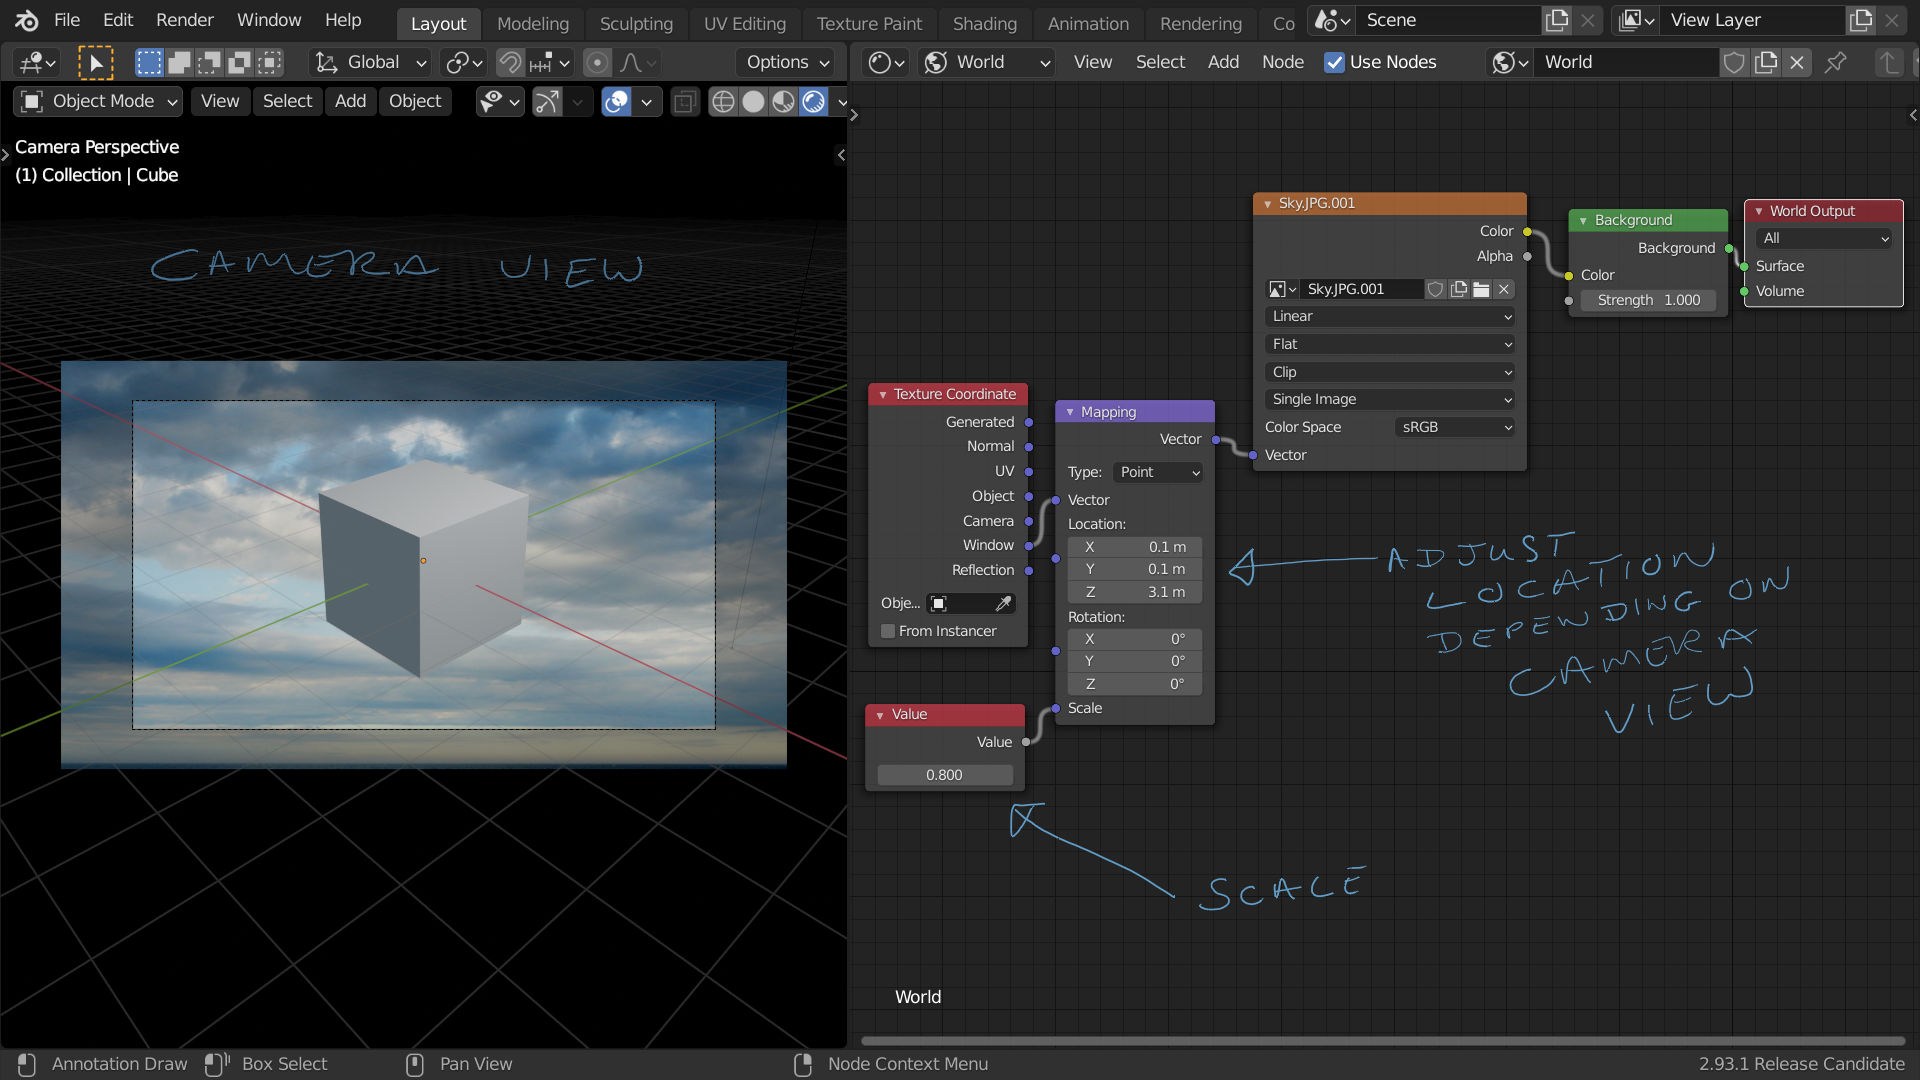
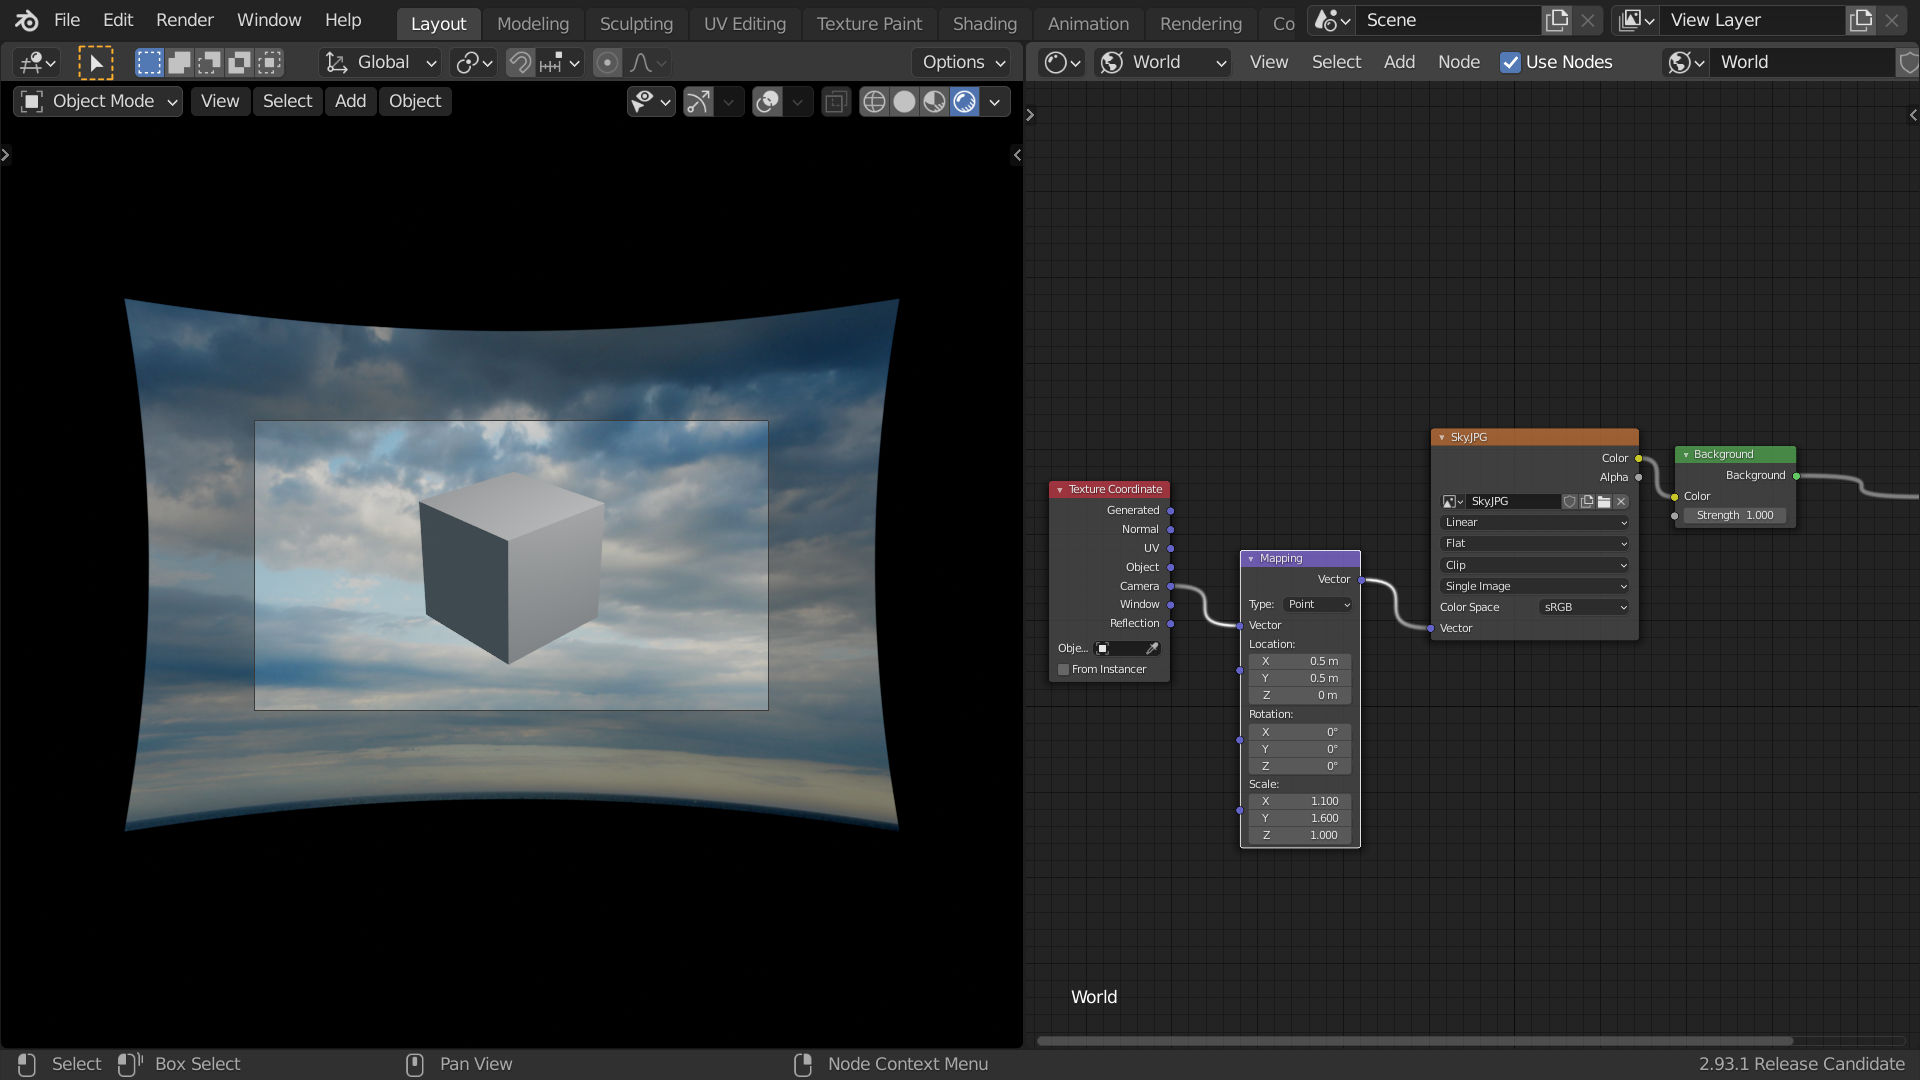
I have tried to figure out how to get these same effects and settings using the 2.8 series of Blender and find myself unable to get any similar results. Watched some tutorials at “You Tube” and also went through the current Blender manual. Have played around through trial and error and cannot seem to get the shaders and nodes correct to come up with the same results. Everytime I add an image to the node settings in “World” by selecting the texture options of “Environment” or “Add Image” the result is a segment of the imported image totally blown out of proportion with only a small segment added to renders. Have tried connecting some vector nodes such as “Normal Map”, “Normal” and “Mapping” yet cannot seem to fit the imported image into the World background with desired settings of projecting the imported image. Tried some other add on nodes that did not work, cannot find the settings I am looking for. What am I missing here, there’s got to be a way of doing this correctly?

Again is there any way of adding clouds to your world setting as a texture that was available in 2.7?

Separate out z coordinate in texture coords in world tab and control colors using a color ramp.
As for mapping textures, are you using an equirectangular map for environment map? For background plates, maybe using window or camera coordinates? Not sure.

For environment map I have tried all the different options available starting with default settings.
Have noticed a flaw in the menu selecting here trying different variables. Once you choose a different setting in the texture environment map other than single image, any attempt to go back to the single image setting will not bring back the image you imported using this node. You wind up getting the default color for texture material that goes back to version 2.7 series an offset primary red and secondary purple material color. Switch in the menu from image to image sequence and you will loose that imported image for some reason. At this point you have to load a different image into this node to clear the old one out and return to default settings. This is something I discovered trying different menu settings in the environment texture node.

You mention separating out z coordinate in texture coords in world tab and control colors using a color ramp, confused on what to do here.

Getting back to the way texture clouds worked for World settings in 2.7 series to set up some decent cloud covering for your blue sky, that was not added to the node texture menu. By creating material without shader nodes, the option is still in the menu for material textures yet it does not work anymore that way. Strangely I saw this You Tube video on Blender Tutorials where this guy used this cloud texture materials to create a low poly ground terrain for a landscape. Strangely something called a cloud texture no longer works for that yet now is usable for low poly ground terrain? :grey_question:

I am not familiar with the method you used in 2.79 but things have changed a bit since then.

The environment texture node is intended for using hdri equirectangular images and mirror ball images, it will distort and blow out a normal photograph. You can download lots of free hdri images from https://polyhaven.com/hdris . Hdri images are one of the best options as they are 360º images that “en-globe your scene” also they do a good job at lighting the scene and will give you nice reflections.

If you want to use a “normal” photograph as a backdrop you should use the image texture node.
Map with “Window” coordinates for best results and adjust the location/scale in camera view.
Setup nodes up like this:

Camera coordinates will distort the image a bit like this:

Another method would be to import the image as a plane and parent it to your camera. That way when you move the camera the backdrop will move with it.
Import images as planes is a free add-on that comes with Blender.
Import the image as a plane and setup its texture nodes like this:

Give the image plane the same rotation settings as the camera and then parent it to the camera.
As you have parented the plane to the camera when you move the camera the plane will follow it and stay in place.
You can move the image plane behind your scene objects using the gizmo with the object gizmos “local” option (you can also move it up down and from side to side with the gizmo in “local mode” respecting the rotation angle of the camera). Look through the camera and scale up the plane to fill the camera view.

As for the texture clouds no there is no cloud texture node, you have to use a noise texture instead. A similar situation is the old wood texture, with nodes you have to use the wave texture.

Clouds texture:
The old cloud texture is still there in the texture tab but is not implemented in the material node system. So yes, you can use a cloud texture for a displacement modifier or a brush in paint mode but not in a node tree. There is a technical reason for this (that I can not explain), the textures were rewritten for the node system.

Here is a “world” node setup to get stylized clouds above the horizon with a noise texture using the sky texture node without a background image. I have use the Nishita option in the sky texture, which will only work for cycles, there are 2 other options that will work for eevee as well (not as good as the Nishita).

The math node in the gradient section controls the height of the gradient that mixes the sky with and without clouds.
Edit: Note that I separated the z vector in the gradient section as CarlG mentioned, this maps the gradient from top to bottom on the z axis. You could replace the gradient node with a colour ramp to get further control of where the cloud line is, for example with a colour ramp that goes from black to white then to black again you would have a line of clouds above the horizon and no clouds at the top.

Sorry for a long answer, I got carried away!

@DNorman

tried the latest set up
and how do you change the bottom color
too yellowish i guess

thanks
happy cl

Hi Ricky, copy the settings I have in the sky texture.

i did
but look at render the bottom is very dark yellow
is there some parameter to change this

or what is the yellow suppose to represent ?

thanks
happy bl

Sorry I was eating!
Edit:

When the sun goes down it turns more yellow then orange then red (because of pollution and particles in air) if you lower the sun elevation further it goes red. If you turn the ozone down (I had it up to get the blue sky) the orange/yellow gets more dominant across the whole sky or if you increase the air parameter.

Yes probably, I just liked the colour contrast.

Edit 2
I just realized you want to get rid of the yellow! Simply turn the air value down. :slight_smile:

air seem to change that yellow color

now how do you normally set up the camera
is it at 0 , 0 , 0 ?

also is it possible to show some clouds high up in the sky ?
what controls the amount of clouds ?

thanks
happy bl

Yes, also it is possible to completely change/tweak the colours of the Nishita sky to get a personal or alien look take a look at this thread, the examples are a bit extreme but you can be more subtle:

The camera is not at 0,0,0 the sphere is. I usually adjust the camera with the lock camera to view option as it it very intuitive. In this case I did not actually use a camera it was a screenshot of the viewport.

The cloud coverage is controlled by the gradient texture node in the “gradient” frame, the math “add” node simply lifts and lowers the gradient, so if you change the value in the math node (now -0.3) the clouds will move up and down. The gradient is mapped vertically on the z axis.
To get more control you can substitute the gradient for a colour ramp. With the colour ramp you can add stops and get a “band” of clouds and use the sliders to position the transitions.

The density of the clouds is controlled by the colour ramp in the “sky with clouds” frame, their size is controlled by the noise texture size.
You can make another copy of the “sky with clouds” frame and change the values to get some different clouds and mix them together, you could also use a different gradient to map them and have different types of clouds at different levels etc, etc.

tried to change the clouds but not working

will work again this night and see what i can come up with

i do have a lot of old sky with cloud’s map
but would like to have a more procedural clouds and no UV image

thanks
happy bl

Thank you for your valuable time and consideration. Your examples and explanations are helpful. I have gone through the first example here using a normal photograph.
This example reminds me of how adjustments were made by importing an image into texture settings through 2.79, working with adjustments for mapping and image mapping.

I have been creating digital paintings with Corel Painter, Art Rage, MyPaint (Newer integrated into The GIMP), and Paint Shop Pro for over 15 years now and have a lot of finished images that I like to try while experimenting with Blender for the learning experience. Not really into photography, never use a camera except in Blender.
Landscape paintings and fractal images sometimes make interesting backgrounds.

1 Like