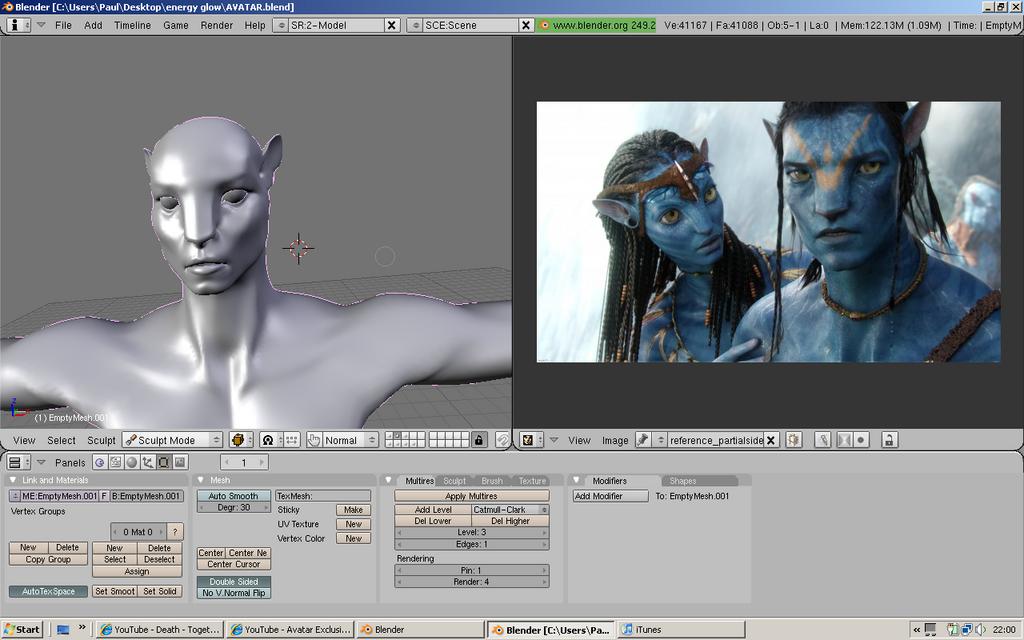
His muscles look weird somehow, too flat maybe. You know everything that is organic never is flat or has straight sharp edges in it. Very round…
hmmm…i dont know it looks fine to me and matches the referance images pretty well it probly looks flat just because the view is in orthographic mode and doesnt have the perspective distortion that would make things pop out
I think that the “smoothness” will come when the proportions are right. First the whole body “blocked out” and then you can start to make smoothness. It is more quick and much more fun than taking pain in each polygon you create. When the “blocking out” is done I like duplicate the area and multires and sculpt that area, then retopo and join to the mesh.
heres another update, i tried to make the muscles smoother and i moved the rib cage down a little bit more. im gona start on the arms now, and i really must say, if it wernt for the comments and links to references iv been getting this model wouldnt look as good as its becoming!
Attachments

heres some progress on the arms and legs, but the arms look weird for some reason, but i think i’ll keep that way for now until i go onto sculpting. i’ll probly start on the hands and feet now and model the tail
Attachments

Instead modeling arms in 90 degree angle with the body make them 45 degree and that way when rigging the deformations are much better. Also it is easy to figure the placing of the center of rotation in the shoulder.
Bao2 i tried to make the arms bend as you said but i couldnt really do it with out deforming parts of the model. i made the hands and feet and have now moved on to sculpting, heres a screen capture, im trying to make the model look like jake and i think i got the face dead-on but i need to make the chin go down a little but more
Attachments
Yes, that is the problem and will show much more when rigged. If you create the arm in 45 degrees to the body instead the 90 you used then you almost rig without any problem of deformations (compared to 90 degrees). I am thinking myself of doing the same with the legs of Neytiri too because I am looking forward and see problems in the knee if modeling in the way I am doing.
Looking already like a child from Neytiri with Jake !!! ![]()
I think it is not the chin but the mouth that is not well placed. The distance from the upper lip to the nose seems much greater in your model than in the reference. Check always other photos (side view etc) because the perspective distortion is misleading.
Next time please post a front view and a side view too.

haha thats awsome! ok i’ve made little progress on my model, and ive decided that the feet are too poorly made to continue sculpting in that area and i’ve decided that most of the mesh is good enough to just start on the retopo
Attachments


LOL at the side view with the tail… Is he looking to Neytiri? LOL
Hands seem big to me. Thick of the arms seems too much mainly in the biceps area and the arms too seem much larger.
I noticed that Jake Sully’s shoulders are wider than any of the other Na’vi. Just something to keep in mind.
Great job.
The arms look way too big. If you compare to everything else.
The arms look way too big. If you compare to everything else
they seem alright to me according to the refrences im using his arms are pretty big, but now that you mention it his legs look tiny compared to his arms.
LOL at the side view with the tail… Is he looking to Neytiri? LOL
Hands seem big to me. Thick of the arms seems too much mainly in the biceps area and the arms too seem much larger.
haha no, i modelled the tail that way because it seemed to be more animation friendly to me for some reason, and the thickness of the arms and hands could be exagerated by the fact that those images where rendered in ortho.
I noticed that Jake Sully’s shoulders are wider than any of the other Na’vi. Just something to keep in mind.
Great job.
hmm never thought of that thanks
heres some progress on the retopo
Attachments


i’ve been meaning to post this update for a while but ive been putting it off, but i guess i’ll do it now that the other avatar related threads are posting updates. also i’ve been playin around with RIB mosaic recently and have been expirementing with subsurface scattering, before i was dissapointed with the resuilts i got from aqsis and pixie because the sss looked kind of hard and not really like sss, but after i got frusterated and set the RGB scales and the scattering radious rediculouslly really high i got pretty damn good resuilts in my opinion, the sss finally gives the “soft” look i’ve been tryin to achieve. the rendered image i posted with the susanne mesh and the two jake models where rendered in aqsis, just so you know. i was gonna render them with pixie but it seems to that only one lamp will contribute to sss when i use pixie. also all three objects have varying scales and scattering radiouses and disregard the fact that jake is purple i was trying to mimic a type of layered skin material by useing one material as opposed to multiple materials but i have failled
EDIT: the aqsis render posted all weird for some reason, the erea were the sky is came out black with a nasty border and GIMP saved it as jpg even tho i chose png for some reson
Attachments


Instead of selecting “png” in the combobox try to add the extension in the filename and you even don’t have to select in the combobox.
I didn’t thought that the blue SSS were difficult to do and now I am intrigued. Before this WIP I was doing another one about a very known barbarian and I posted some tests of SSS and i found it was very near to what I wanted, so I thought with these smurf guys there will be no problem. The SSS is very well explained in the number 16 of blenderart free magazine. Download it and read the multi-layer SSS shader there.
The blue color is almost the negative of a normal skin photo. Take a photo of a human and make it negative and you have an aproximation that only needs some correction to the cyan. So I expect doing this thing with some skin to get an aproximation and then correct. I always always always use an eyedropper and a calculator when trying to obtain a color in some render. I also use colorcard to calibrate my lights. I hope to explain it better in my Neytiri thread.
I think it is better to use only blender internal if there is the possibility of my Neytiri joining your Jake Sully sometime in the future. And perhaps we can convince the Thanator to join us!
The face of Jake looks too much wide. I would scale the whole head vertically.
actually i know how to use sss in blender internal but with aqsis and pixie its handled differently so you have to mess around the settings in order to get the resuilt you need, im not sure how blenders implementation of sss works but i know aqsis and pixie fake it with depth maps. also those realtime renders of jakes head where done in ortho so ther isnt any perspective distortion but i’ll check some reference images to see if it really is too wide
When rendering the image I can see it creates a depth map of the material that you can see in the render, and then it replaces it with the final render so it is probably working the same as renderman.
I think it is better idea use blender internal and jump to the blender internal in 2.5 when they code the “new way of materials” that they are working on just now. That way the WIP will be a way to learn 2.5.