^^ Looks really nice.
Another utility node rather than a material. Basically a group that creates 18 random 0-1 floats based on Object Info/Random node and some vector constant that acts as a seed. To the right in the screenshot you can see how I use this to drive 18 inputs in 3 material components (PBR.Base, PBR.Coat, and PBR.Sheen, inspired by PBR approaches and Disney shader, where Coat and Sheen are optional). Just messing around, maybe useful for some:
Resulted in this image, same material applied to all spheres:
The wetting material on the “table thingie” is just something else I’m toying with.
Another one. Was actually going for something slightly different, but this had a nice appeal for I in certain cases I guess.
The node setup (stepfunctions are extremely useful for anyone toying with materials):
And what it produces:
The blue nodes are what you’d typically expose to user tweaking.
CarlG - Some really interesting ideas and approaches going on. I look forward to seeing more.
For this one, I was attempting the chrome look achieve in this post by minoribus in his fantastic needless things series, except of course I want it to be all procedural and usually not invoking more than one shader (for speed). The shader group actually has two anisotropic shaders, but its setup makes it so as to choose only one of them; GGX for all general purpose stuff, or Bechman which I will try to explain the usefulness here.
The material below is useful for polished metals (very low roughness), with scratches and dents increasing the roughness slightly to catch light better. But not so much that dimming the fresnel becomes a necessity. I do that in my base shader (PBR approach), but I’ve tested it with glossy/anisotropic shaders too and it doesn’t go crazy. You can always opt to reduce what goes into roughness.
So, the basic material setup of a scratched and dented chromium (are those chrome values correct? other conductive fresnel examples I’ve seen here give off colored edge). It’s not intended for massively scratched or roughed up metals:
Blender limitation: I’m not allowed to paste more than one unique group input/output node, but Util.Math.fLerp should have Input/Val0/Val1 inputs and Output, whereas Util.Math.fStepfunctions should have Input/Edge0/Edge1 inputs and Linstep/Smootstep/Smootherstep outputs. fLerp can be replaced with a color mix node, this does the same thing, is less flexible, but only does it for one channel. In this case, the fStepfunctions can be replaced with a color ramp or RGBCurves, but I find the damned things impossible to control (twitchy on the input side, and you can’t control their behavior with other nodes (like variable step points based on user choices but that’s not used here anyway).
The node highlighted in red is pretty much where the magic of the scratches happen (given that Musgrave settings input, which is not normalized to visual ranges). I have no idea whatsoever what makes 2.000 work and nothing else. Might be a bug/feature in fBM? Nonetheless, it does give me the stuff I want.
If you setup this stuff, be sure to use node wrangler so you can see exactly how much each node changes the output. Previewing the node bump is a fine way to see final size, density, and wriggling of the bumping. I’m mixing the two bumps rather than adding them, for previewing purposes. Rendering this stuff out produces something like this:
Bottom Right: Scratched isotropic chrome, GGX.
Bottom Left: Scratched anisotropic aluminium, Beckman (full aniso, medium roughness - about 7).
Top Left: Scratched anisotropic silver, Beckman (full aniso, medium roughness - about 7).
Top Right: Scratched anisotropic copper, GGX (very high aniso - 0.8’ish, very low roughness).
And I absolutely hate GGX based anisotropic for metals even if everyone else say use GGX for everything. It looks absolutely horrible, and the light tail doesn’t seem to stretch much at all while being soft in the perpendicular direction.
Possible bug: The teapots were UV unwrapped to be used for anisotropic tangent control (needs only rectangular grids). Base and lid can easily be done with z radial, but that won’t look right with nose and handle. But the anisotropic shading fails miserably across the UV seam. I also tried completely normal anisotropic shaders with no fancy stuff and more reasonable inputs but it still fails. I’ve tried to camouflage the error here by adjusting the lighting so the highlight covers it fully.
For ref, my PBR Base Shader, loosely based on the ideas discussed here:
As always, if creating node groups, be sure to plug in a bump strength as input first before replacing it with another one. That makes the sliders a lot less twitchy than if clipping out a value node.
These shaders are working great, CarlG. Unbelievable what you can do with all these math nodes. Sometimes I wish, there would be a node that would simply processes a script and would allow numerical inputs.
Thanks for sharing all this elaborated work!
Kind of a breakthrough, the following one. I’ve done this in the past in other software, but couldn’t for the life of me remember what the approach was. I made a separate thread in the tips&tricks section, but apparently that has to be approved  In case it doesn’t make it as important enough of being there, I thought I’d mention it here as well.
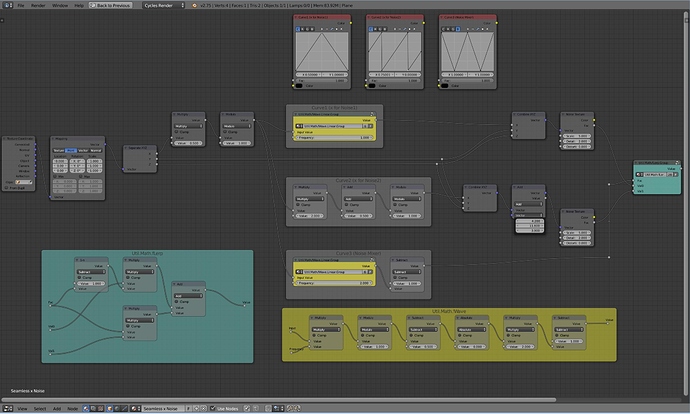
It’s basically mixing two noises together with curves controlling x inputs of both, in such a way that the end result is seamless noise in the x direction. Now, there is a visible mirror, but it is at a disjointed location so it’s not that obvious. In current state (with mirror), it’s useful to create radial brushing patterns without a visible seam, but not (due to mirror) to create a seamless planetary texture.
@minoribus: Some of the “math nodes” do the same as some color nodes, but only at one channel. See also this post for efficiency question about just that.
Ok, here is the node setup.
The math frames does what the unused curves at the top does (to x). I just kind of hate using the twitchy curves, which will also fail at discontinuities.
Think of this post whenever you go “I wish I could hide this noise seam” 
Hello people, thank you so much for that thread which became cool learning book for me about cycles materials.
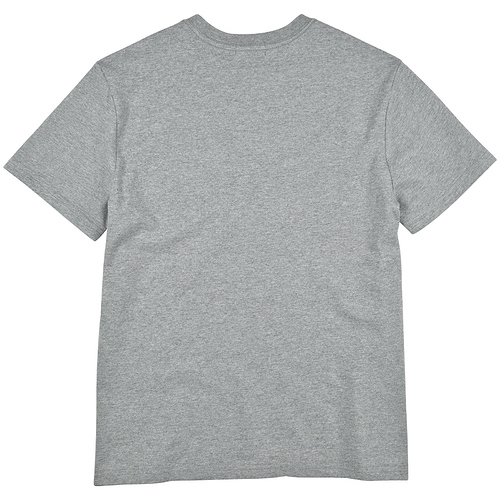
And I want to ask help, mayby somebody already have experience with that material - I’m looking for jersey cotton, which is usual for T-shirts and Longslives, slightly melange and not thick in drapes. Something kind of this:
I was sure there are a lot of ideas about how to make it as a procedural material but actually didnt find any tutorial or ready shreder(( Would you be so kind to help me a bit?
I’m pretty sure I saw an OSL based fabric material, but I’m unable to find it at the moment. There was also a pretty good felt material somewhere in this thread that could be a good starting point. I think you would be better off asking in a separate thread, and clarify what is important to you. I may be able to help with the coloring (see post above for seamless noise in x, which I have simplified a lot yesterday, see image below), but any underlaying bumps may get trickier, if that is important to the shots you’re setting up.
Assumptions and observations based on picture: Being a shirt, it will end up on a character, which forces the use of UV unwrap. It has a horizontal streaky noisy gray pattern with dark and light spots (perfect for noise), but on the sleeves this direction changes. UV unwrap and noise are sworn enemies due seamless being tricky, but if the shirt had a visible seam anyway you wouldn’t have to deal with it. Can you provide a model of the shirt, UV unwrapped with seams where you want them, and possibly photos of shirt also from the backside and closeup of the pattern? Preferably in own thread.
Anyhow, improvements to the SeamlessXNoise setup above:
Ignore the stuff in yellow unless you for some weird reason require to use Object based Texture coordinates (which have negative coordinates due being centered on object). For UV or Generated, a normal math based modulo is all that is required (green nodes). See also this post for more details and example of what it actually is capable of

i created some OSL shaders a while ago that could be useful:
http://www.swineworld.org/2012/12/a-fabric-osl-shader-for-blender-cycles.html
http://www.swineworld.org/2013/02/a-fabric-shader-using-gabor-noise.html
http://www.swineworld.org/2013/10/osl-lace-curtain-shader-for-blender_27.html
Toyed around after getting inspired by Martin Norris in this post and came up with some kind of crackled paint pattern (or something). Looks really awesome as a bumpmap. Adjusting the 5 orange controls typically to be exposed will produce wildly different crackle patterns. Large scale “billowing” which cracks up and leave a valley in between. Uses two voronoi and one noise generator. Unfortunately a lot of noise detail is required to get the look I like at least, so may not be of the fastest setups. The nodes are actually quite simple:
And one of the results possible, used as bump map for a simple shader setup:
Orange nodes to be exposed have some meaningful labels, but I won’t even try to explain in detail what they do

The simple material nodes layout I attached works for most woven fabrics. It falls apart a bit really up-close, but at most distances the checker pattern is enough to fool the eye without needing detail. Change colors to suit, and for cotton you’ll want a finer scaling to the checkers. Put some thin particle hair over it, and you also get a good mat for a loose-knit sweater. (That’s how I used it recently.)
Attachments
Looks like a great material - might have a play with this when I get home ![]()
I would add a surface shader to go with that too just to add a tinge more realism (by way of getting lighting effects only possible with surface shading).
I’m pretty sure you can’t do that with Volumetrics.
True, the lighting effect will only be on the surface of the object, but in this case the relative lack of effects is more more noticeable on the surface than the interior.
Besides that, Cycles automatically creates a transparent shader as the surface shader anyway when the surface output is empty, it’s not literally one or the other as in BI.
Hey Guys need your help for creating a procedural (would be perfect) cycles material for chipboard (particleboard). Look at attached picture. THX for your help
Hi Guys! This is my first post in this Forum! Im really desperate in creating a shader of a black Aluminium Shader with a rough surface like in the picture below. Idealy it should work with no texture. I´ve already watched many tutorials about this, but just couldn`t achieve the rough look with the soft Highlights of the casted metal. It always looks like plastic :). I hope you can help me!!


