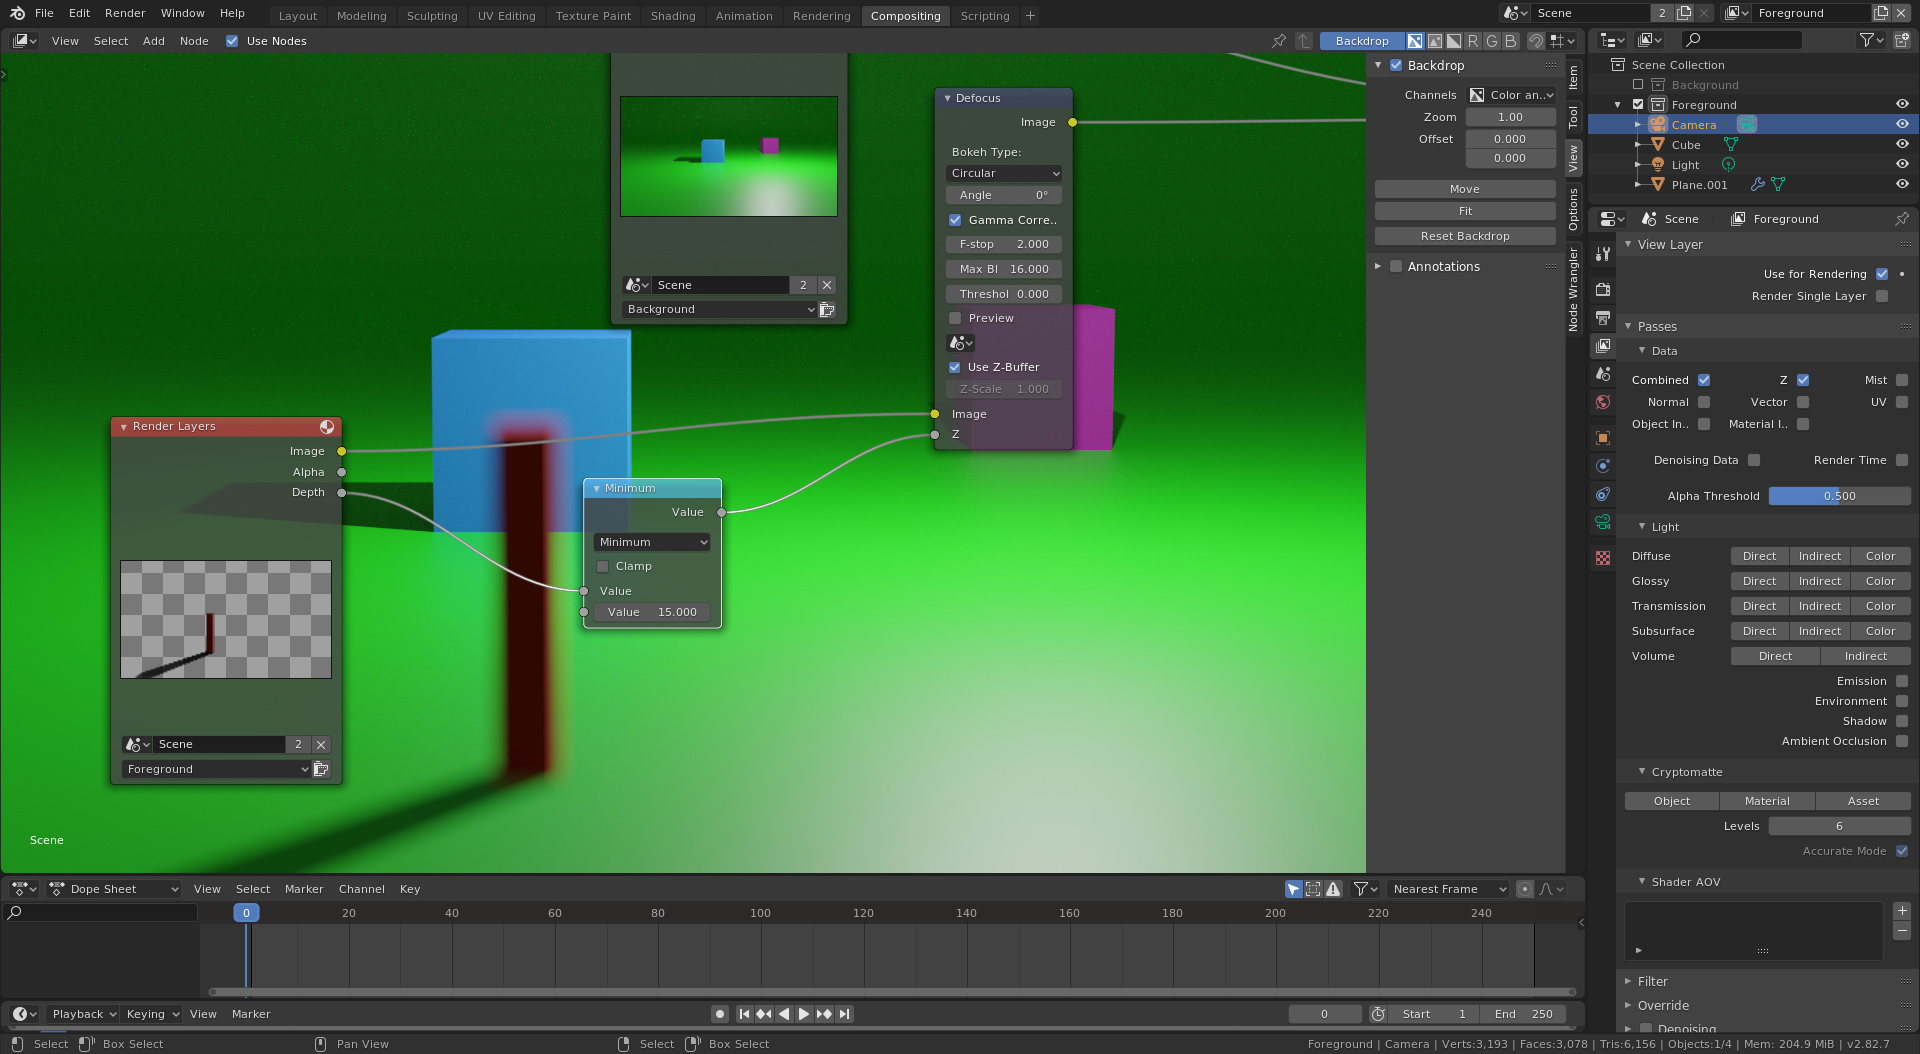
The result looks incorrect because you are altering the Z-depth pass in a way that does not make any sense. Why are you using the Normalize and ColorRamp nodes and what result you are trying to get?
EDIT: to clarify, the Defocus node expects a z-buffer with a nominal range that usually extends far beyond 1.0, with surfaces in the background having larger Z-depth values than in the foreground. You have altered the Z-buffer quite violently and are now asking why the result is “not right”. This is rather like deliberately dialing the wrong number on a phone and asking why you did not reach the person you wanted.
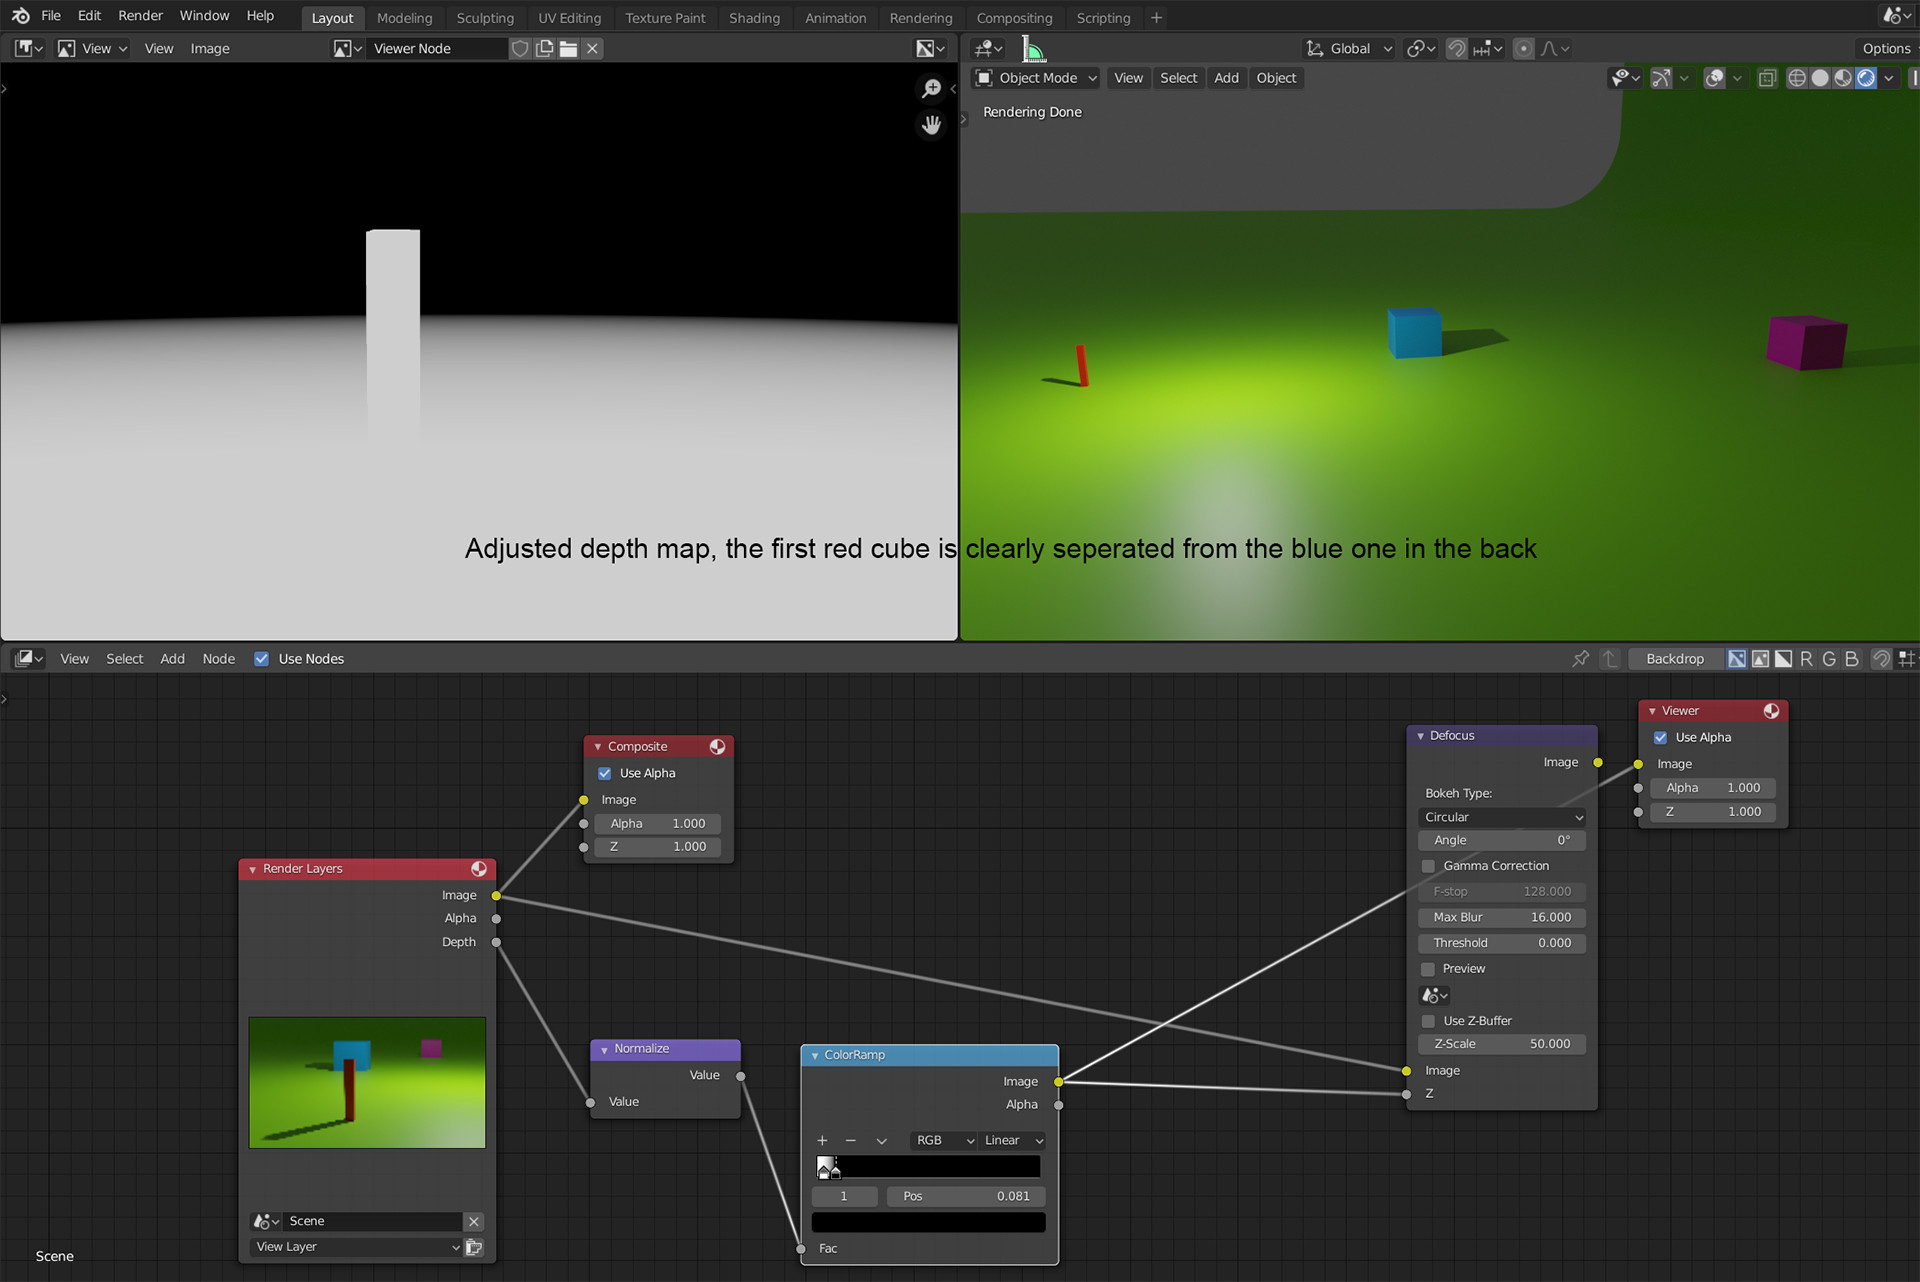
What I meant with “not right” is that based on the distance to the camera, the bottom of the red cube and the top should have roughly the same amount of blur. Because they have almost the same distance, z depth, to the camera.
I tried using the map range node instead of the color ramp, but I get the same issue.
*Edit better images:
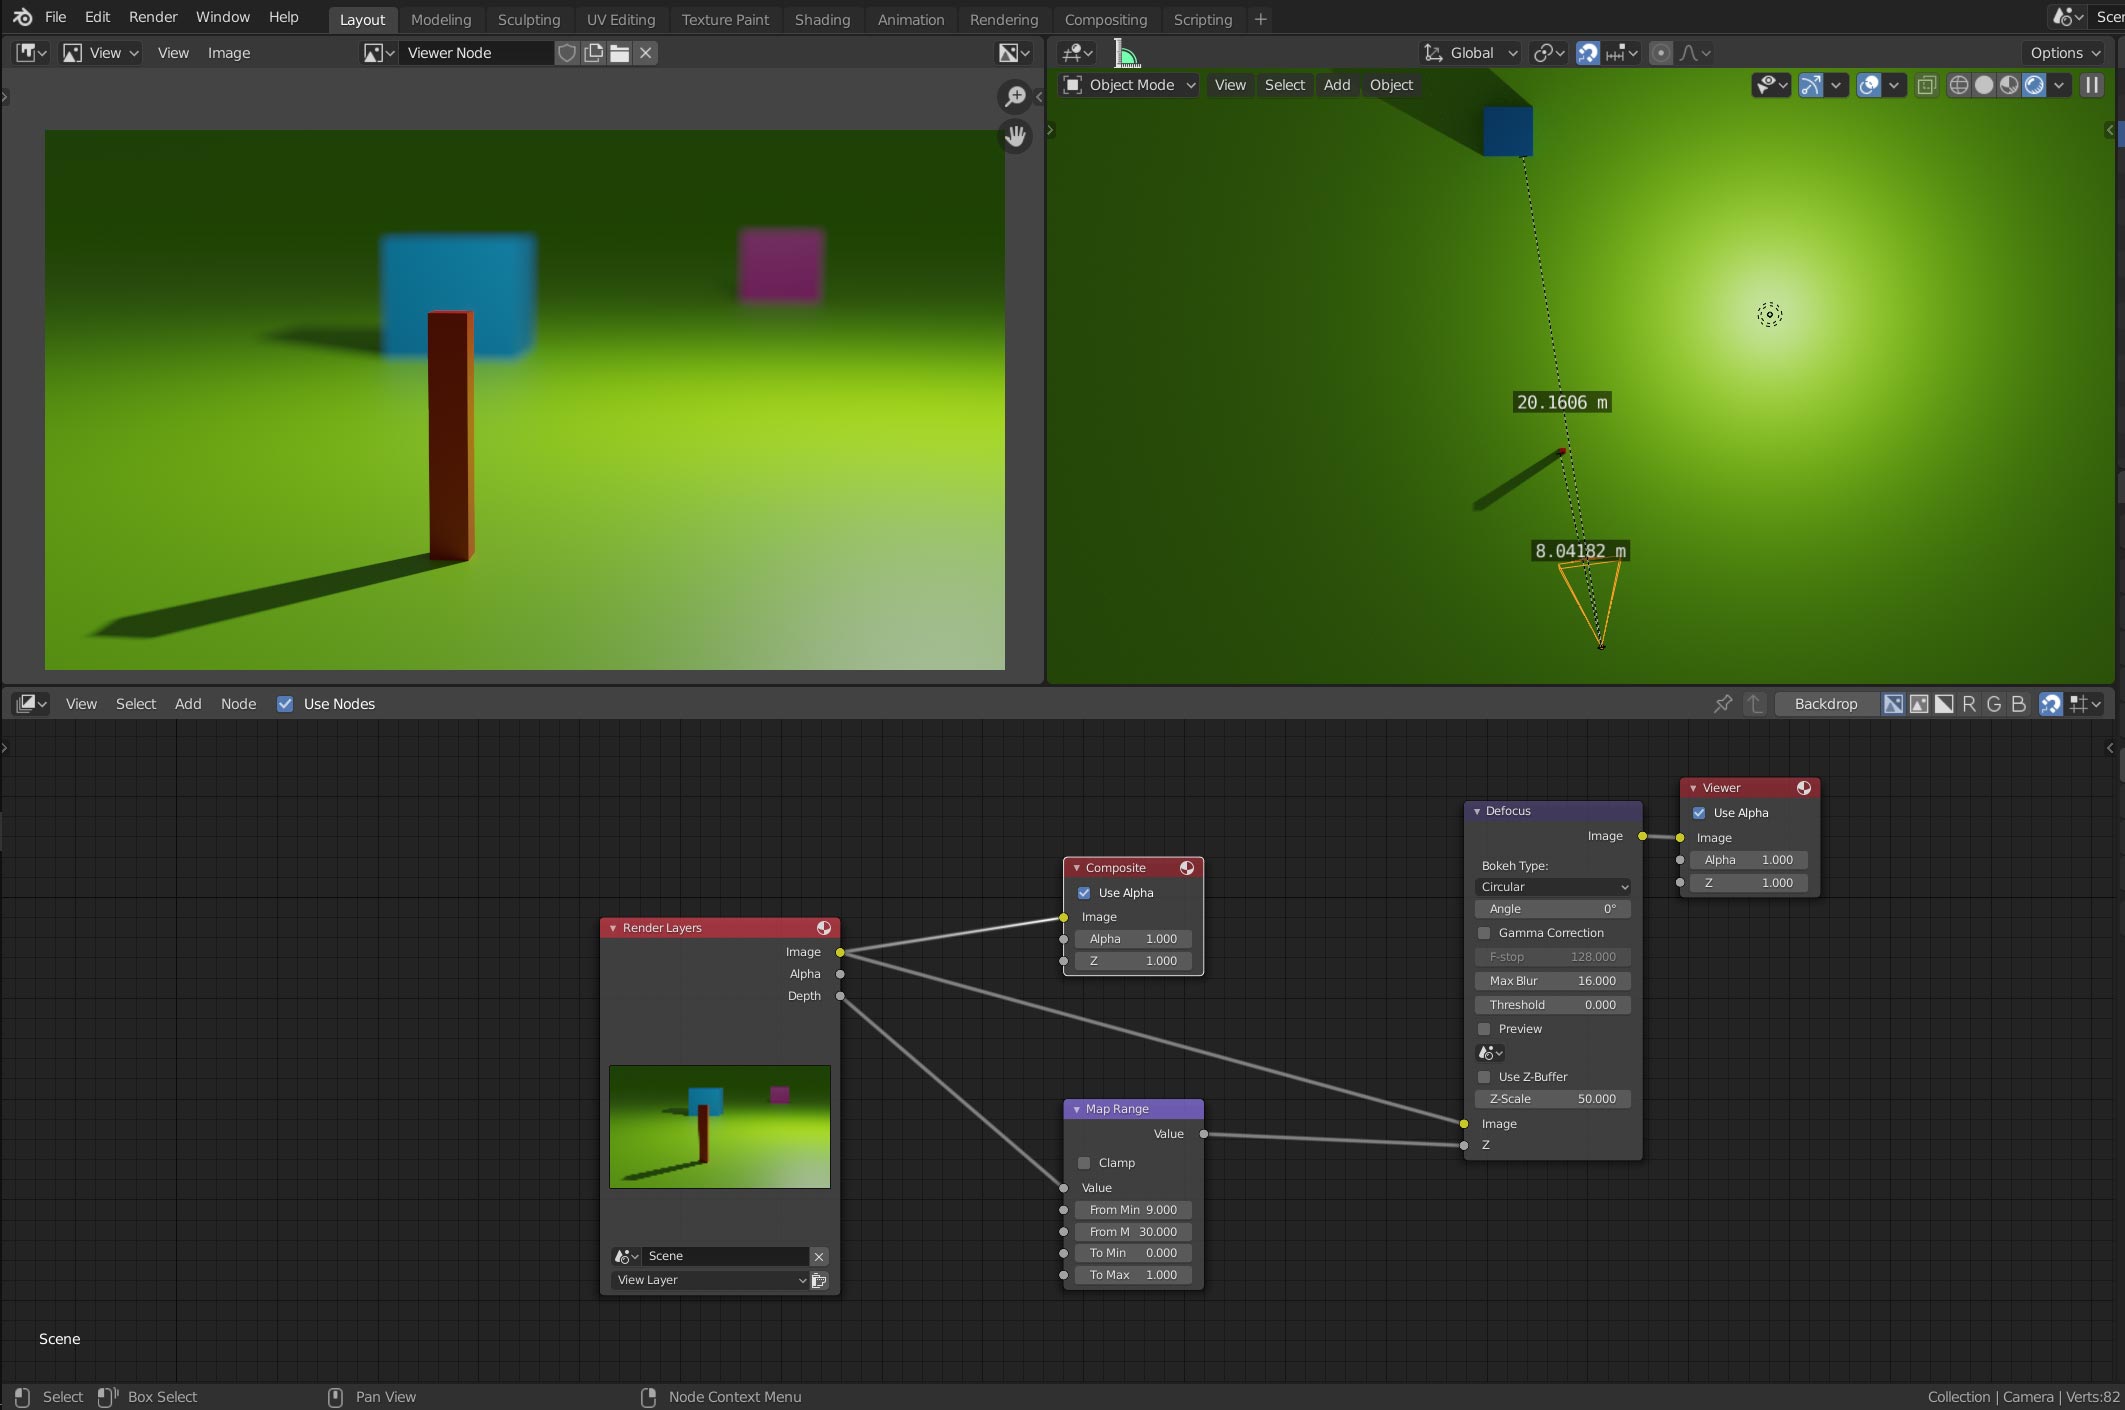
The red cube is at 8 meters from the camera, so I set my depth range from 9m to 30m.
I expect anything closer than 9m to be sharp, and then get progressively more out of focus from 9m to 30m. I get the result I expected. Correct workflow so far?
I run into the same issue as in my first post. I expect the entire blue cube to be sharp. But what I get is that the bottom of the blue cube is actually blurred, when based on the distance to the camera I would expect it to have roughly the same sharpness on the entire object. What am I doing wrong?
To answer your question, what I am trying to achieve:
chose which object is in focus by tweaking the depth pass. Do this in post processing in the compositor using the depth pass, not in camera before rendering.
I think I understand. You shouldn’t invert the depth pass, but that’s not the only problem. The real issue is harder to fix.
What you are seeing is a shortcoming of the Defocus node. It’s good for blurring things in the background as they get farther away, but the results simply don’t look as good the other way around. This is a property of optics; you cannot arbitrarily blur an object in the foreground if you don’t have all the data of what’s behind it.
True DoF must be done with the camera in the rendering stage, not in post (and you must use Cycles, not Eevee). If you want to blur foreground objects in post, you must separate elements into different render layers, blur them separately, THEN composite them together.
So, I second @Rocketman’s suggestion of either using Cycles or separately rendering, defocusing and compositing them back together. Other than running this test with example objects and blocking, could you tell us more about what your end product is going to be? That might help us to tailor the recommendation to what you are trying to accomplish.
I see, I think I understand that thank you. When you blur the cube in the front, the elements behind it should show through the blurred parts. But we did not render the pixels behind the front element in one single combined pass, so we don’t have those pixels.
Which is most of the time not really an option in regular scenes is it? For a simple scene like this with one object it is doable, but most likely way too much work as soon as you have regular scenes with multiple objects, isn’t it?
So I got it working following your instructions, thank you.
However this is not a complete workaround, as the depth pass is not used, everything is blurred uniformly without taking the distance gradation from the camera into account:
When I try to use the depth pass information, in order to have gradation in the blur amount, I run into the same issue as before. Which confuses me, because this time I have the elements on separated layers
I’ve been using cycles since the beginning. I wanted to use this in a project that I already finished, so with this topic I am just trying to learn how to properly add depth of field in post . But I understand now that to efficiently blur objects in the front, you have to do it in camera.
I shouldn’t have implied separating every single object; typically what you would do is separate collections of objects into layers based on distance to the camera. For example you could have render layers for the foreground, mid-ground and background
Yes, you don’t need to make a another render layer for the Z-depth of the whole scene. Use the Depth pass from the render layer which was already separated.
And quit fucking with it! You inverted it again! Don’t normalize it, don’t invert it, and don’t put it through a Color Ramp!
Enable “Use Z-Buffer” in your Defcous node and just subtract the focal point distance from the depth pass using a Math node (The Defocus node does this automatically if you use a focal point in your camera settings).
Truth time. I typed a long response explaining how to do this best, and then I encountered an issue that I’m not sure I can explain using the Defocus node.
You should be able to use the Defocus node, the Z-Buffer, and the Camera’s Focus distance setting to tell Blender what parts of your image should be blurred and what should be in focus. This kinda works, but there looks to be an issue with the Z-Buffer when blurring if your object happens to pass through the part of the scene where the camera’s focus is set. It may simply be a limitation of the Defocus node, and if so, rendering depth of field with Cycles will get you the most realistic result.
Let’s use a recreation of your scene with baked-in, rendered Depth of Field as “ground truth”:
Using the Focus Object picker and picking the blue cube, the red column blurs uniformly along its height. I also achieve smooth blurring of the green plane in the foreground and the background (along with some slight blur on the purple cube).
Now if we use a setup similar to what you’ve done using the Defocus node with the normalized Z-Buffer and ColorRamp output, you can get uniform blur across the entire red column, but you are still losing out on blur on the green plane and the purple cube.
If we switch to a similar setup using foreground and background view layers, using the Focus Object picker to pick the blue cube, and blurring with the Defocus node, there is not uniform blur along the height of the red column. We also lose smooth blur of the green plane in the foreground and background (and the purple cube receives zero blur). I’m mostly concerned with why the red column becomes sharp around where it intersects with the blue cube’s base. I can’t wrap my head around why that might be. See below:
If anyone can explain why the red column becomes sharp while using the Z-Buffer and the Defocus node, I’d love to know. I’ve attached my file in case anyone wants to tweak it and reupload.
I’m mostly concerned with why the red column becomes sharp around where it intersects with the blue cube’s base.
The red column becomes sharp where it intersects with the floor at its focal point, because you’re using a shadow catcher for the floor, which is influencing the Z-Buffer read by the defocus node.
There’s no need to use a shadow catcher when you can simply have the render layers influence each other indirectly. Here’s an improved version: Defocus02.blend (132.0 KB)
I downloaded your scene thank you again for your help
I do think the shadow catcher is necessary, unless there is another method. In your scene you blur the cube over the shadow from the other render layer, because of that the blur spills over the shadow where it should not exist and the cube appears to be floating:
Thank you for taking the time for your complete feedback
The @Rocketman is right, it has to do with the shadow catcher pass which is messing with the result. I got it working by making the shadow catcher smaller, and not intersect with the cube:
I updated the file, one reference scene with the in camera blur, and one scene for the compositing with the smaller shadow catcher: Defocus03.blend (150.5 KB)
@Rocketman To make sure I understand everything; in your setup you choose to use the “Use Z-Buffer check box” in order to use the focus point set in the camera tab, and not have to adjust the depth pass in the compositor with color ramps to set the focus. Is this the “correct” workflow, and adjusting the depth pass with color ramps is not recommended?
And regarding the shadow catcher pass messing with the depth pass, is that “normal” or is there a way to avoid it?
I was hoping no one would notice but yeah, you’re right! I hate using shadow catchers if I don’t have to because it complicates everything, but your improvement looks way better. Another solution in post would be to use a shadow catcher, but clamp the Z-Depth:
To make sure I understand everything; in your setup you choose to use the “Use Z-Buffer check box” in order to use the focus point set in the camera tab, and not have to adjust the depth pass in the compositor with color ramps to set the focus. Is this the “correct” workflow, and adjusting the depth pass with color ramps is not recommended?
The main difference with enabling “Use Z-buffer” is that the node works with the larger range of values that come directly out of the Depth pass. The depth pass is expressed in the raw Blender units of your scene which can go into the hundreds and thousands; this is why the Depth pass just looks like a blank white image if you try to view it directly.
When Use Z-Buffer is disabled, the defocus node is able to work with a Depth buffer in a range of 0.0 to 1.0, like what you see when you normalize the Depth pass and bring it into a visible range with a ColorRamp. This can be more practical in some cases, like if you want to use a regular b/w image to control the defocusing. But you still have to multiply the image with that “Z-Scale” value afterwards to bring the b/w image back into a range that the Defocus node understands. What number should we use for the Z-Scale? Well, we don’t know in your case because that normalize node isn’t telling you exactly what offset and slope it’s automagically using to bring the Z-Depth into the (arbitrary) visible range!
To put it shortly, if you have a Z-buffer to use, you should enable “Use Z-buffer”. This also makes the node implicitly use the focal point distance of the scene’s active camera, but all that does is automatically subtract the focal point distance from the Z-depth. The same thing can be accomplished with a math node if you want. Rarely should you use a Color Ramp for this sort of thing because those only work with an input range of 0.0 to 1.0 and they don’t extrapolate.
It’s normal in the sense that’s it’s doing the same thing a regular floor would do. We’ve explored some ways to avoid it but none of them are perfect; it will probably have to depend on what works for each shot




 . But I understand now that to efficiently blur objects in the front, you have to do it in camera.